
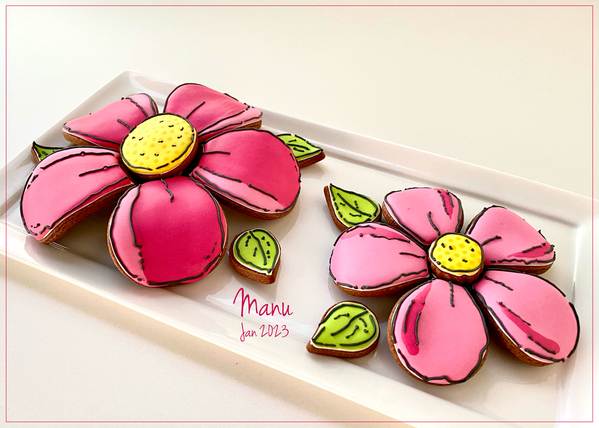
This month I have a tutorial for a dimensional cookie platter comprised of two flowers whose petals, centers, and leaves are contoured. When I was thinking about how to decorate the cookies, I decided to jump on the comic-style trend that has so captivated the cake and cookie community over the past few months. I rated this tutorial "intermediate" because icing the contoured cookies can be tricky. But, with the right royal icing consistency, anyone of any skill level can have success with this tutorial. If you are reading this tutorial solely for the comic-style technique, then, by all means, bake the cookies flat and then pick up my instructions at Step 2a. But, you will miss out on valuable practice with contouring cookies! [EDITOR'S NOTE: Please see Manu's extensive notes at the end of this post about the origins and evolution of the comic-style trend. Crediting originators is very important to us here on Cookie Connection, so we have made every attempt to do so. But when an idea rapidly goes mainstream as this one has, and evolves in various ways whilst proliferating, it is sometimes impossible to point to a single originator. Nevertheless, we have made every attempt to credit those who have contributed to this trend to the extent that we can. At the very least, Manu weaves an incredibly interesting story about how inspiration spreads. ~JMU]
This tutorial is my third one in a row that includes contoured cookies. I learned this technique a few years back by following @Julia M. Usher’s YouTube videos. But our recent Watch-Learn-Create Challenge #51, where Julia was the featured guest, planted a few more seeds of creativity in me that kept “blooming”! In Julia's two videos (Part 1 and Part 2) that launched this challenge, Julia shared her extensive expertise on contouring cookies and showed step-by-step methods for creating a few different shapes. If you missed these videos, I recommend that you check them out to learn all you can about this amazing technique.
- Cookie dough of your choice (rolled 1/8 in/0.3 cm thick)
- 3 nested teardrop cookie cutters (See dimensions in Step 1, below.)
- 2 round cookie cutters (See dimensions in Step 1, below.)
- 1 (2 3/4-in/7.0-cm-diameter) silicone hemisphere mold, for contouring flower centers
- 1 to 3 perforated baking mat(s)
- 1 to 3 (2 1/2-in/6.4-cm) stainless steel cake ring(s) or round cookie cutter(s)
- Perforated baguette pan (optional; for propping in Step 1)
- Aluminum foil or other ovenproof props (in lieu of baguette pan)
- Royal icing:
- White and dark grey piping-consistency, in pastry bags with PME #0 or #1 tips (or equivalent)
- Hot pink, pink, medium yellow, dark egg yellow, and green medium thick-consistency, in tipless pastry bags with openings equivalent to PME #2 tip
- Scribe tool
- Long plate/tray, for arranging cookies
Step 1: The cookies
- 15 teardrop-shaped cookies in three different sizes (I used all of the cutters from this four-piece set except the small one.)
- 5 extra large (3 x 2 1/4-in/7.6 x 5.7-cm) teardrops, for petals of big flower
- 5 large (2 1/4 x 1 5/8-in/5.7 x 4.1-cm) teardrops, for petals of small flower
- 5 medium (1 3/8 x 1-in/3.5 x 2.5-cm) teardrops, for leaves
- 2 round cookies
- 1 (1 9/16-in/4.0-cm) round, for center of big flower
- 1 (1-in/2.5-cm) round, for center of small flower
Here’s a visual summary of the baked cookies. Please note that I baked one extra petal for both flower sizes to test my flooding technique. However, I used only five of them for each flower in the final project.
I contoured the 17 cookies using two different methods/tools. For the round cookies, place each dough round on top of a 2 3/4-in/7.0-cm-diameter silicone hemisphere mold, as shown in the photo above; then bake as directed in your recipe.
For the teardrop cookies, I used the same method/tools that I used in my previous two tutorials. That is, roll up a perforated baking mat, secure it with a 2 1/2-in/6.4-cm stainless steel ring (a cookie cutter of the same size will work too), and place the mat inside a baguette pan to keep it from rolling in the oven. If you don't have a baguette pan, simply prop the rolled mat with aluminum foil or other ovenproof objects. And, if you own three mats and three rings, then - great - bake all 15 teardrop cookies at once!
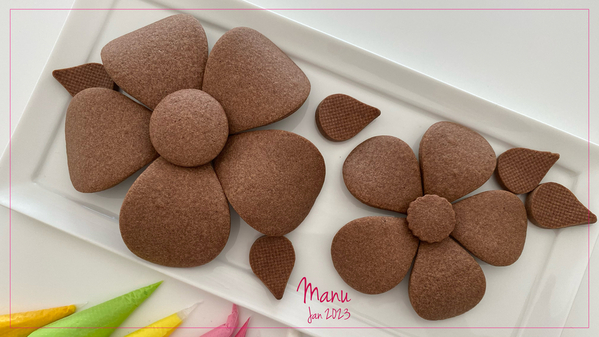
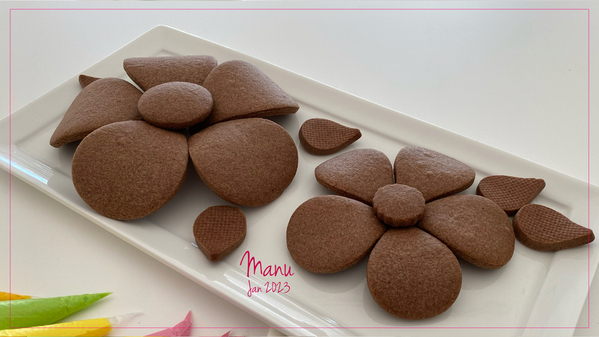
In the pictures below, you'll see how I assembled the cookies prior to decorating, to test the final display on the plate. They look good just bare like this, don’t they? This composition is terrific for a small tabletop arrangement to be enjoyed with tea or coffee.
Here’s a view from the top:
Here’s another view that best highlights the dimensional look of the petals and leaves:
Step 2: Outline cookies
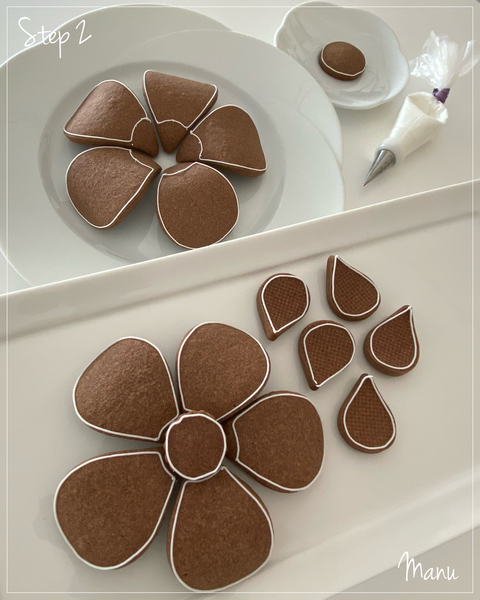
After arranging the naked cookies on the plate, I noticed that the pointed end of each petal was covered by the central round. Not only would it not be necessary to flood the petals in that zone, but the smaller contoured areas needing icing would be a lot easier to flood!
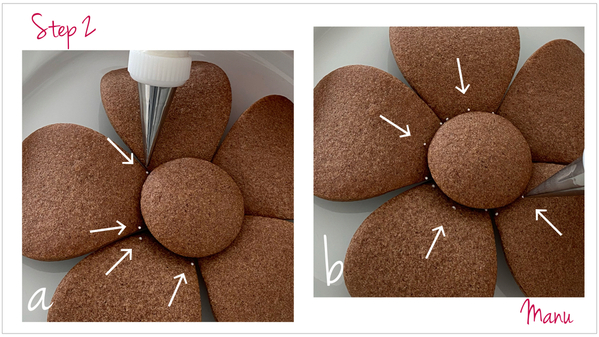
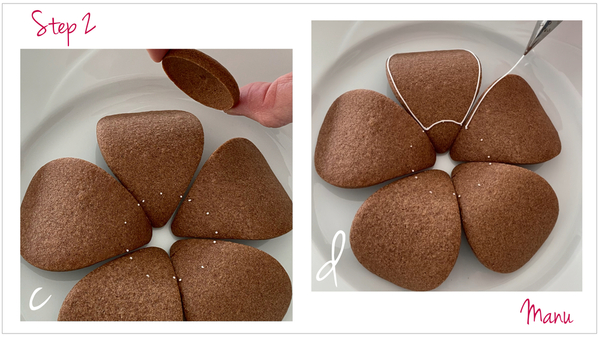
Before starting to outline with icing, it helps to create a piping guide (Steps 2a to 2c, below) to make sure you pipe up to the central round but no further.
a. With the bare flower cookie still assembled, pipe two dots on both sides of each petal at the points where the center covers the petal. Use white piping-consistency royal icing in a pastry bag with a PME #0 or #1 tip (or equivalent).
b. Now pipe one more dot centered between the pairs of dots you just piped on each petal.
c. Pictured here is a top-down view of the piped dots with the center cookie removed. Again, these piped dots will serve as an outlining guide in the next step.
d. Using the same white icing and tip, touch the outermost dot on one side of the petal with the tip of your piping bag to anchor the icing; then proceed to outline the petal. Let the line of icing drop from the tip, guiding it from overhead around the outer edge of the petal until you reach the outermost dot on the other side. Redirect the icing flow at that dot/corner without breaking the icing (if you can); then pipe an arch that connects the two outermost dots and runs through the middle dot. Repeat this process on all remaining petals on both flowers.
Proceed to outline the flower centers and leaves as well.
Below is a video I shot while outlining. In retrospect, placing the cookies on the rolled mat (like I do in Step 3) and then outlining would have been far easier!
Here’s a photo recap of all of the outlined cookies. Please note that, for the leaves, I turned the cookies upside down before outlining them so they curve upward in the final composition.
Step 3: Flood petal cookies
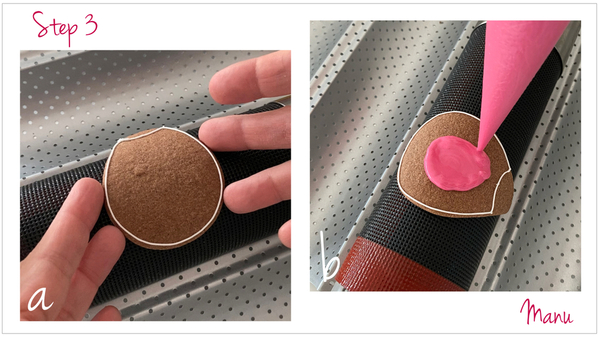
a. Place one of the big petal cookies on the rolled perforated mat, and orient it such that the area to be flooded is in the uppermost position possible (with the area that won't be iced hanging most over the edge). This way, the area to be flooded will be most level, and the icing will be less likely to drain off the contoured surface.
b. Using hot pink medium thick-consistency royal icing and a PME #2 tip (or equivalent), flood the cookie starting from the center and moving toward the outline. Starting from the center will reduce the risk of the icing overflowing the outline. The icing is also quite thick for flooding (again, to keep it from draining off the contoured cookie) and therefore needs a little extra work to level it as described in the next step.
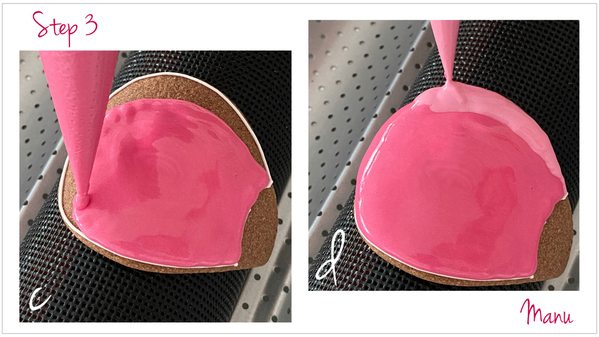
c. Use the tip of your bag as a scribe tool to smooth/level the icing as you go. Gradually push the icing toward the outline with the tip of your bag, taking care not to add too much "new" icing near the edge of the cookie, again to avoid overflow. Also use a real scribe tool, if needed, to ease the icing up against the outline as you get closer to it. Leave an area to the right side of the petal for flooding with a lighter shade of pink in the next step.
d. Now, flood the remaining un-iced area with pink medium thick-consistency royal icing using a PME #2 tip (or equivalent).
Here’s a quick video where I show the flooding process. As you can see, the icing is quite thick and stays in place without draining.
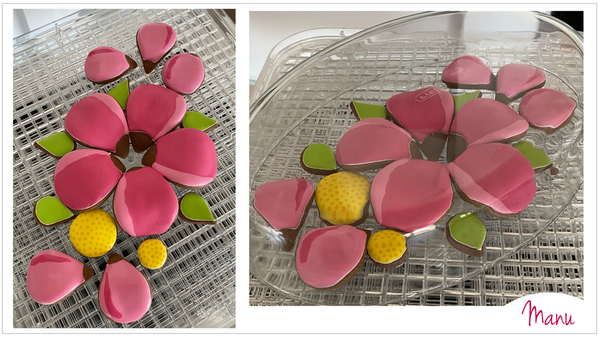
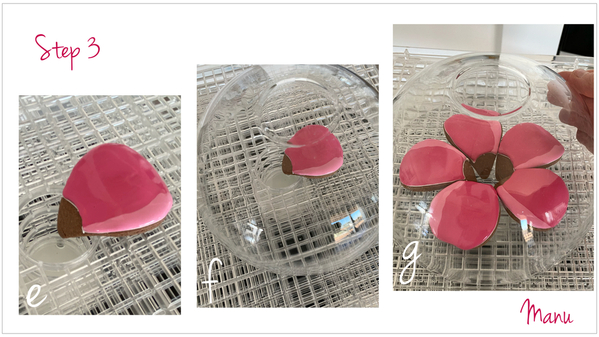
e. f. g. Immediately place the cookie (still on the rolled mat, if needed for stability) in front of a heat fan or in a dehydrator. It's important to dry the icing immediately to further reduce the risk of it draining off the cookie. Note: I actually have a dehydrator with stacked trays and the heat source at the bottom, as shown below. Each tray has a hole in the center where I put my petals to stabilize them while drying (thus, I didn't keep them on the rolled mat). And since the lid of my dehydrator wasn’t tall enough to clear the cookies, I covered the cookies on the top tray with a bowl. As a I finished each cookie, I simply lifted the bowl and added the freshly iced cookie to the tray. This process worked like a charm!
Repeat the entirety of Step 3 to complete all of the large petals, and then repeat again for the smaller petals, but invert the color scheme.
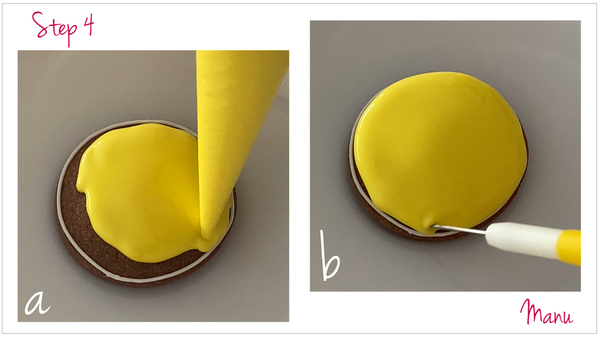
Step 4: Flood flower center and leaf cookies
a. Flood the center of the bigger flower using yellow medium thick-consistency royal icing and a PME #2 tip (or equivalent). This cookie is small and not so contoured, so there’s less risk of the icing overflowing the outline, but, regardless, it's best to start flooding from the center. Once again, use the piping tip as a tool to level the icing and drag it toward the outline.
b. And, again, use your scribe tool to ease the icing up against the outline.
c. Once the cookie is flooded and the icing is level, immediately pipe dots on top using a darker shade of egg yellow royal icing (of the same consistency) and a PME #2 tip (or equivalent). This process of piping wet icing on wet icing is called the wet-on-wet technique. Cover the top completely with dots, spacing them relatively uniformly.
d. Now flood a leaf cookie using green medium-thick consistency royal icing and a PME #2 tip (or equivalent). This cookie is so small that its surface is nearly flat. Plus, the concave side is facing upward, so it's highly unlikely that any icing will flow off.

And here’s a video of the flooding of these two pieces:
Proceed to flood the rest of the leaves and the small flower center in the manners just described, placing each immediately in front of a fan or in a dehydrator as it is finished. Pictured below are all of my flooded cookies on the top tray of my dehydrator. I eventually replaced the bowl with a bigger serving dish to keep them all covered while drying.
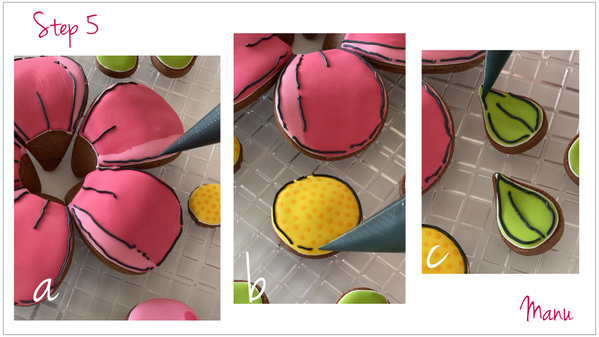
Step 5: Detail cookies for comic-style look
a.b.c. Once the cookies are dry, it's time to give them that characteristic comic-style look by detailing them with dark grey piping-consistency royal icing and a PME #0 or #1 tip (or equivalent). If you are good at outlining cookies, you have surely spent hours practicing the technique of touching the pastry bag tip to the cookie to anchor the icing, and then letting the icing fall to get a perfectly rounded line. Well, now you need to forget everything you know and start to outline like you did your very first time, because the more shaky and rough your outline, the better the comic style will look! So please drag the tip of your pastry bag on the icing without elevating the tip, just as if you were writing on the icing using a pen. Also, your lines shouldn’t be continuous; instead, stop here and there, leave some space, and then continue to pipe. That’s really all there is to it. I also half-outlined some of the wet-on-wet dots on the center cookies.
And here’s a final video showing this detailing step:
Step 6: Assemble cookies on plate
a. On a long plate, arrange each set of petals in a circle so that their un-iced ends point toward the center. Scatter the leaves around the flowers to create a balanced distribution of color across the plate.
b. Last, add the center cookie to each flower . . .
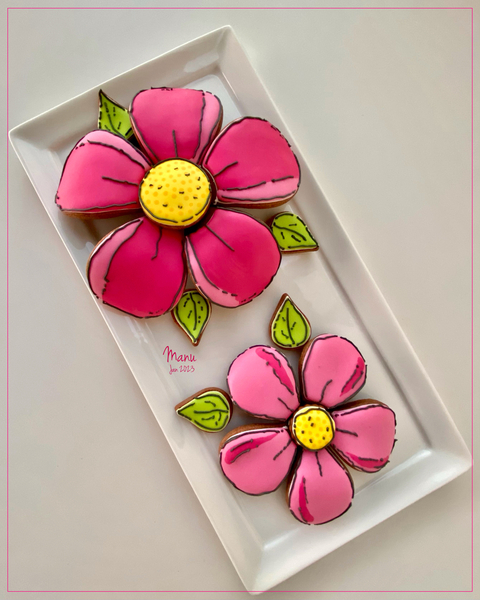
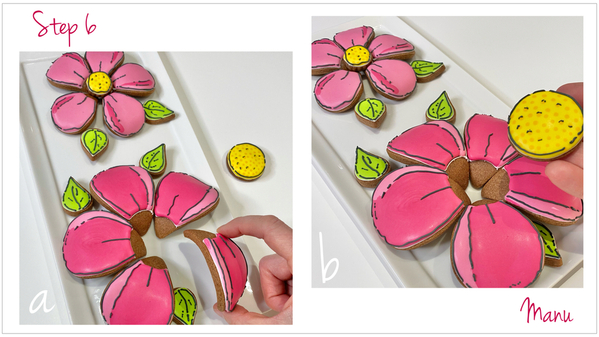 . . . and your dimensional comic-style flower cookie platter is ready! This cookie platter makes a fun presentation for Mother's Day and other springtime occasions. Just swap out colors to fit your theme!
P.S. My notes on the origin and evolution of the comic-style trend
According to my research, the earliest comic-style cakes started appearing at least as early as the beginning of 2022. They were typically iced with white frosting and then outlined in black fondant or black icing like this one by mopmuku (February 16, 2022). They were called "2-D cakes" or "cartoon cakes" because this way of decorating made them look flat like a 2-D comic strip. I assume these cake artists were inspired by the black and white "2-D cafes" that first opened in Korea in 2017 and later gained more worldwide popularity. When you walk in a 2-D cafe, it's as if you are entering a cartoon world. Everything, from the walls to the furniture, is white and then outlined in black, which at first-glance makes the space look quite flat. Here's another article with photos of these trend-setting cafes.
While scrolling through Instagram posts of 2-D cakes, in chronological order under the #2dcake hashtag, I noticed how 2-D cakes started incorporating more color over time. The color accents were dainty at first, but, by the end of 2022 and as of February 2023, the norm was/is more vibrant versions, often described as "comic cakes", "comic-style cakes", or "cartoon cakes" in the hashtags.
Tigga MacCormack (aka @tigga_mac on Instagram) catapulted the colorful comic cake slice into popularity last November when both her TikTok and Instagram videos featuring her version took off. (The latter now has 119M views!) Tigga says she wishes she came up with this comic trend herself, but gives credit for the cake slice design to @amys.littlecakery who posted a colorful cake slice a month earlier on October 31, 2022. But . . . in her post, Amy tagged @cherrycakeco for inspiration for the cake slice. Back in March 2022, @cherrycakeco posted her colorful cake slice when these kind of cakes were already online, though again mainly in black and white like the one by @mopmuku.
Of course, we've now all seen this trend move to cookies. I've also seen it on waffles, mason jars filled with cakes, macarons, cupcakes, donuts and . . . well, almost any treat. Speaking of cookies and the cookie world, I would like to cite @_emmas_sweets (aka @Emma's Sweets) who, inspired by Tigga’s post, applied this decoration to some donut cookies on December 9, 2022. I'd also like to mention @sweetsbymariela who, also in early December 2022, made one of the first 3-D gingerbread houses in this style. Since then, other cookie notables, such as @SweetAmbs and The Flour Box (aka @Anne Yorks), have also jumped on the comic-style bandwagon with heart cookies and comic cookie kits, respectively.
Any guesses as to where this trend will go next? ![]() [EDITOR'S GUESSES: runway fashion, jewelry, cars, exterior house painting . . .
[EDITOR'S GUESSES: runway fashion, jewelry, cars, exterior house painting . . . ![]() One additional observation: This history truly speaks to the power of crediting. Imagine how much more difficult it would have been to understand the sources of this trend had people not credited? Manu, thanks again for the excellent research and the lesson on proper and diligent crediting! ~JMU]
One additional observation: This history truly speaks to the power of crediting. Imagine how much more difficult it would have been to understand the sources of this trend had people not credited? Manu, thanks again for the excellent research and the lesson on proper and diligent crediting! ~JMU]

Manuela Pezzopane, affectionately called Manu by her friends and family, is the author of the blog feature Made by Manu, where each month she shares the method behind a magical cookie of her own making. In March 2022, Manu also assumed the role of host of our rebranded and reformatted Cookie Connection Challenges: Watch-Learn-Create Series, which debuted in a virtual video format in July 2022. A fan of everything handmade, Manu professes to have tried every possible hobby. However, it wasn’t until the end of 2014, when an American friend invited her to a Christmas cookie exchange, that she first discovered decorated cookies. In 2015, after watching Julia M. Usher's videos and signing up on Cookie Connection, Manu finally attempted her own designs. Since then, cookie decorating has become Manu’s passion, and her mesmerizing video shorts have earned her a large and loyal following throughout the global cookie community. Manu harks from Rome, Italy, where she currently resides. You can email Manu at manubiscottidecorati@gmail.com, follow her on Facebook and Instagram, or explore her past challenges and large library of Made by Manu tutorials here on Cookie Connection.
Photo credit: Manuela Pezzopane
Note: Made by Manu is a Cookie Connection blog feature written by Manuela Pezzopane, where each month she shares the method behind a magical cookie of her own making. This article expresses the views of the author, and not necessarily those of this site, its owners, its administrators, or its employees. To read all of Manuela's past Made by Manu tutorials, click here. And to see all of Cookie Connection's tutorials, click here.







Comments (15)