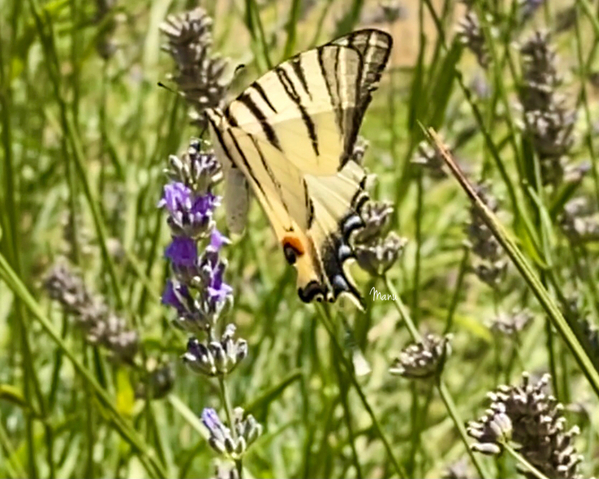
 These lavender cookies were inspired, in their entirety, by a video I shot last year while mesmerized by a butterfly moving from sprig to sprig on a lavender bush.
When I replayed the video, the lavender sprig caught my attention instead. Such a simple yet elegant form, and clearly something I could translate into royal icing without too much difficulty. So, here I am with a quick-and-easy project tutorial featuring the lavender sprig - plus my signature continuously piped lace border! This tutorial is primarily focused on enhancing piping skills. You won't even need cookie cutters, as I just used a paring knife to cut cookie sticks of different lengths. So grab your leftover cookie dough and royal icing, and let's get started!
- Baked hand-cut cookie sticks, lengths of your choice*
- Royal icing:
- White piping-consistency, in tipless pastry bag with opening equivalent to PME #1 tip
- White flood-consistency, in tipless pastry bag with opening equivalent to Wilton #2 tip
- Green piping-consistency, in tipless pastry bag with opening equivalent to PME #1 tip
- Lavender (navy blue plus pink) piping-consistency, in tipless pastry bag with opening equivalent to PME #1 tip
* Note: My sticks shown here are 7.0 to 12.0 centimeters (2 3/4 to 4 3/4 inches) long and 3.3 centimeters (1 1/4 inches wide).
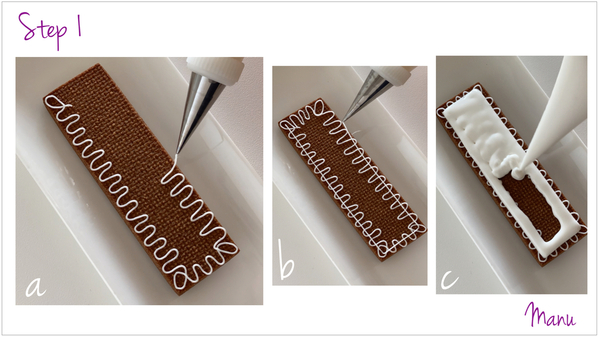
Step 1: Pipe continuous squiggly border, and flood cookie
a. Using white piping-consistency royal icing and a PME #1 tip (or equivalent), pipe a long squiggly line all around the cookie stick. BTW, the stick shown below measures 11.0 x 3.3 centimeters (4 1/4 x 1 1/4 inches). The icing should be of a consistency that flows smoothly from the pastry bag. It should bend easily, yet hold a tight line at the same time. It is not at all necessary to pipe a continuous outline, and you can stop at any time, as part of the squiggle will be covered anyway. You can even pipe a sequence of small “U”s to make tiny arches along the border. (For that approach, see Steps 2a to 2b of my past tutorial.) I tell you, after piping enough “U"s, you’ll find yourself naturally piping a continuous squiggly line, and, with enough practice, you'll even be able to pipe a tiny squiggly border like the one in this tutorial.)
b. Now, pipe a line all around the cookie about 0.2 centimeter (1/16 inch) from the cookie edge so that only tiny arches will be seen once the space inside the outline is flooded in the next step.
c. Flood the cookie using white flood-consistency royal icing and a Wilton #2 tip (or equivalent). You’ll end up with an iced cookie stick with a delicate lacy border. Let the icing dry completely before proceeding to the next step.
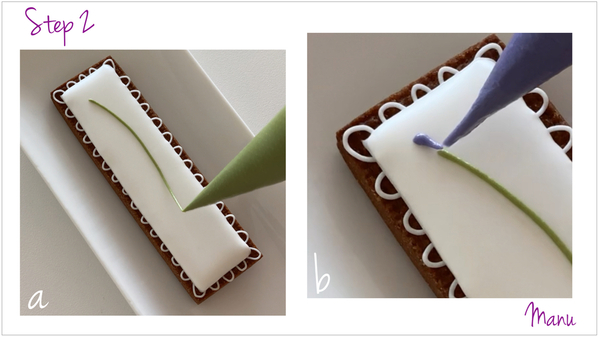
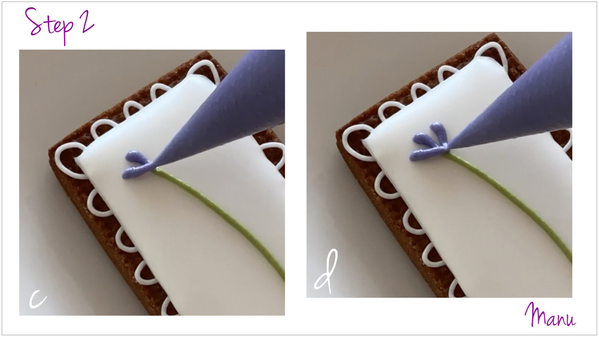
Step 2: Decorate cookie with lavender sprig
a. Use green piping-consistency royal icing and a PME #1 tip (or equivalent) to pipe a stem along the cookie. I piped a curved stem here, but it could also be straight.
b. Now, using lavender piping-consistency royal icing and a PME #1 tip (or equivalent), pipe a bead and release pressure to create a tail on the bead that ends just where the stem starts at the top of the cookie.
c. Pipe another bead with a tail to the left side of the bead you just piped.
d. Now, pipe another bead with a tail to the right side.
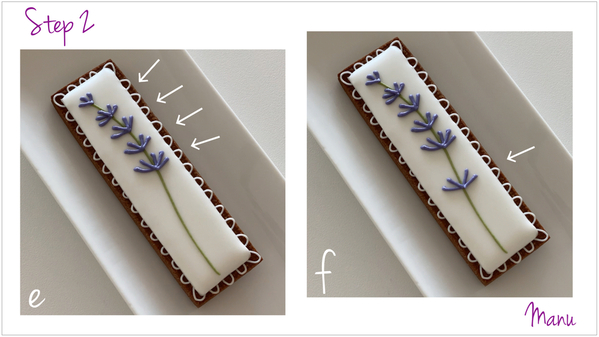
e. Pipe four groups of beads-with-tails beneath the top cluster, at a distance of about 0.6 centimeter (1/4 inch) from each other. For each group, pipe two or three beads-with-tails on each side of the stem.
f. Pipe one more group of beads-with-tails at a distance of 1 centimeter (3/8 inch) from the last group you piped. (The weather was quite hot when I made this tutorial, so the icing didn't hold the shape of a bead-with-tail, and ended up looking more like a little line . . . but it conveys the idea of a lavender sprig anyway.)
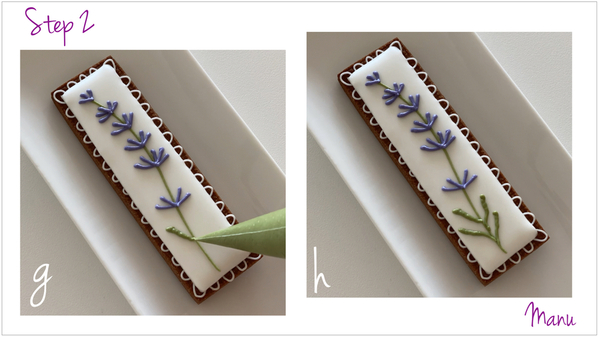
g. Using green piping-consistency royal icing and and a PME #1 tip (or equivalent), pipe a long leaf to the left side of the stem, about 1.5 centimeters (5/8 inch) from the last group of beads-with-tails that you just piped. Start by piping a large bead; then keep piping while gradually releasing pressure until you reach the stem.
h. Pipe one more leaf to the left of the stem, just under the one piped in Step 2g, and two more to the right, either meeting the others on the opposing side, or slightly staggered relative to them.
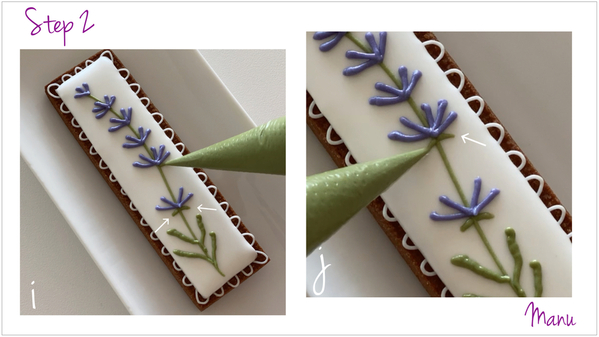
i. Using the same green royal icing, pipe two little leaves at the base of the bottom group of flowers. This time, pipe a bead-with-tail starting with the bead at the stem.
Repeat this step for the next two groups of flowers. First to the right of the stem . . .
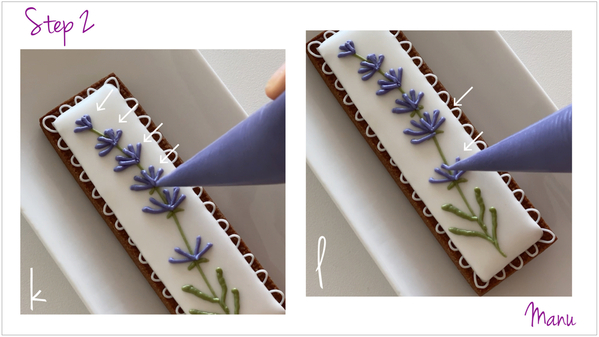
j. . . . and then to the left (or vice versa)! Be sure the lavender icing is fairly well set before proceeding to Steps 2k and 2l.
k. and l. Using the lavender royal icing again and a PME #1 tip (or equivalent), carefully pipe more beads-with-tails on top of each flower grouping. I added one or two more beads-with-tails to each cluster.
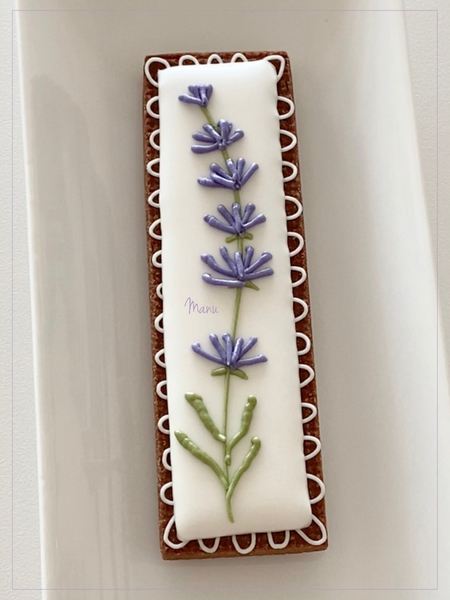
The piping is done, and here’s the cookie!
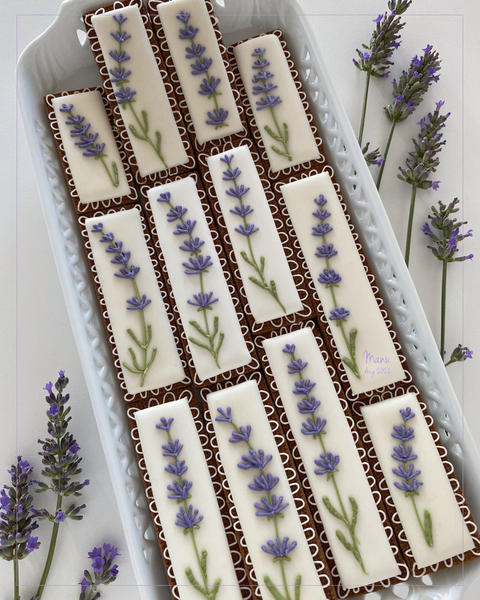
I decorated more cookies of different lengths to fill a tray. Each sprig decoration is a bit different, which lends interest to the side-by-side display shown here:
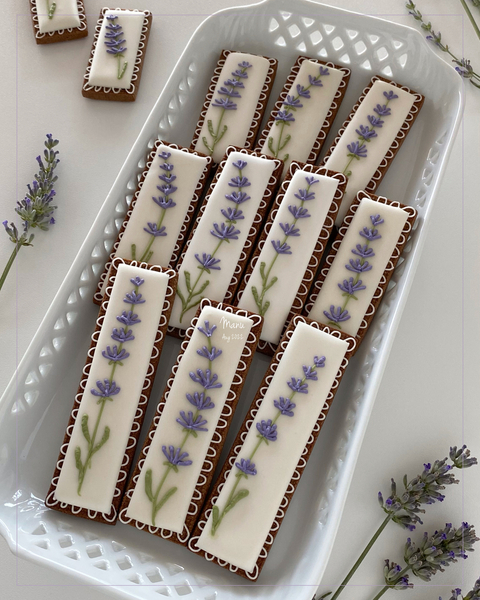
As always, I love project variations, so I couldn't leave well enough alone! ![]() In the next display, I stacked the cookies in small groups. I can't decide which composition is my favorite, but I think that the one below better conveys a lavender bush vibe.
In the next display, I stacked the cookies in small groups. I can't decide which composition is my favorite, but I think that the one below better conveys a lavender bush vibe.
With the cookies now artfully arranged, it's time to enjoy them over tea or coffee with friends . . . Please also enjoy this short video of the decorating process that includes my original butterfly-and-lavender inspiration video!
And last, let me remind you that there are still almost four weeks left to participate in the new Watch-Learn-Create Cookie Connection Challenge that will end on September 20! The featured guest of this first challenge is @Julia M. Usher who presented a wonderful demo of 3-D contoured cookies. Watch Julia’s demo here, learn everything about contoured cookies, and be inspired to create an entry of your own design for the challenge. Moreover, if you have any doubt or further questions about contoured cookies, post them in the comments to the challenge blog post while the challenge is open, and Julia will be available to reply. What a great and unique learning experience! It is a chance to challenge yourself, to connect with Julia M. Usher and fellow cookier participants, and to win randomly drawn prizes. So, don’t miss out!
Ciao! Manu 💜

Manuela Pezzopane, affectionately called Manu by her friends and family, is the author of the blog feature Made by Manu, where each month she shares the method behind a magical cookie of her own making. In March 2022, Manu also assumed the role of host of our rebranded and reformatted Cookie Connection Challenges: Watch-Learn-Create Series, which debuted in a virtual video format in July 2022. A fan of everything handmade, Manu professes to have tried every possible hobby. However, it wasn’t until the end of 2014, when an American friend invited her to a Christmas cookie exchange, that she first discovered decorated cookies. In 2015, after watching Julia M. Usher's videos and signing up on Cookie Connection, Manu finally attempted her own designs. Since then, cookie decorating has become Manu’s passion, and her mesmerizing video shorts have earned her a large and loyal following throughout the global cookie community. Manu harks from Rome, Italy, where she currently resides. You can email Manu at manubiscottidecorati@gmail.com, follow her on Facebook and Instagram, or explore her past challenges and large library of Made by Manu tutorials here on Cookie Connection.
Photo credit: Manuela Pezzopane
Note: Made by Manu is a Cookie Connection blog feature written by Manuela Pezzopane, where each month she shares the method behind a magical cookie of her own making. This article expresses the views of the author, and not necessarily those of this site, its owners, its administrators, or its employees. To read all of Manuela's past Made by Manu tutorials, click here. And to see all of Cookie Connection's tutorials, click here.



Comments (12)