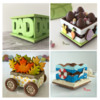
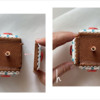
 I've always worked hard to hide the seams on my past 3-D cookie constructions by mitering the edges, or by mitering and then covering the edges with royal icing. My goal was to minimize the gap between any two adjacent cookie sides, as you can see in the photos below.
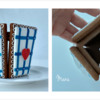
In this 3-D cookie vase tutorial, I took a decidedly different approach and instead highlighted the seams, making them a featured part of the overall design. They are obvious, but attractive wide open “V" shapes that require no time-consuming mitering whatsoever!

I also used a paper straw as a crucial element to help the construction, as I've been doing in many of my recent projects. However, I decided to use the straw in a slightly different way this time - mostly because I couldn’t find any prop of the proper height to stabilize the vase as it dried. But enough talking! Let me show you what I mean!
- Cookie dough of your choice, rolled to different thicknesses (See Step 1.)
- Rolling pin with guides
- 1 (5.1-cm/2-in) round cookie cutter
- 1 small (4.5-cm/1 3/4-in) square cookie cutter (See note below.*)
- 1 medium (6.4-cm/2 1/2-in) square cookie cutter (*I used the two smallest square cutters from this PME set.)
- 1 trapezoidal cookie template (You’ll find photos and measurements in Step 1, and the template in "Attachments" under "Files" at the end of this post.)
- 1 paper straw
- Sugarcraft knife
- Royal icing:
- White piping-consistency, in pastry bag with PME #1 tip (or equivalent)
- White flood-consistency, in tip-less pastry bag with opening equivalent to PME #3 tip
- Brown very thick-consistency (@Julia M Usher calls it “glue”; see her video for reference), in parchment cone or tip-less bag
- Navy blue gel coloring diluted with vodka
- Small (0.3-cm/1/8-inch-wide) flat paint brush (I used the flat one in this set from Wilton.)
- 4 (2-cm/3/4-in) red heart royal icing transfers (For royal icing transfer techniques, see Steps 4a to 4c of my previous tutorial; the template can be found in "Attachments" under "Files" at the end of this post.)
- Round paint brush, from the same Wilton set, above
Step 1: Cut and bake cookies
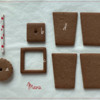
Six (6) cookies are needed for this project, plus one (1) paper straw and one (1) round cookie for construction purposes only. These cookies and their measurements are listed below, in order of decreasing thickness of the cookie dough. They are also coded with the letters (a) through (d) to correspond to their images in the photo directly below.
- Cookie rolled to thickness of 1 centimeter (3/8 inch):
- 1 (5.1-cm/2-in) round cookie (a) with a hole cut in the center with a paper straw. I used a scalloped cookie cutter for no particular reason; any round cutter of this size will do. Roll the dough to the indicated thickness, and cut and bake as you normally would.
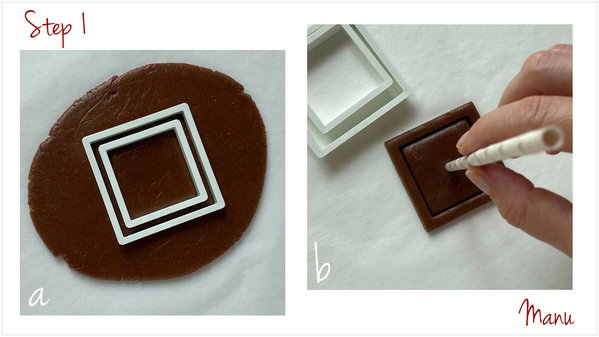
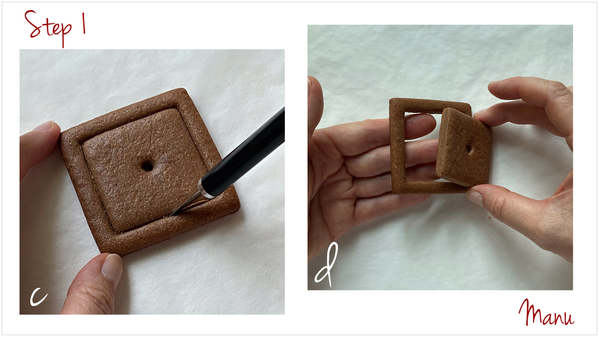
- Cookies rolled to thickness of 0.6-centimeter (1/4 inch): See Steps 1a to 1d for more information about how to cut and bake these cookies.
- 1 (4.5-cm/1 3/4-in) square cookie (b) with a hole cut in the center with a cookie straw
- 1 (6.4-cm/2 1/2-in) cookie frame (c)
- Cookies rolled to a thickness of 0.4-centimeter (a little more than 1/8 inch)
- 4 (4.5 + 6 x 8-cm/1 3/4 + 2 3/8 x 3 1/8-in) trapezoidal cookies (d). Note that trapezoid dimensions are listed as b1 + b2 x h, where b1 refers to the shortest of the two shortest sides of each trapezoid; b2 refers to the longest side; and h refers to the height. Cut this dough to the indicated thickness, lay the trapezoid template on top, and cut carefully around its edges. Repeat to make four (4) trapezoids, and bake as you normally would.
Again, to cut and bake cookies (b) and (c), which are a little more involved . . .
a. Roll your dough to a thickness of 0.6 centimeter (1/4 inch). Roll on parchment paper or a silicone mat that can be easily transferred to your baking sheet without directly handling the cut cookie dough. Arrange the two square cutters on the dough so they fit inside each other and are the same distance apart all the way around. Push them to cut the dough.
b. Remove the excess dough from around the bigger square, and carefully remove the two cookie cutters. You will end up with a square in a frame. Hold a paper straw perpendicular to the dough, and use it to cut a hole in the center of the square. Without removing the square from within the frame, bake the cookies as you normally would. Baking them together will prevent the frame from spreading and misshaping.
c. Once the two cookies are out of the oven, they will be barely held together at the cut seam. While the dough is still warm, use a sugar craft knife to carefully cut along the seam to release the square.
d. Carefully push the square out of the frame if it doesn't drop out on its own.
Let all cookies cool completely before proceeding to the next step.
Step 2: Decorate cookies
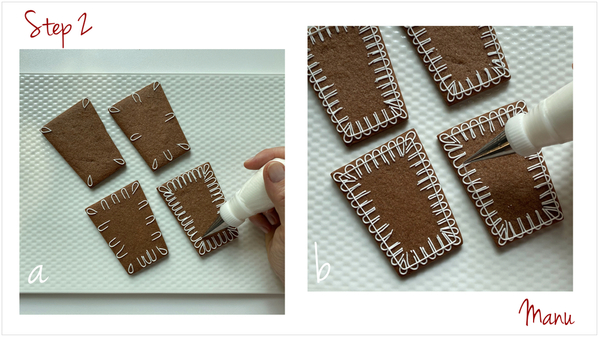
The trapezoids are the only cookies that will be decorated.
a. Using white piping-consistency royal icing and a PME tip #1 (or equivalent), pipe a series of arches all around the perimeter of each trapezoid. The easiest way to pipe this border evenly is to start by piping a teardrop shape at each corner, and then a long "U" or arch at the midpoint of each side. Bisect the empty spaces between "U"s with another "U", and then proceed to fill in the remaining empty spaces with more "U"s to complete the border.
b. Now, outline each cookie about 0.3 centimeter (1/8 inch) from the edges. The outline should cover the ends of the “U”s, so that only the little arches will be seen once the space inside the outline is flooded in Step 2c.
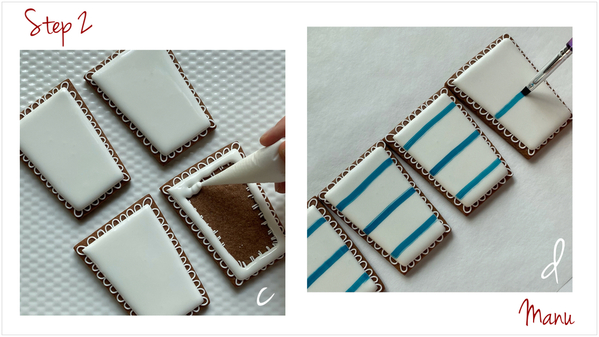
c. Use white flood-consistency royal icing and a PME tip #3 (or equivalent) to flood the interior of each trapezoid. Let the icing dry completely.
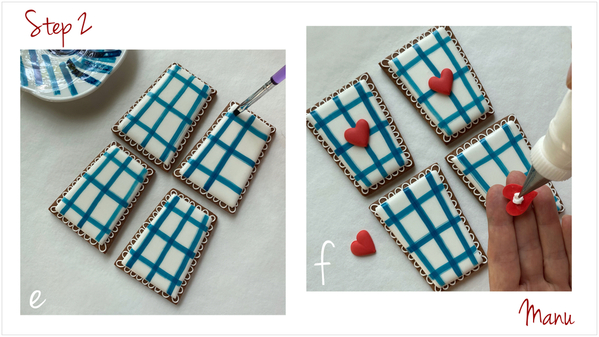
d. Line up all four trapezoids in a row. (Aligning them will allow you to more easily paint lines that will all match up in the final construction.) Dilute a few drops of navy blue gel food coloring with vodka to make a fairly opaque paint. Using a small flat paint brush, paint a stripe crosswise through the middle of each cookie. Then paint another two stripes about 1 centimeter (3/8 inch) away from, and parallel to, the upper and lower edges. It is easiest to align the stripes by painting one at a time, moving down the line of cookies. (Note: The width of the stripe is determined by the width of the paint brush and the pressure you apply. My stripes here measure about 0.3 centimeter (1/8 inch), i.e., my brush width. The diluted coloring helps the paint brush to glide easily along the flooded surface without having to apply much pressure.)
e. Now, rotate the cookies 90 degrees, and line them up in two rows in preparation for painting crosswise through each cookie, perpendicular to the lines painted in the last step. Paint one stripe through the middle of each cookie, and another two stripes about 0.5 centimeter (a little less than 1/4 inch) away from, and parallel to, the upper and lower edges of the longest sides. Do not paint these lines parallel to the center line you just painted.
f. Now pipe a dot of white piping-consistency royal icing on the back side of the heart transfers (prepared in advance), and glue one to the center of each cookie where the stripes intersect.
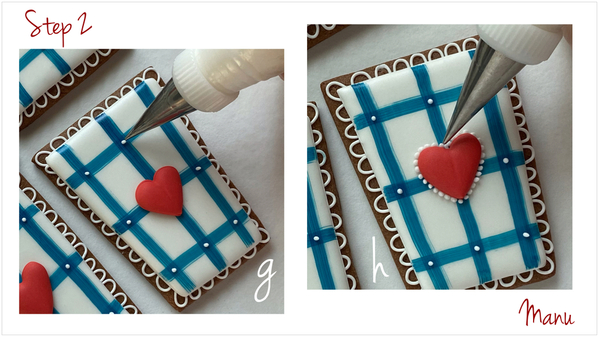
g. Highlight the grid on each trapezoid cookie by piping a dot of royal icing at every stripe intersection. I used white flood-consistency icing and a PME #1 tip (or equivalent).
h. With the same icing and tip, pipe a dotted border around each heart transfer.
Step 3: Assemble cookies into vase
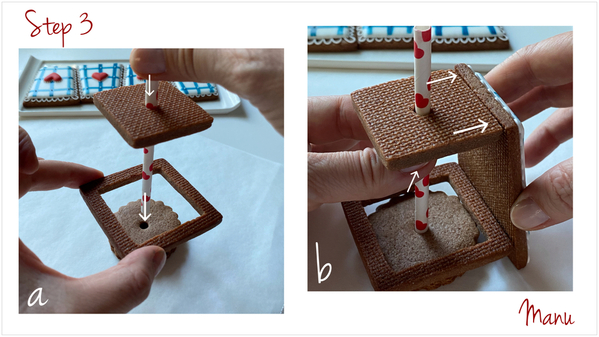
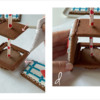
a. Place the frame cookie on the round construction cookie, so that it hovers over your work surface. Elevating the frame cookie will cause the seams to be more open at the upper edges than at the bottom edges. (Consider adding another construction cookie if you'd like the seams to be even more open at the top.) Insert one half of a paper straw into the square cookie, and then insert the other end of the straw into the round construction cookie. The straw will keep the square cookie elevated while you attach the four sides in Steps 3b to 3h.
b. Place one of the trapezoids upside down and flush against the square and frame cookies. Adjust the height of the square cookie, if needed, to make sure that it's at the same height as the bottom (shortest) edge of the trapezoid. Now pinch the straw right beneath the square cookie to prevent it from sliding down the straw as you continue to assemble the vase.
c. Using a parchment cone (or tip-less bag), pipe brown very thick-consistency royal icing (aka "glue") along two opposing edges of the square cookie and the frame cookie.
d. Working with two trapezoid cookies at a time, push them into the just-piped icing to attach them to the edges of the square and frame cookies. Make sure each trapezoid's bottom and corners are aligned with the square and frame cookies.
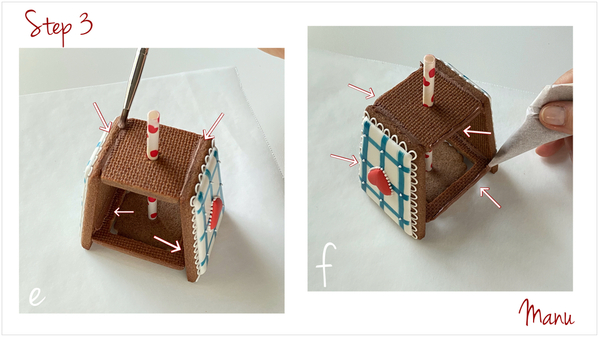
e. Use a damp round paint brush to smooth any excess brown "glue" along the inner vase seams. Pipe more "glue" if necessary, and smooth the excess icing in the same fashion.
f. Pipe brown “glue” along the remaining edges of the square and frame cookies.
g. Attach the remaining trapezoid cookies just as you did in Step 3d.
h. Again, make sure all of the cookies are properly aligned with one another, add more glue if necessary, and clean the seams with a round paint brush.
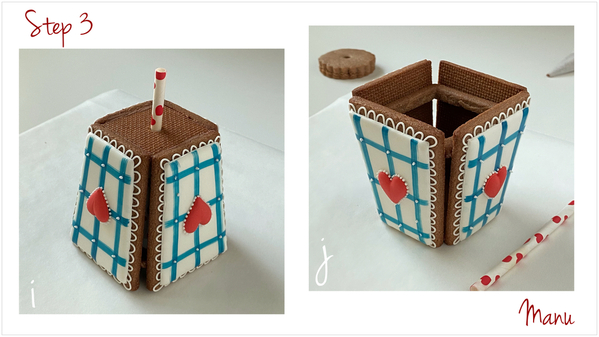
i. Leave the cookie vase upside down, and refrain from touching or moving it for a few hours while the glue is drying. Place the vase in front of a fan, so air can flow inside the cookie vase through the open seams and accelerate the drying process.
j. Once the glue is dry, carefully lift up the vase to release the round construction cookie (but don’t eat it, as you may still need it later!). Turn the vase right side up, and remove the paper straw. (If the structure is at all wobbly, pipe more brown glue along the inner vase seams, clean any excess with the round paint brush, and let the icing fully dry once again.)
And that completes my 3-D cookie vase! Let’s see what one can do with it!
It could be used as a cookie box. Filled with mini heart cookies, it's perfect for Valentine’s Day, Mother's or Father’s Day, or, really, any other occasion where you want to spread some cookie love . . .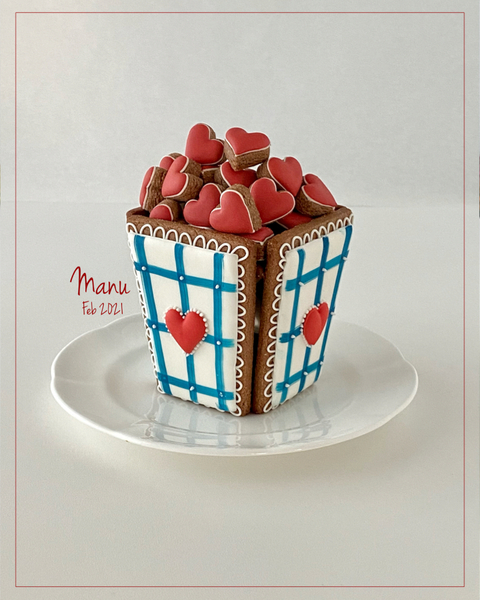
Speaking of Mother’s Day, you could instead fill it with a single cookie flower. Simply insert some marshmallows in the vase, place the round construction cookie (made in Step 1) inside the vase, and then thread the straw on the flower cookie through the holes in the construction cookie and the vase bottom. Fill the vase with more marshmallows to make the construction extra stable. (Note: For more details about the flower construction, see my previous "3-D Felt Flower Cookie" tutorial, and, for more details about the actual decoration, watch my video here. In this case, I piped a long squiggly line, rather than a sequence of small “U”s, to make the tiny arches in the border.)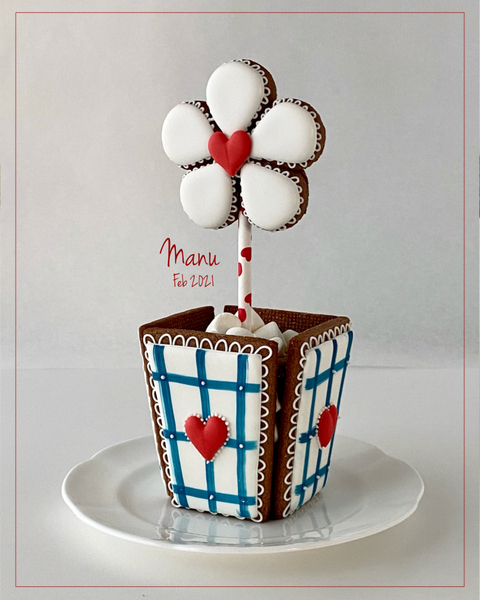
You can also use a pentagon or hexagon cookie for the base and frame, and get a different vase shape. Below, I used a pentagon and cut the trapezoidal sides a little bit taller. I used the same construction cookie, but, in retrospect, I should have added at least one more (0.6-cm/1/4-inch-thick) cookie to further elevate the frame during construction and to open up the seams more at the top.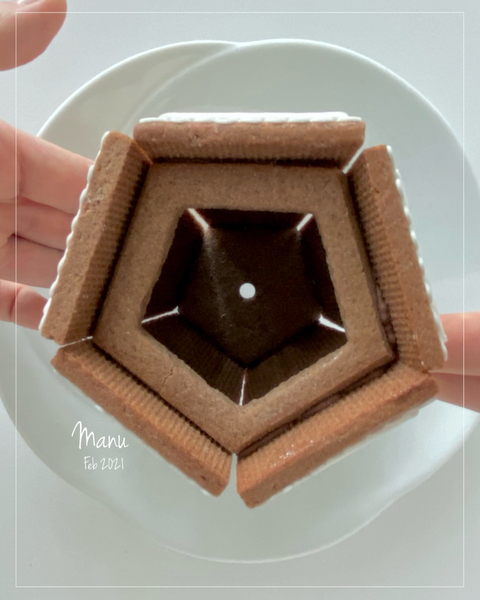
Here’s another view of my pentagon box, simply flooded and decorated with royal icing roses. I glued a single rose to the center of each side, but I probably would have preferred the roses closer to the upper edges. Even though my pentagon box didn’t turn out exactly as I planned, I filled it anyway, with the nearest thing to chocolate Easter eggs that I could find in Southeast Asia in February! If you don't have time to make this project for Easter (which is just around the corner!), no worries, it can easily double as a Mother’s Day present!
Ciao, Manu🌸

Manuela Pezzopane, affectionately called Manu by her friends and family, is a fan of everything handmade, and professes to have tried every possible hobby. However, it wasn’t until the end of 2014, when an American friend invited her to a Christmas cookie exchange, that she first discovered decorated cookies. In 2015, after watching Julia M. Usher's videos and signing up on Cookie Connection, Manu finally attempted her own. Since then, cookie decorating has become Manu’s passion. You can follow Manu on Facebook and Instagram, or email her at manubiscottidecorati@gmail.com.
Photo and cookie credits: Manuela Pezzopane
Note: Made by Manu is a Cookie Connection blog feature written by Manuela Pezzopane, where each month she shares the method behind a magical cookie of her own making. This article expresses the views of the author, and not necessarily those of this site, its owners, its administrators, or its employees. To read all of Manuela's past Made by Manu tutorials, click here. And to see all of Cookie Connection's tutorials, click here.










Comments (23)