
This month's tutorial is all about royal icing transfers, which are decorations piped on parchment paper or acetate and then attached to cookies once they are dry . . . but we are not using cookies! Although I like the idea of decorated cookies as place cards, I like less the idea of having a sweet treat on the table during the meal. If the treat is unwrapped, its sweet smell can compete with the savory food, or it can stain the tablecloth or the place mat (at least my recipe would). So I thought I’d separate the usual royal icing decorations from my cookies, and use just the icing for my place cards. After dinner, I'll give guests a box of cookies to take home with their place cards. And if I create holes in the cards before flooding them, they can also be used as tags for the boxes!
Since royal icing pretty much lasts indefinitely, these cards also make great keepsakes. Not to mention, they are also a wonderful way to make use of leftover icing from other projects!
The place card in this tutorial is very simple: a plaque transfer with a pumpkin transfer on the side with room to pipe, paint, or write a name on the plaque. However, we are going to make three kinds of pumpkin transfers, just to jazz things up a bit!
- Templates (See "Attachments" under "Files" at the end of this post.)
- Acetate and parchment paper
- Tape
- Royal icing:
- Blue thick flooding-consistency, in tip-less pastry bag with opening equivalent to PME #2 tip, for both outlining and flooding (Note: Hereafter, I'll refer to icing used for both of these tasks as one-consistency icing.)
- Orange one-consistency, in tip-less pastry bag with opening equivalent to PME #2 tip
- Brown medium-consistency, in parchment cone or tip-less pastry bag with opening equivalent to PME #1 or #2 tip
- Orange thick-consistency, in pastry bags with five-point star tip (for Step 3) and with opening equivalent to PME #3 tip (for Steps 4 and 5)
- Green piping-consistency, in parchment cone or tip-less pastry bag with opening equivalent to PME #1 tip
- Small round paint brush (for Step 3f)
- White paper
- Scribe tool or equivalent
- Fine liner paint brush (optional; for painting names)
- White gel food coloring (optional; for painting names)
- Black food marker (optional; for writing names)
Step 1: Prepare place card transfers
a. Place the 4.4 x 8.3-cm (1 3/4 x 3 1/4-in) plaque template on your tabletop, and tape a piece of acetate on top of it. I prefer to use acetate (versus parchment paper) for this step. It not only is easier to see through, but it also misshapes less as the icing dries, thus decreasing the likelihood that these relatively large transfers will misshape as well.
b. Using blue one-consistency royal icing and the equivalent of a PME #2 tip, outline the plaque templates and then flood them. Let them dry completely (ideally overnight, or use a fan or dehydrator to accelerate the process).
Step 2: Pipe first easy pumpkin transfer
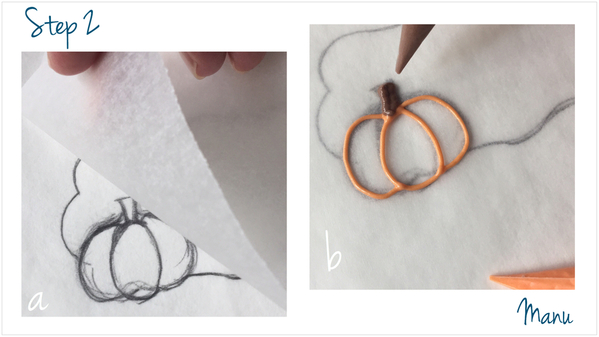
a. Set the place card template (again, in “Attachments” at the end of this post) under a piece of parchment paper. (Both parchment paper and acetate work fine for these relatively small transfers, but transfers piped on parchment paper will dry slightly faster than those piped on acetate.)
b. Use orange one-consistency royal icing and the equivalent of a PME #2 tip to outline the sections of the pumpkin. Then use brown medium-consistency royal icing and the equivalent of a PME #1 or #2 tip to pipe the pumpkin stalk.
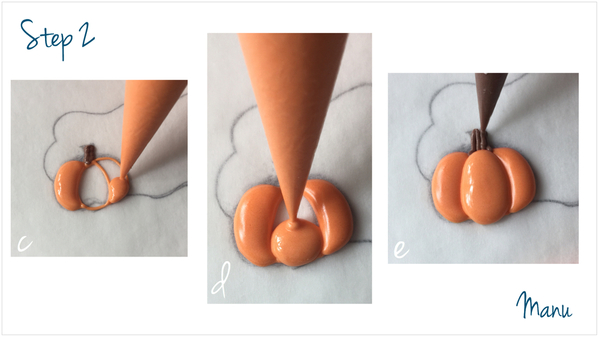
c. Use the same orange one-consistency icing to flood the two sections on the pumpkin sides. Allow a little drying time, just until the icing has crusted. A bit of drying will ensure that each section remains distinct when you pipe the central section in Step 2d, directly below.
d. Flood the central pumpkin section, just as you flooded in Step 2c.
e. And last, using the same brown medium-consistency and tip used in Step 2b, add some line details to the stalk so it connects to the pumpkin body. Let the icing dry completely before attempting to remove the transfer from its underlying parchment paper.
Step 3: Pipe second easy pumpkin transfer
This piping method is a trend at the moment. I was drawn to the buttercream pumpkins on a beautiful cake by Katie Severn (aka @bakerbatterlylove) in her recent Instagram post, and I was inspired to do the same with royal icing.
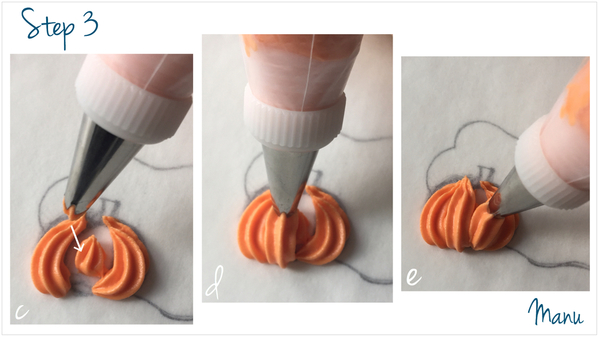
a. Place the same template used in Step 2 under a piece of parchment paper. Here, the template will be used as a guide for the overall pumpkin size. Now, using orange thick-consistency royal icing and a five-point star tip (see photo), pipe over the left section of the pumpkin. To ensure a plump pumpkin bottom, apply more pressure at the bottom of the pumpkin, and gradually release pressure as you approach the stalk.
b. Repeat Step 3a on the right section of the pumpkin.
c. Pipe a small dollop of icing in the pumpkin center. This icing will ultimately add more dimension to the pumpkin and also serve as a support to the two sections that get piped on top of it in the next step.
d. Pipe another section just to the left of the dollop piped in Step 3c, again applying more pressure at the bottom of the pumpkin and releasing as you get to the top.
e. Repeat Step 3d to the right of the dollop to close the entire central gap.
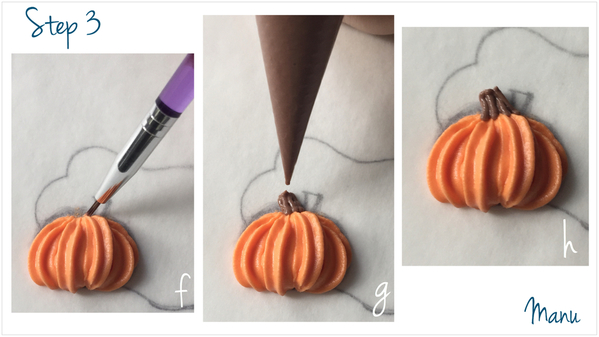
f. Use a small damp paint brush to pat down any peaks in the icing at the pumpkin top.
g. Once again, use brown medium-consistency royal icing and the equivalent of a PME #1 or #2 tip to add some line details to connect the pumpkin stalk to its body.
h. Let the icing dry completely.
Step 4: Pipe third dimensional pumpkin transfer
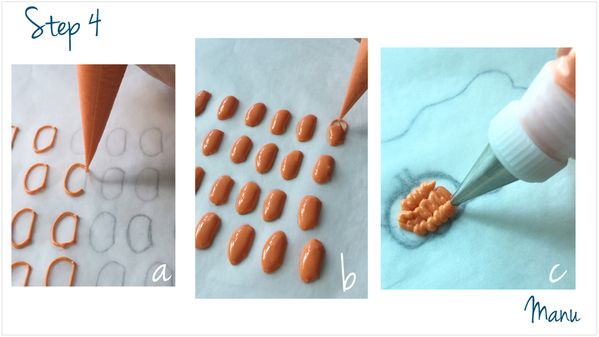
a. On a piece of regular white paper, trace a series a small “C”s, each about 1 x 2 centimeters (or 3/8 x 3/4 inch), and connect the two free ends on each with a line. These shapes will become pumpkin sections, and four will be needed to form one pumpkin. Place the paper under a piece of parchment paper. Using orange one-consistency royal icing and the equivalent of a PME #2 tip, outline the templates you just drew.
b. Use the same icing to flood the pumpkin sections. Let the transfers dry completely before moving onto the next step. To accelerate the drying process and to minimize “cratering” (icing sinking in the center of the transfers as they dry), dry the transfers in front of a fan or in a dehydrator.
c. Set the place card template used in Steps 2 and 3 under a piece of parchment paper. Carefully remove four dry pumpkin section transfers from the parchment paper on which they were piped and have them nearby, ready to put into service! Using orange thick-consistency royal icing and the equivalent of a PME #3 tip, fill the center of the pumpkin with a layer of icing (see photo below). Note: The icing here must be relatively thick, as it is not being used to flood, but instead to glue, as you will see in the next step.
d. Insert two of the pumpkin section transfers into the icing glue on the sides of the pumpkin. I recommend placing them perpendicular to the tabletop and then pushing them gently toward the sides to spread them like a butterfly’s wings. There’s no need to prop them, as the icing should be thick enough to support them.
e. Attach one more section in the pumpkin center in the same fashion.
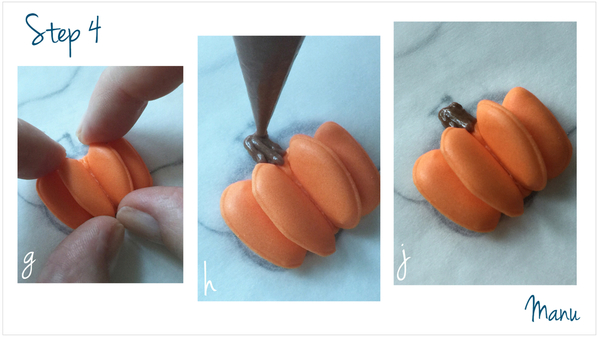
f. And, last, insert the fourth transfer next to the one attached in Step 4e, again to resemble the wing position on a butterfly. Use a scribe tool (or equivalent) to adjust transfer placement and to clean up any visible icing glue.
g. And/or use both hands to make sure the slices are well aligned with one another.
h. Once again, use brown medium-consistency royal icing and the equivalent of a PME #1 or #2 tip to pipe a stalk and add line details for more dimension.
j. (Oops, I meant "i"! ![]() ) Let the icing dry completely, and the third pumpkin transfer will be ready!
) Let the icing dry completely, and the third pumpkin transfer will be ready!
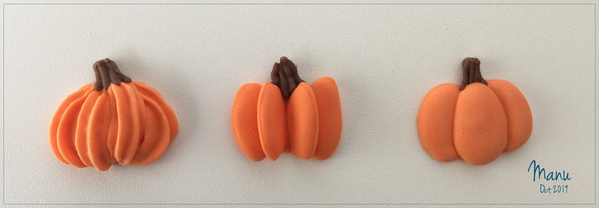
Here’s a recap of all of the transfers demonstrated above. Now, let’s assemble the place cards.
Step 5: Assemble place card(s)
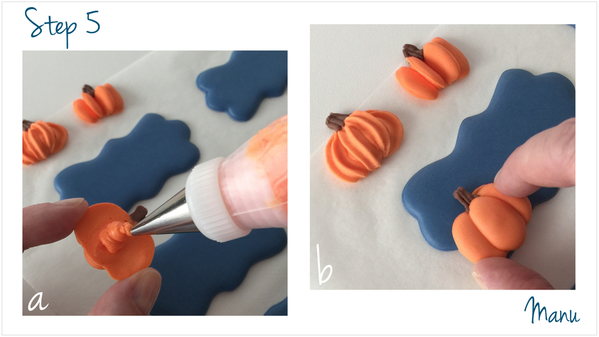
a. Using the equivalent of a PME #3 tip, pipe a dollop of orange thick-consistency royal icing on the back side of a dry pumpkin transfer of your choice. (Again, be sure the transfers are completely dry before attempting to release them from the parchment paper on which they were piped.)
b. Attach the pumpkin to the corner of a plaque transfer by gently applying light pressure (so as not to break either transfer).
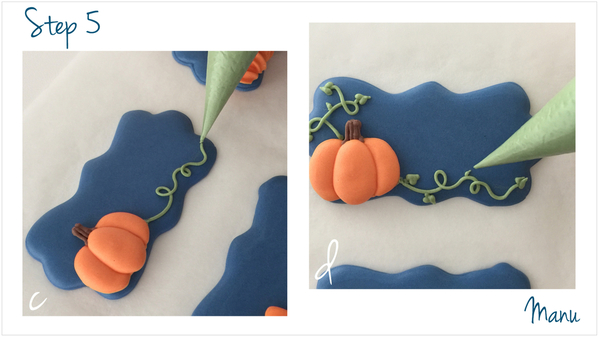
c. Use green piping-consistency royal icing and the equivalent of a PME #1 tip to pipe vines that start at the pumpkin and move along the two neighboring sides of the plaque.
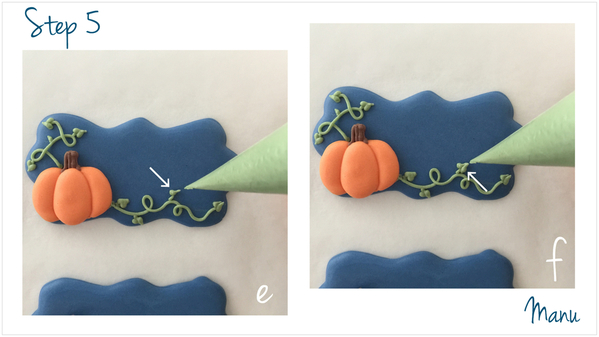
d. Pipe little stems randomly along each vine.
e. At the tip of one of the small stems piped in Step 5d, make half of a heart-shaped leaf by piping a small bead to one side of the stem and then gradually releasing pressure to create a tail on the bead.
f. Repeat Step 5e on the other side of the stem to complete the heart-shaped leaf.
Repeat Steps 5e and 5f to fill out as many stems as desired with small leaves, and then repeat Steps 5a to 5f to create as many different place cards as you want.
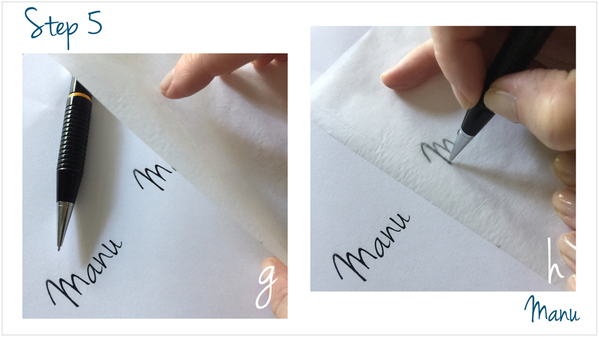
Now, it’s time to write names on the place cards. It might be wiser to first write the names on the place cards, unless, of course, you want to stockpile cards far in advance and fill in names when you know them closer to event-time. My handwriting isn’t great, and I am not good at piping/writing/painting freehand (centering and spacing the letters are issues for me). So I prefer to use a projector. But here, in Steps 5g through 5j, is another approach, a trick learned from Noriko Foster (aka @mintlemonade (cookie crumbs)) here in this Cookie Connection forum post:
g. Print the name in your favorite font onto regular paper.
h. Trace the name onto a piece of parchment paper.
i. Place the parchment paper over the plaque transfer, and trace over the letters with a scribe tool.
j. You’ll end up with a lettering guide scored into the icing!
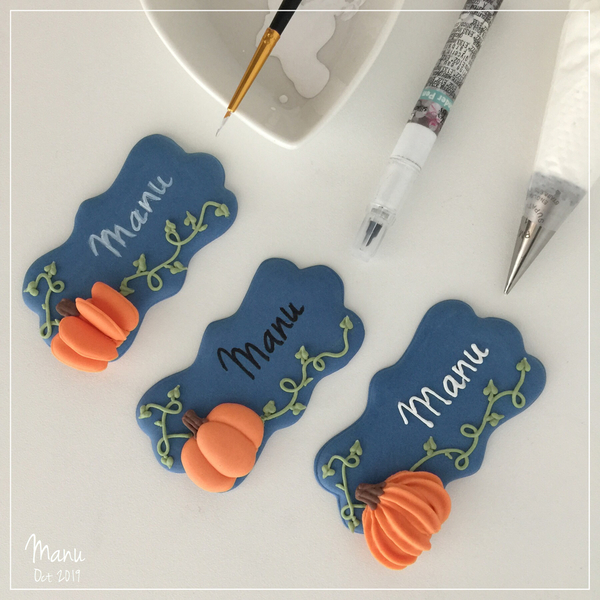
Now, handpaint the name over the scored marks, or draw it with a food marker . . . or pipe royal icing on top. I personally can’t do better than what you see below without a projector, but Noriko’s approach is far better than writing freehand!
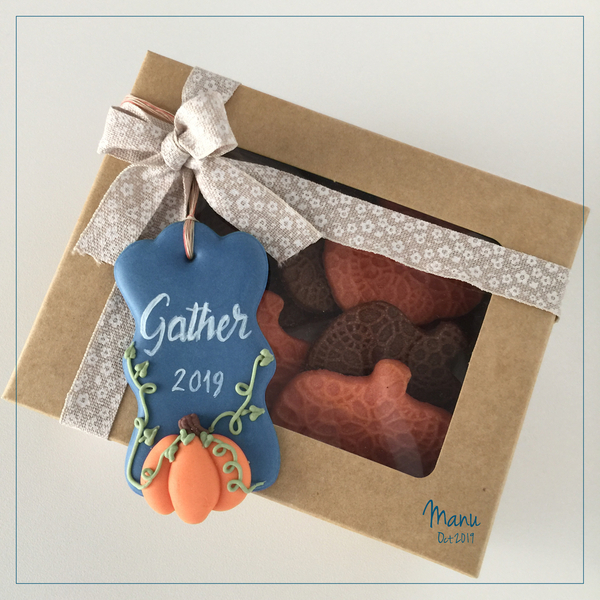
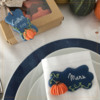
Here’s a place card transfer at its place on the table, and a variation as a gift box tag. Again, to make the tag, just be sure to leave a little hole (to receive twine or ribbon) near the top edge of the plaque when flooding it in Step 1.
And a close-up of the box of cookies . . .
And, if you have one more minute, I leave you with a video recap. Enjoy!
Manu 🎃


Photo and cookie credits: Manuela Pezzopane
Note: Made by Manu is a Cookie Connection blog feature written by Manuela Pezzopane, where each month she shares the method behind a magical cookie of her own making. This article expresses the views of the author, and not necessarily those of this site, its owners, its administrators, or its employees. To read all of Manuela's past Made by Manu tutorials, click here. And to see all of Cookie Connection's tutorials, click here.










Comments (37)