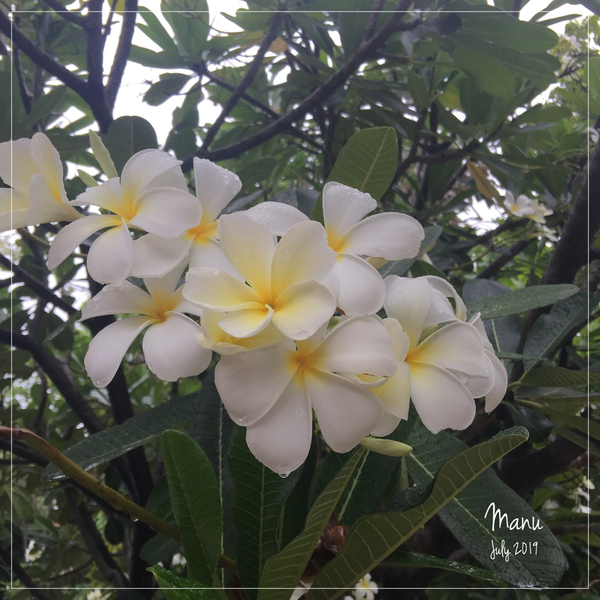
 Frangipani, pomelia, and plumeria are all different ways to name the same beautiful flowers. I like the contrast of their white color against their dark green foliage and brown branches. Under each frangipani tree, you can always find fallen flowers, but they look fresh and perfect for hours before they start to wilt. Plus, the rain doesn’t ruin the flowers on the tree, as you can see in the picture below taken right after a heavy rain, when their smell becomes even more intense in the humid air.
And during the rainy season, the wet-on-wet and marbling techniques are perfect ways to decorate cookies, because the icing takes longer to set and gives you more time to play!
Aside: Piping wet icing onto a wet base icing, so that the top icing settles into the base to leave a smooth surface, is called the wet-on-wet technique. Marbling is dragging a scribe tool, or other needle tool, through the wet icing to create patterns. About one year ago (July/August 2018), I tried these techniques with sunflowers and poppies, and shared two tutorials here on Cookie Connection. Moreover, I had the honor of a cameo appearance by @Julia M. Usher. In those tutorials, she left us with three important and precious tips about the wet-on-wet technique (related to work speed, icing consistency, and drying methods), which you can read here (sunflower tutorial) or here (poppy tutorial).
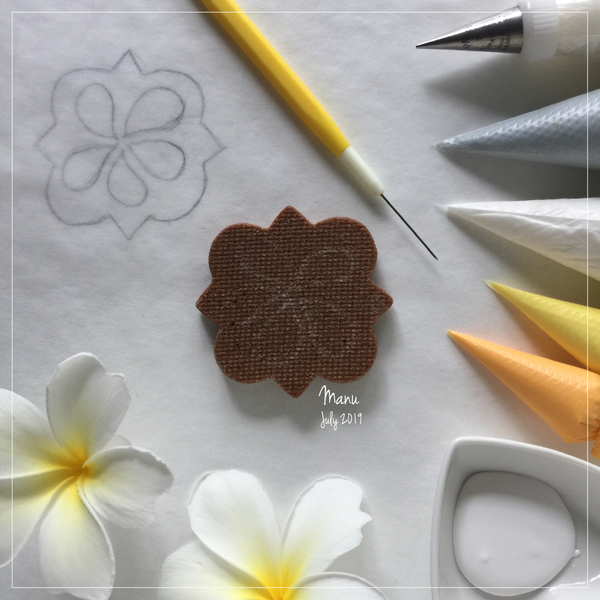
- Frangipani template (See "Files" in "Attachments" at the end of this post.)
- Parchment paper
- Paper towels
- Scribe tool (or equivalent)
- Scissors
- 1 (7.2-cm/2 3/4-in) square plaque cookie
- Tea strainer or fine-mesh sieve
- Icing sugar, aka confectioner's or powdered sugar (one spoonful)
- Royal icing:
- “Natural white” (without any white food coloring) piping-consistency, in pastry bag with PME #1 tip (or equivalent)
- Light grey, "natural white", yellow, and orange thick flooding-consistency, in pastry bags with PME #2 tips (or equivalents; I used tip-less bags)
- “Tinted white” (colored with white food coloring) runny-consistency, applied with scribe tool
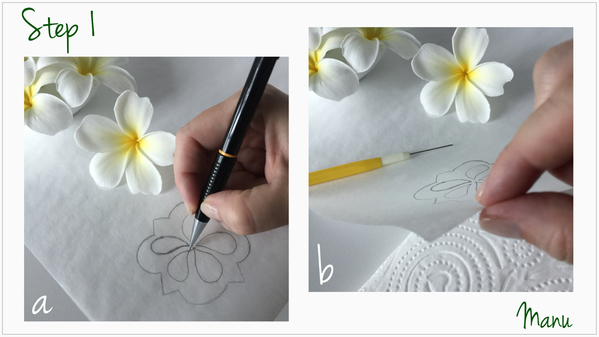
Step 1: Transfer frangipani template onto cookie
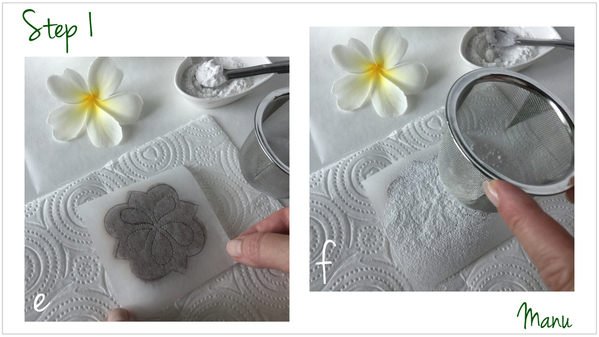
This step outlines a quick and easy way to transfer a template onto a dark cookie using the pouncing technique and icing sugar.
a. Trace the frangipani template onto parchment paper. (Again, you can find it in "Files" under "Attachments" at the end of this post.)
b. Lift the parchment paper, and set a couple of paper towels, folded over four times, between the parchment paper and your work surface.
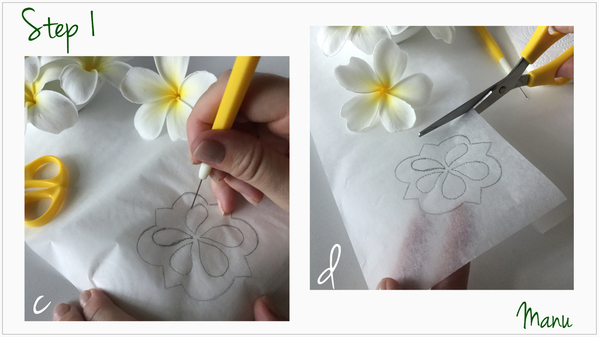
c. Use a scribe tool (or equivalent) to prick (or pounce!) holes through the design. The soft layer of paper towels between the parchment paper and your work surface will "ease" the point of the scribe through the parchment paper.
d. Once you have pricked the outline of each petal, cut out the design from the parchment paper.
e. Lay the pricked template on your cookie.
f. Use a tea strainer (or fine-mesh sieve) to sift the icing sugar over the parchment paper. Be sure to cover the entire pricked flower design.
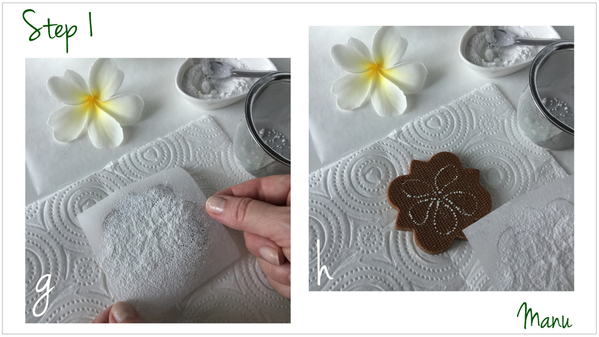
g. Now, lift the parchment paper off the cookie.
h. The icing sugar will have passed through the holes in the pricked template, leaving a transferred flower outline on the cookie. Gently tap the cookie on your work surface to remove the excess sugar. A faint, but clear, sugar outline will remain on the cookie.
We are now ready to decorate!
Step 2: Decorate cookie
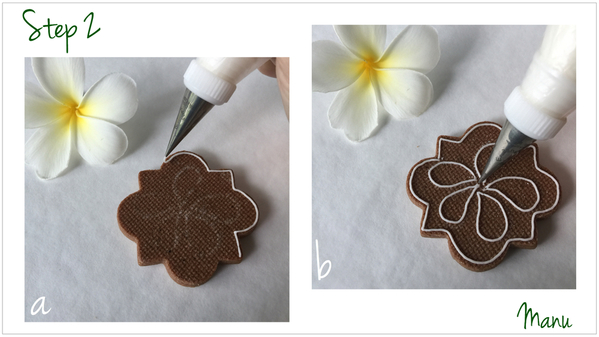
a. Using “natural white” piping-consistency royal icing and a PME #1 tip (or equivalent), outline the cookie edge. This outline will serve as a dam that prevents icing from overflowing when you flood the cookie and add more icing for the marbling technique.
b. Outline the petals by piping over the sugar flower guide created in Step 1. Wait a couple of minutes for the icing to set. These outlines will also serve as dams, and will give you more control over the ultimate shape of the petals.
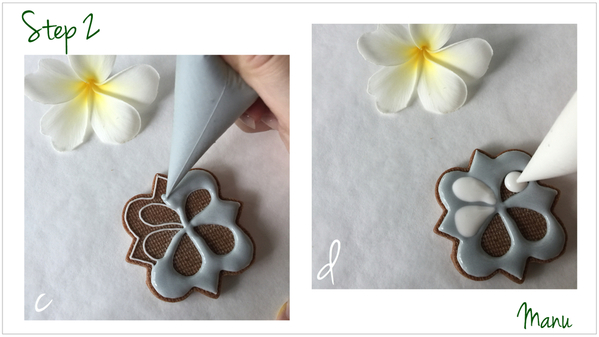
c. Using light grey thick flooding-consistency royal icing and a PME #2 (or equivalent), flood the outer area of the cookie excluding the petals.
d. Now using “natural white” thick flooding-consistency royal icing and a PME #2 tip (or equivalent), immediately flood the petals. Outlining the petals not only creates dams that contain the icing, but also defines the petal shapes upfront and eliminates time spent thinking about placement and flooding of those areas while you work. And, any second saved when doing the wet-on-wet technique is precious and crucial, as, ideally, the icings shouldn't even start to set while you are working.
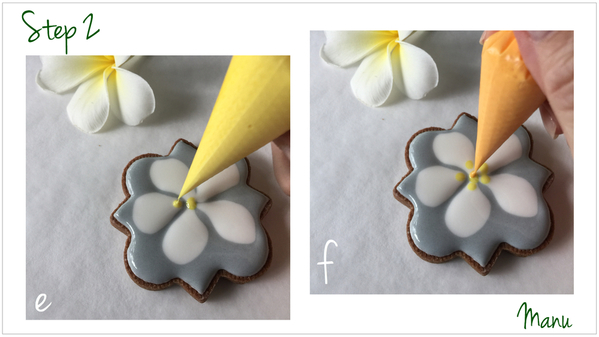
e. Immediately pipe a yellow dot in the center of the flower and one on the pointed end of each petal. Use yellow thick flooding-consistency royal icing and a PME #2 tip (or equivalent).
f. Using orange thick flooding-consistency royal icing and a PME #2 tip (or equivalent), immediately pipe an orange dot on top of the yellow dot you just piped in the flower center.
Now onto outlining the petals again, this time using the wet-on-wet technique. Remember: Move quickly through the remaining steps so that the icing does not set while you are working.
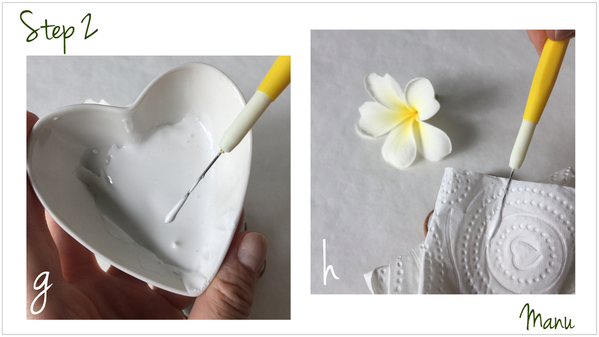
g. Dip your scribe tool in the “tinted white” runny-consistency royal icing, so that the icing coats the end of the needle. The needle will be used as a “nib”, and the icing will be the “ink”. Aside: After many different tries with dark icing (grey, green, and black) for the petal outline, I decided to use white for two reasons: (1) the contrast between the two shades of white more closely resembles the real flowers, and (2) the risk of a darker color bleeding into the petal white is eliminated.
h. Remove the excess icing by wiping the needle tip on paper towels. You want to have enough icing on the needle to be able to “write” on the cookie, but not so much that you risk excess icing dripping or draining onto the cookie surface.
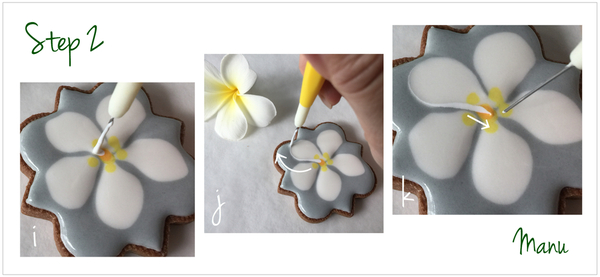
i. Dip the tip of the scribe tool in the center of the cookie and start dragging it along the edge of one petal.
j. Keep dragging the scribe tool around the petal edge. The “tinted white” royal icing will, little by little, transfer from the scribe tool to the "natural white" icing, leaving behind a relatively bright white outline that is more thick and evident on the side of the petal where you started and thinner on the other side. For best results, drag the very tip of the needle along the top of the icing. Avoid plunging the tip into the icing (like I did here on this cookie), as the outline won't end up as crisp and defined.
k. Since I had too much “tinted white” icing in the center of the flower where I started the outline, I dragged the scribe tool in the opposite direction just a bit to create a more delicate point. If you work quickly, there is time to fix little imperfections like this!
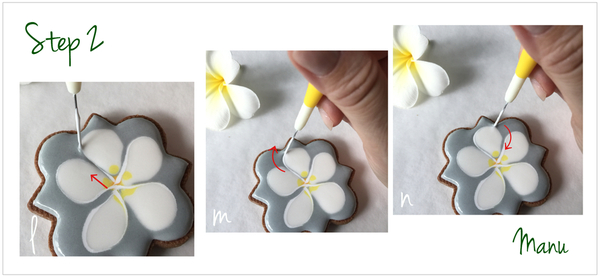
l, m, n. Rotate the cookie, dip the scribe tool in the “tinted white” royal icing once again, and outline the next petal. Continue in this fashion to outline all of the petals. Be sure to dip the scribe tool afresh before you start each petal.
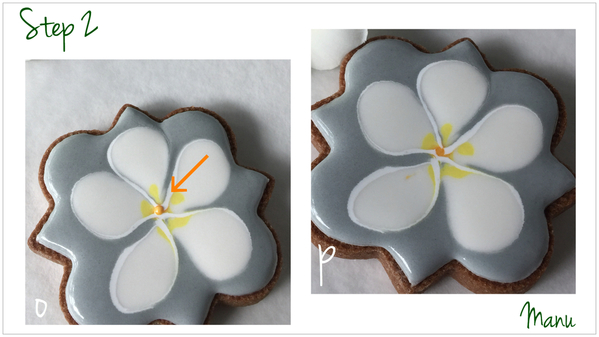
o. Pipe a dot of orange thick flooding-consistency royal icing in the center of the flower.
p. Let the orange icing settle into the icing underneath. At this point, the cookie would normally be finished and ready to dry, but I wasn’t happy with the shape of the bottom-left petal . . .
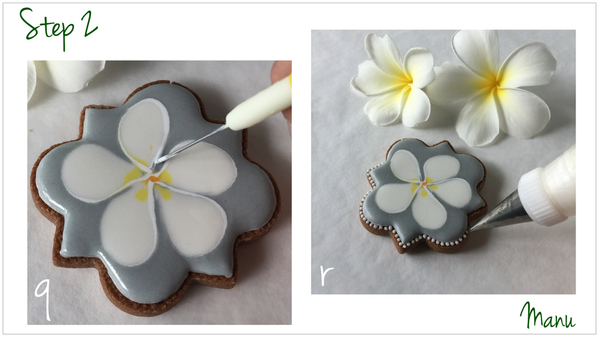
q. So I, once again, dipped the point of the scribe tool in the “tinted white” royal icing and outlined the petal to adjust its shape. Fortunately, the icing was still wet, and I was able to do this without leaving tracks in the icing. Once the petals are exactly how you want them, let the icing dry completely in front of a fan or in a dehydrator. (Speed-drying with these tools minimizes the chance of colors bleeding.)
r. Pipe tiny dots all around the cookie edge using "natural white" piping-consistency royal icing and a PME #1 tip (or equivalent).
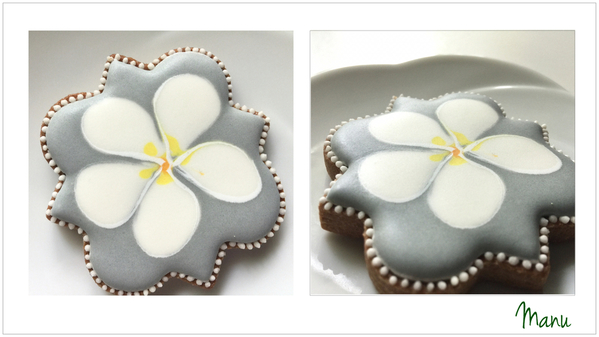
Our cookie is finished! The surface is smooth, and the flower looks almost as if it was printed on the cookie surface, as you can see in the picture below to the right.
A final design note: If you'd like to avoid the scribe tool for outlining, you can! Instead, use a food-grade marker or a paint brush dipped in food coloring to draw or paint those details once the cookie icing has dried. The final outcome will not be exactly the same, however, as you will see either paint brush or marker strokes if you hold the cookie up to the light and look at it closely . . . but this is a cookie, and it is eventually going to be eaten, so do what is easiest for you!
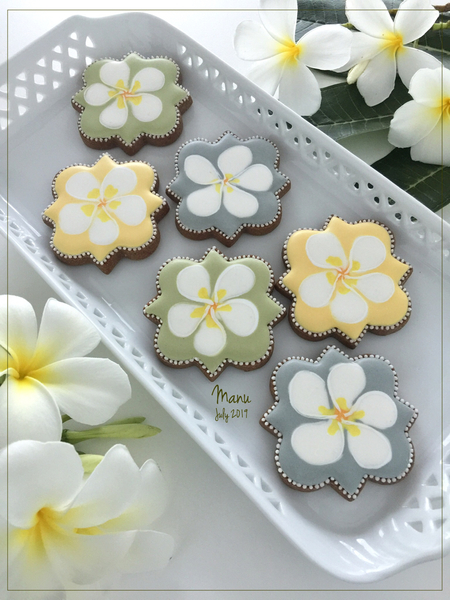
Here's the finished cookie on a plate with similar cookies in different colors, all ready to be enjoyed with a cup of tea or coffee.
And as I always do, I leave you with a 60-second video of the whole process to help bring it to life.
Happy summer!
Manu

Manuela Pezzopane, affectionately called Manu by her friends and family, is a fan of everything handmade, and professes to have tried every possible hobby. However, it wasn’t until the end of 2014, when an American friend invited her to a Christmas cookie exchange, that she first discovered decorated cookies. In 2015, after watching Julia M. Usher's videos and signing up on Cookie Connection, Manu finally attempted her own. Since then, cookie decorating has become Manu’s passion. You can follow Manu on Facebook and Instagram, or email her at manubiscottidecorati@gmail.com.
Photo and cookie credits: Manuela Pezzopane
Note: Made by Manu is a Cookie Connection blog feature written by Manuela Pezzopane, where each month she shares the method behind a magical cookie of her own making. This article expresses the views of the author, and not necessarily those of this site, its owners, its administrators, or its employees. To read all of Manuela's past Made by Manu tutorials, click here. And to see all of Cookie Connection's tutorials, click here.



Comments (30)