As we all know, the creative process of decorating cookies involves so much more than baking cookies. In fact, the actual cookie is, for the most part, just a blank canvas. It's really the icing, sprinkles, fondant, and all of the other materials and techniques we use that make our decorated cookies works of art. For this challenge, I want you to add a special material and skill to your cookie decorating repertoire. Specifically, I want you to learn how to use sugar and/or isomalt to enhance and embellish your cookies. You know, kick those cookie decorating skills up a notch (or three)!
Of course, this wouldn't be a Practice Bakes Perfect challenge if there weren't also a spectacular prize to reward you for your efforts! As always, one lucky entrant will be chosen at random from among all of the challenge entrants, and, remember, the more times you enter the challenge, the greater your chance to win! And what, you may ask, is our prize for this challenge? Glad you asked!
It will be a grab bag of goodies (estimated value: $75 USD) donated by Cookie Connection host @Julia M. Usher, which, she assures me, will contain isomalt, a candy thermometer, assorted molds, and other items pertinent to this challenge.
For starters, and purposes of this challenge, we will be talking about forms of sugar that are hard and translucent. The three main types of hard, translucent sugar that are commonly used for decorating cookies are isomalt, crushed and melted hard candies, and boiled sugar mixtures. Corn syrup and glucose syrup are translucent sugars, and are ingredients in some hard candy and boiled sugar recipes, but they cannot be used alone for purposes of this challenge because they never set hard.
Before we get into the nitty gritty of this challenge, I have a little confession to make. *Says with a whisper* . . . I have never actually used isomalt. I have made plenty of things with other translucent sugars, but never isomalt. And so, with this challenge, I propose that we learn about this heretofore intimidating ingredient together, shall we?
[AUTHOR'S NOTE: I cannot thank @Julia M. Usher enough for her help and patience in teaching me the "kitchen science" that formed the basis for this challenge. Her deep knowledge of all things sugar never ceases to amaze me!] [EDITOR'S NOTE: Awww, shucks! ![]() ]
]
What is Isomalt?
Isomalt is a chemically produced sugar substitute derived from sucrose found in sugar beets. It has a few advantages over granulated cane sugar when doing "sugar" work. First, it's quite resistant to recrystallization, so it doesn't require the addition of anti-crystallization agents, like corn syrup or glucose, when boiling, and it's less likely to turn foggy after it cools and sets. It's also less vulnerable to the effects of humidity (such as sweating or wilting) and can withstand higher temperatures before browning. All of these factors make isomalt a favorite among sugar artists, especially when crafting ornate showpieces that have to withstand the test of time. (Sources: polyols.org, pastrysampler.com.)
Isomalt is commonly sold in two forms: crystals and nibs (aka tiles). Isomalt crystals are opaque white granules, whereas nibs (or tiles) are larger clear (or tinted) chunks of pre-cooked and set isomalt crystals. Crystals must be melted and heated to the "hard crack" stage (300°F/149°C) or hotter before use to ensure that the syrup sets firm and clear. Instructions for some brands of isomalt recommend heating to 320°F (160°C) or 340°F (171°C) before use, but be cautious about exceeding 340°F (171°C), as isomalt can still discolor when subjected to high heat or repeated reheating. To help prevent overheating and/or burning, many people add water to their isomalt crystals to create a "slurry", which heats more evenly than a pot full of dry crystals placed over direct heat. When working with crystals, CK Products recommends adding color (if desired) at 280°F (138°C) and then continuing to boil to 320°F (160°C). You don’t want to add color at the end, as the added water in the coloring may cause the syrup to set improperly. Again, isomalt nibs or tiles have already gone through the heating process, so they can simply be reheated and melted without having to worry about getting the isomalt back up to a certain temperature. They can even be reheated in the microwave. Leftover isomalt can also be saved and reheated for later use. However, again, if isomalt is repeatedly reheated, it can begin to discolor.
The eye-popping isomalt suncatcher by Sonja Galmad (aka @iSugarfy (aka swissophie)), shown below, was made with isomalt tinted with various food colorings. For a mini-tutorial about how she placed isomalt in these teeny-tiny areas, please see Sonja's recent Cookier Close-up.
Isomalt Butterfly Suncatcher by swissophie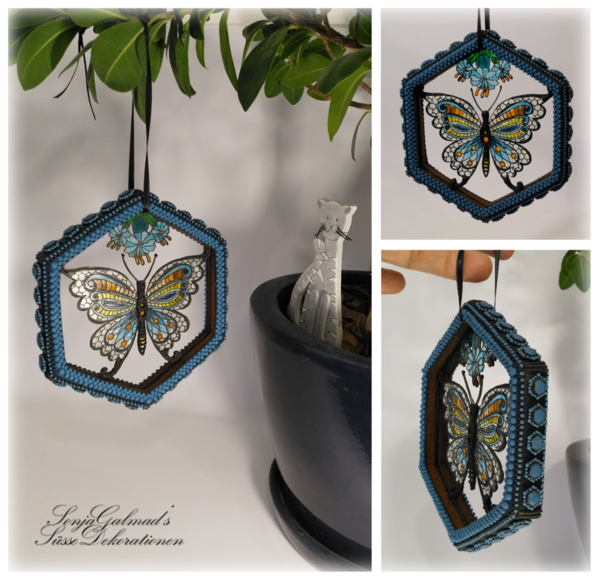
To give you an idea of how versatile isomalt can be, here are some other examples of cookies with isomalt elements:
3-D Cookie Lantern by Manu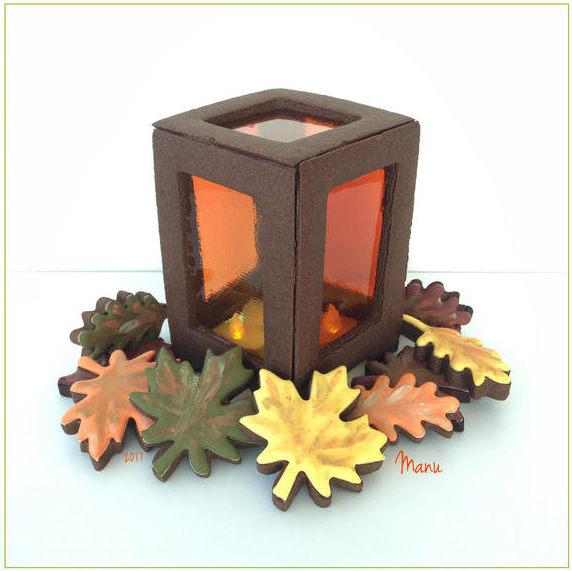
Here, the lantern "glass" is colored isomalt. In the tutorial for this lantern, Made by Manu: 3-D Cookie Lantern, @Manu biscotti decorati also provides detailed instructions for working with isomalt.
Red Panda by Ryoko ~Cookie Ave.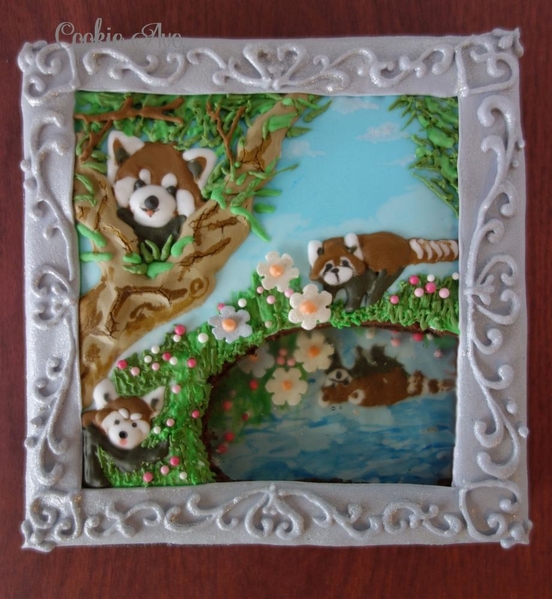
In this cookie by @Ryoko ~Cookie Ave. (an entry for Practice Bakes Perfect Challenge #14!), isomalt was used to create the pond.
A Taste of Morocco by Fernwood Cookie
In this cookie puzzle by @Fernwood Cookie, Kerri used isomalt to create the pouring tea effect. (This photo may look pretty familiar since it was also a recent Practice Bakes Perfect Challenge #29 entry!)
Stained Glass Cookie by Evelindecora
In this glorious stained glass window by @Evelindecora, the entire "window" is isomalt that was painted and piped over with royal icing, which was then painted gold.
I hope the examples above give you an idea of some of the different ways isomalt can be used in cookie decorating.
Since I am no expert in making and using isomalt, I will defer to some others who are a lot more knowledgable. Simi Cakes & Confections has a website with lots of free tutorials and instruction about how to work with both isomalt forms (crystals and nibs/tiles). CK Products also offers instruction for working with isomalt crystals here. Both Simi and CK sell their own isomalt products. Since isomalt products do vary a little bit from manufacturer to manufacturer, it is very important to read the instructions provided with whatever isomalt product you are using.
Finally, for additional helpful tips and tricks for working with and storing isomalt, I recommend this article from the Sugar Arts Institute.
Crushed Candies
If you don't need a lot of sugar because you are doing just a few small details, then you can use crushed clear candies to create an isomalt-like effect. (In fact, many "sugar-free" hard candies are made of isomalt!) Popular candies to use for this approach are "crystal mints" (clear hard candies) and Jolly Rancher-brand candies (colored hard candies). Simply, one just crushes several pieces of candy and heats them to liquid form. The melted candies can then be used like isomalt.
For instance, @Lucy (Honeycat Cookies) used crushed candies for the water droplets on these spiderwebs:
Honeycat Spiders! by Lucy (Honeycat Cookies)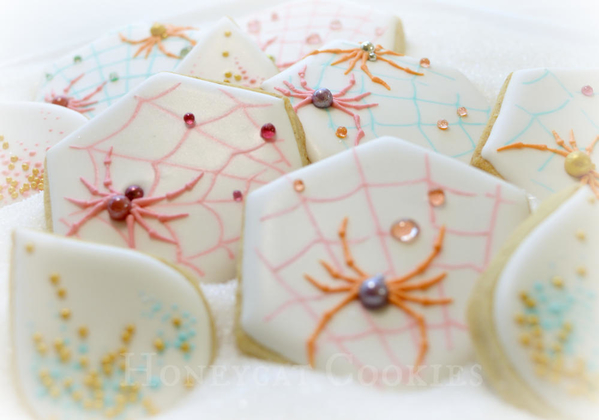
For more details about how to use crushed candies to create translucent sugar details, please see the marvelous tutorial that Lucy created for these spider cookies: What's New, Honeycat? Spiders for Halloween (or Christmas?).
Traditional Boiled Sugar
The last translucent hard sugar we will discuss for purposes of this challenge is good old-fashioned boiled sugar. By boiled sugar, I mean a mixture that is mostly granulated cane sugar and water, but can also include other sugars such as corn syrup or glucose (added to prevent recrystallization). This syrup is cooked on a stovetop to the "hard crack" phase (300°F/149°C) before being poured and left to cool and set. If you have ever made your own candy, this is probably how you did it. The advantage of this method is that you don't need any special ingredients, as you can make boiled sugar with as few as two ingredients: granulated cane sugar and water. (You will need a candy thermometer, however.) The disadvantages of this method are a few. Cane sugar solutions begin to caramelize (turn yellow or golden) at about 320°F (160°C), and, as noted before, they are more vulnerable than isomalt to recrystallization and humidity.
I used a boiled sugar method to make the "water" for this fountain (which was an entry for Practice Bakes Perfect Challenge #5!):
Lily Fountain by Bakerloo Station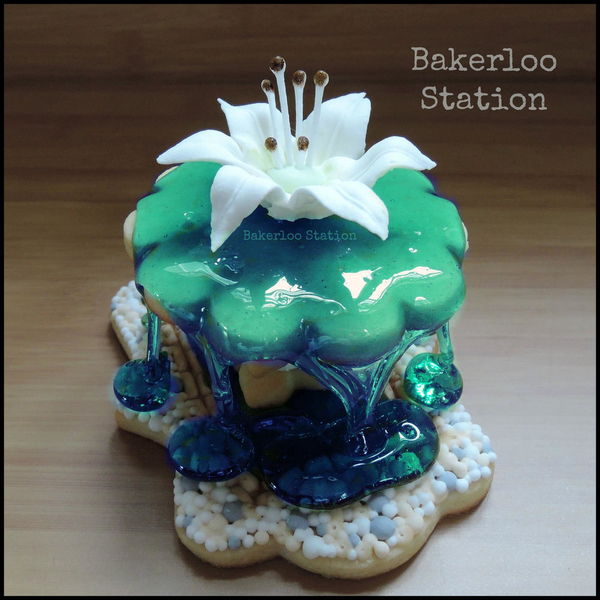
Notice how the water is rather green-blue? Well, I added straight royal blue food coloring to the boiled sugar. However, the final color came out greenish because the boiled sugar was a golden yellow color. I believe that I inadvertently heated my syrup above 320°F (160°C), because my candy thermometer was inaccurate, and so the blue added to the golden yellow syrup made turquoise!
If you would like to try making your own boiled sugar, I recommend this tutorial by Wendy McGowan: How to Make Homemade Sugar Work. Wendy adds some corn syrup to her boiled sugar mixture, which minimizes the risk of recrystallization during boiling. If you do not have access to corn syrup, you can do what I did and just boil equal parts of cane sugar and water with a touch of cream of tartar (also a safeguard against recrystallization) until they reach 300°F (149°C). Here is a quick recipe from Genius Kitchen for this approach.
So, now that we know about the three types of sugar I would like you to work with in this challenge, let's get to the rules!
Rules:
1. Create a cookie or set of cookies using at least one of the three types of hard sugar discussed above: isomalt, crushed candy, or boiled sugar.
2. In the first comment under your entry, please state the sugar-making technique(s) that you used.
3. As always, we ask that you make a brand new original cookie (or cookies) for this challenge. (In accordance with Cookie Connection rules and US copyright laws, no copyrighted images or characters may be used without permission.)
4. You may enter the challenge multiple times, however, each entry must be substantially different. For instance, if you create five cookies with spider webs and isomalt water droplets, then they will count as only one entry (even if the five cookies are not identical).
5. Think outside the box, take some healthy risks, and HAVE SOME FUN.
- Please post an image of your cookie (or cookies) to the site under the Practice Bakes Perfect clip set no later than September 30, 2018 at 5 pm central.
- Please state which sugar technique(s) you used in the first comment under your entry photo. This information is a requirement of the challenge; photos without it will be disqualified.
- Because these challenges will be ongoing, we ask that you put "Practice Bakes Perfect Challenge #30" in your photo caption field AND in a tag, so that we can tell the challenges apart from month to month. Please use the main title field to uniquely name your cookie as you normally would.
- Please also assign other relevant clip sets and tags to your image, as you normally would. (Meaning don't just use the Practice Bakes Perfect clip set and leave it at that, or your photo won't easily be found with keyword searches.)
- You can enter more than once, but please post only one clip of each distinct entry/cookie. Multiple clips of the same entry/cookie are not allowed unless added in a comment beneath the one primary clip.
After the challenge has closed on September 30, we will announce the winner in the Saturday Spotlight the following weekend (on or about October 6). The next challenge will be announced after that Spotlight.
And one last thing . . . This is NOT meant to be a competition. The only person you should be competing against is yourself. Period. These challenges are intended to inspire the artist in you and push you to be the best cookie artist YOU can be at this snapshot in time. Remember, the whole point of this exercise is to get you out of your comfort zone - to "take healthy risks," as my wise-beyond-his-years son always reminds me. Plus, prizes are given entirely at random, so healthy risk-taking has its own rewards!
I would love to chat with you as you journey through this process, so if you have any questions about the challenge, are having trouble getting started, need help bringing an idea to life, or want technical advice, please leave a comment below or DM me.

 Christine Donnelly began her professional baking career at 16, when she was hired on the spot at her local bakery to work the counter and decorate cakes. After detours to college and law school, she worked as a trial lawyer in Chicago for many years, ultimately leaving that career to become a stay-at-home mother to her two children. In her “retirement,” she continued to bake at home, at last finding her preferred artistic medium in decorated cookies. In February 2013, Bakerloo Station was born with a presence on both Facebook and Instagram. Christine makes cookies to balance her left brain, to inspire and share creative ideas, and to feed those needs that only art can satisfy.
Photo credit: Christine Donnelly
Note: Practice Bakes Perfect is a bimonthly Cookie Connection blog feature written by Christine Donnelly that poses inspiration or challenges to get you to stretch as a cookie artist - for practice, for prizes, and for fun! Its content expresses the views of the author and not necessarily those of this site, its owners, its administrators, or its employees. Catch up on all of Christine's past Cookie Connection posts here.



Comments (9)