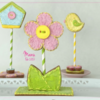
 Spring is quickly approaching, so here’s a 3-D flower cookie to get you in the mood! It's decorated using the felt technique, because it's February and still cold, and because this technique is perfect when you want to cover both sides of a cookie without the icing getting too thick. I previously shared a tutorial featuring the felt effect on mug cookies, so feel free to read it for all of the technique details. Though, in a nutshell, the felt technique can be summarized in three simple steps:
- Ice a cookie, and let it dry completely (or skip this step and go immediately to Step 2, as we're doing in this tutorial).
- Use a paint brush to randomly apply dabs of royal icing over the dry icing (or bare cookie) to create texture.
- Then, immediately coat the textured icing with colored icing sugar (aka confectioner's or powdered sugar), and shake off the excess.
Again, in this tutorial, I skipped Step 1, because I wanted to cover the back of the cookies, while keeping their overall profiles relatively thin. This project is intended to be a 3-D centerpiece or place card, so I wanted it to view nicely from all angles without the icing being too thick. I also continued my recent trend of using paper straws, without any thick royal icing "glue", to assemble the project. This type of construction allows for easy dismantling of the cookie parts for eating!
- Cookie dough of your choice
- 1 (7.3-cm/2 7/8-in) flower cookie cutter (I used this cutter from PME.)
- 1 (6.3 x 7-cm/2 1/2 x 2 3/4-in) double-leaf cookie template (You'll find my template in "Attachments" under "Files" at the end of this post, though you can use a tulip cutter if you have one.)
- 1 (5 x 11-cm/ 2 x 4 1/4-in) rectangular cookie template with smaller (1 x 6-cm/3/8 x 2 3/8-in) rectangular hole in center (Again, see "Files" below.)
- 2 paper straws
- Scissors
- Zester or Microplane tool
- About 2 tablespoons icing sugar, aka confectioner's or powdered sugar
- Pink and green gel food coloring (I used Colorgel by Modecor, but any gel coloring should do; avoid liquid colorings.)
- Food-grade plastic bags
- Large round paint brush
- Tea strainer or fine-mesh sieve
- Royal icing:
- Medium-consistency pink and green
- Piping-consistency yellow, in pastry bag with PME #1 tip (or equivalent)
- 2 (2.5-cm/1-in) yellow button royal icing transfers with green threads in center (Prepare in advance following Steps 3a to 3c of my previous tutorial; for the button shape, use my template under "Files" below.)
Step 1: Cut and bake cookies
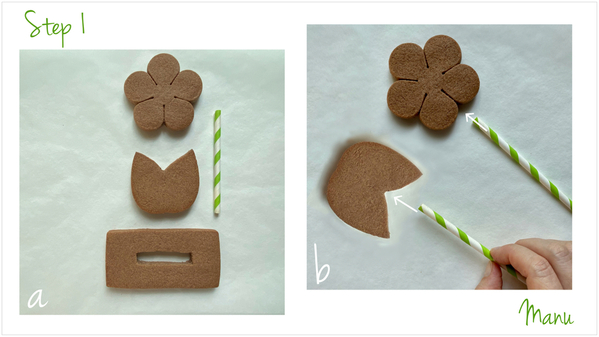
a. As suggested in the supplies list above, three cookies (shown, baked, in the photo below) are used in this project:
- 1 (7.3-cm/2 7/8-in) flower cookie, cut with a standard flower cookie cutter;
- 1 (6.3 x 7-cm/2 1/2 x 2 3/4-in) double-leaf cookie, hand-cut using the attached template (or a tulip cookie cutter of similar size); and
- 1 (5 x 11-cm/ 2 x 4 1/4-in) rectangular cookie with a (1 x 6-cm/3/8 x 2 3/8-in) rectangular hole cut in the center, also hand-cut with templates.
b. To make the above cookies, roll your cookie dough of choice to a thickness of about 1 centimeter (3/8 inch), and cut out the cookie shapes as indicated in Step 1a. Bake as directed in your recipe.
As soon as the cookies are done, and while the dough is still warm, insert one of the straws into the side of the flower cookie where the petals intersect. Push it in about 2 centimeters (3/4 inch), and then remove it to create a hole. Likewise, insert the other straw into the double-leaf cookie, where the two leaves intersect, and remove it. (I prefer to insert straws into warm baked cookies rather than raw dough, because the cookies are less likely to misshape.)
Let the cookies cool completely; then check that the bottom of the double-leaf cookie fits into the hole in the rectangular cookie. If it turns out that the dough spread into the hole during baking, gradually file open the hole with a zester or Microplane tool until the bottom of the double-leaf cookie just fits inside. Be careful not to over-file; the two cookies should fit snugly together so that the final assembled project is stable.
Step 2: Tint icing sugar
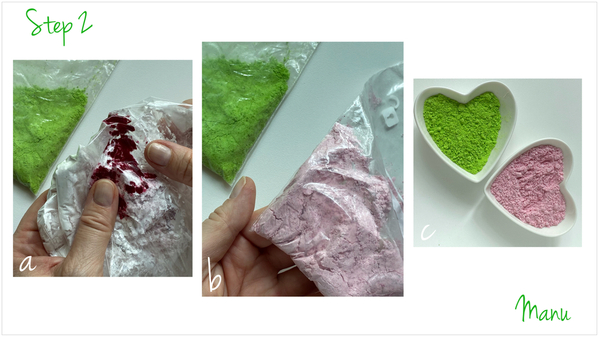
a. Put a tablespoon of icing sugar and a drop of pink gel food coloring in a food-grade plastic bag. Get another bag, and repeat this process, this time using a drop of green gel food coloring.
b. Massage both bags until the coloring is evenly distributed throughout the sugar. The sugar should absorb all of the coloring, and stay quite dry and never get pasty. At any time, you should be able to sift it through a fine-mesh sieve. If you happen to add too much coloring, then add more sugar. Also, remember that the color will "develop" and get a bit darker as it sits. If you tinted the icing sugar at an earlier time and find it has developed into a darker shade than you like, just add more non-tinted icing sugar to make it lighter.
c. The tinted icing sugar is ready.
Step 3: Decorate cookies
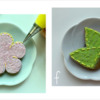
a. Use a large round paint brush to spread pink medium-consistency royal icing all over the bare flower cookie surface. Take care to hide the dough and create some texture at the same time. Spread a thin layer of icing, but make sure it isn't too even.
b. Before the icing dries, use a tea strainer (or fine-mesh sieve) to sift a generous layer of pink sugar onto the wet icing.
c. After a couple of minutes, shake off the excess, unattached sugar. You will notice that only a thin layer of icing sugar has adhered to the royal icing, but it's enough to give the desired woolly look. If there are some spots that are lean on sugar, never mind them; they won’t be noticeable once the icing underneath has dried. Let the icing dry completely.
Repeat Steps 3a to 3c for the double-leaf and rectangular cookies, now using green medium-consistency royal icing and green icing sugar. Make sure to leave a bare (un-iced) strip, about 1 centimeter (3/8 inch) wide, along the lower edge of the leaf. (Refer to the Step 3f photo.) Once this icing is dry, repeat Steps 3a to 3c to decorate the back sides of the flower and double-leaf cookies, using the appropriate (matching) royal icing and icing sugar colors for each piece.
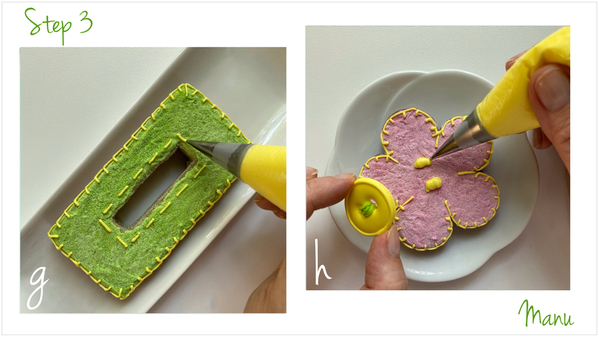
d. Once the icing on the cookie backs is completely dry, use yellow piping-consistency royal icing and a PME #1 tip (or equivalent) to pipe five stitches (thin lines) on the flower cookie where the petals intersect. These stitches help to delineate the petals, while fitting with the felt motif.
e. Use the same icing and tip to pipe little blanket stitches (typically seen on felt crafts) all along the edge of the flower. The easiest way to pipe these stitches is to pipe a series of "L"s, or vertical and horizontal dashes. You can proceed left to right, or vice versa - your choice!
Once the icing is dry, repeat Steps 3d to 3e to add the same details to the back side of the flower cookie.
f. Now, on to the double-leaf cookie. Using the same yellow icing and pastry tip, pipe simple dashes to outline and differentiate the two leaves. Once the icing is dry, repeat this step to add the same details to the back side of this cookie.
g. And last, on to the rectangular cookie. Again using the same yellow icing and tip, pipe blanket stitches all around the outer edge, and simple dash-type stitches along the inner edge. Let the icing dry completely.
h. Attach a yellow button transfer (again, prepared following Steps 3a to 3c of my previous tutorial) to the center of the flower cookie, using the yellow icing as "glue". Let the icing set; then turn over the cookie, and attach the second button to the other side.
Step 4: Assemble cookies
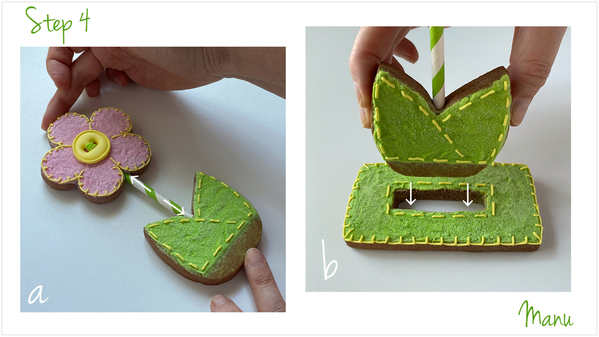
Now that all of the cookies are ready, cut one of the two paper straws in half to about 10.5 centimeters (4 1/8 inches) in length. We're ready to assemble the cookies into a 3-D form!
a. Insert one end of the half-straw into the bottom of the flower where the hole was created in Step 1b. Insert the other end into the hole in the top of the double-leaf cookie.
b. Insert the bare (un-iced) bottom edge of the leaf cookie into the slot in the rectangular cookie.
Our 3-D felt flower cookie is ready!
And, as always, If you have made it to this point and are interested in more floral-themed project tutorials, here’s a list with links to my past Cookie Connection tutorials that feature flowers. I've also included my "Felt Technique" tutorial at the end for good measure!
- Made by Manu (April 2017): Embroidery Hoop Cookie
- Made by Manu (February 2018): Walking Toward Spring
- Made by Manu (June 2018): Royal Icing Water Lily and Lily Pad Transfers
- Made by Manu (July 2018): Wet-on-Wet Sunflower Cookie
- Made by Manu (August 2018): Wet-on-Wet Poppy Cookies
- Made by Manu (April 2019): Orchid Cookies for Mum
- Made by Manu (July 2019): Wet-on-Wet Frangipani Cookies
- Made by Manu (April 2020): Tropical Arrangement Cookie Platter
- Made by Manu (August 2020): Wafer Paper Daisy Wreath Cookie
- Made by Manu (January 2019): A Warm Hug for a (Cookie) Mug (aka Felt Technique)
Happy cookie-ing!
Ciao,
🍃🌸Manu🌸🍃

Manuela Pezzopane, affectionately called Manu by her friends and family, is a fan of everything handmade, and professes to have tried every possible hobby. However, it wasn’t until the end of 2014, when an American friend invited her to a Christmas cookie exchange, that she first discovered decorated cookies. In 2015, after watching Julia M. Usher's videos and signing up on Cookie Connection, Manu finally attempted her own. Since then, cookie decorating has become Manu’s passion. You can follow Manu on Facebook and Instagram, or email her at manubiscottidecorati@gmail.com.
Photo and cookie credits: Manuela Pezzopane
Note: Made by Manu is a Cookie Connection blog feature written by Manuela Pezzopane, where each month she shares the method behind a magical cookie of her own making. This article expresses the views of the author, and not necessarily those of this site, its owners, its administrators, or its employees. To read all of Manuela's past Made by Manu tutorials, click here. And to see all of Cookie Connection's tutorials, click here.









Comments (16)