 This month, I've got a Christmas version of my tutorial from a couple of years ago, which, as you may recall, was a cookie platter that became a surprise 3-D lantern just by stacking the cookies. In the previous project, the cookies were all of the same size and stayed in place even without “gluing” them together with icing. In this project, two sides of the lantern have cookies that are the same shape as those in my Christmas tree cookie platter of last year. However, I chose to connect the cookies using paper straw segments before stacking them, to make the lantern less prone to collapse. This is my fourth tutorial using straws to aid construction. They are light yet sturdy; they don’t bend easily; they are easy to cut; they cut nicely through raw cookie dough without misshaping it (as the excess dough gets pushed into the straw); they can be securely fit into cookies without using icing “glue”; and, last but not least, their stripes and colors are an added decorative element.
- Cookie dough of your choice
- Rolling pin
- 1 (6-cm/2 3/8-in) star cookie cutter (or see my templates in "Attachments" under "Files" at the end of this post)
- Tree part templates (again, in "Attachments" at the end of this post; dimensions are also listed in Steps 1a and 1c)
- Sharp paring knife, for hand-cutting dough
- 4 paper straws
- Scissors
- Microplane tool or zester (optional)
- Royal icing:
- White, yellow, and red piping-consistency, in pastry bags with PME #1 tips or equivalents
- Green, red, and yellow flooding-consistency, in tip-less pastry bags with openings equivalent to Wilton #3 tip
- Red thick piping-consistency, in pastry bag with PME #42 tip or equivalent
- Graph paper (optional)
- Ruler
- Scribe tool
- About 3 LED tealights
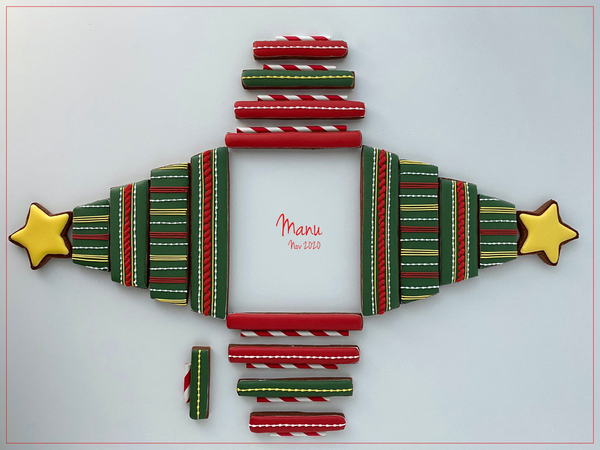
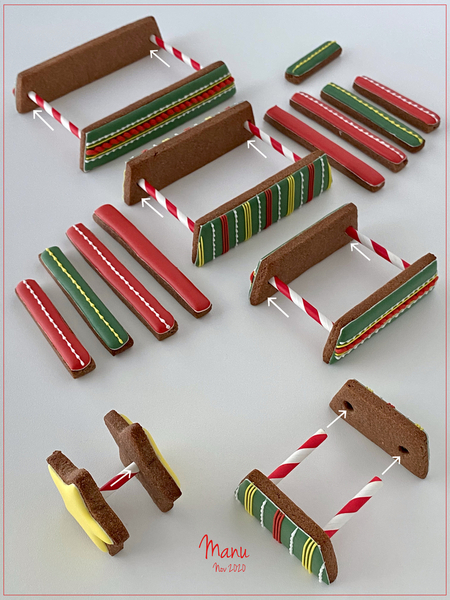
To see where we’re headed, here’s a visual overview of all the decorated cookies and straw segments that will be needed for the lantern.
Step 1: Cut and bake cookies
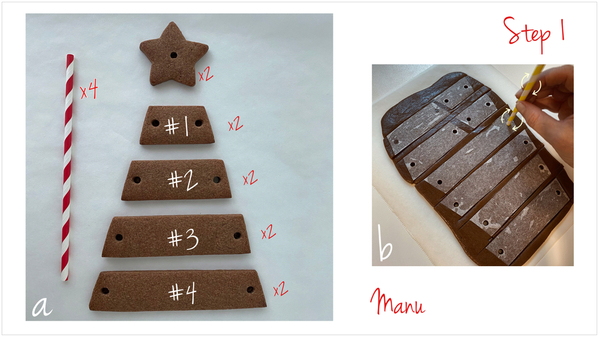
a. Roll your dough to a thickness of at least 0.6 centimeter (1/4 inch). Using my templates and a sharp paring knife, cut out a total of 19 cookies, following the "Cookie Notes" directly below and "More Cookie Notes" in Step 1c. (Again, see "Attachments" at the end of this post for my templates.) Then bake the cookies as directed in your recipe, and let them cool completely.
- 2 (6-cm/2 3/8-in) star cookies
- 2 top tree parts (#1): 4.5 + 6.2 x 3 cm or 1 3/4 + 2 1/2 x 1 3/16 in
- 2 middle tree parts (#2): 8 + 9.5 x 3 cm or 3 1/8 + 3 3/4 x 1 3/16 in
- 2 large middle tree parts (#3): 11 + 12.5 x 3 cm or 4 3/8 + 4 7/8 x 1 3/16 in
- 2 base tree parts (#4): 13.4 + 15 x 3 cm or 5 1/4 + 5 7/8 x 1 3/16 in
- 1 (3.5-cm/1 5/16-in) segment
- 2 (5-cm/2-in) segments
- 2 (6.5-cm/2 1/2-in) segments
- 2 (8-cm /3 1/8-in) segments
- 2 (10-cm/4-in) segments
b. Tip: Use a paper straw to cut out the holes by plunging it perpendicularly into the dough and rotating it. To avoid misshaping the cookies, don't remove the excess dough from around the cookies until the holes have been cut.
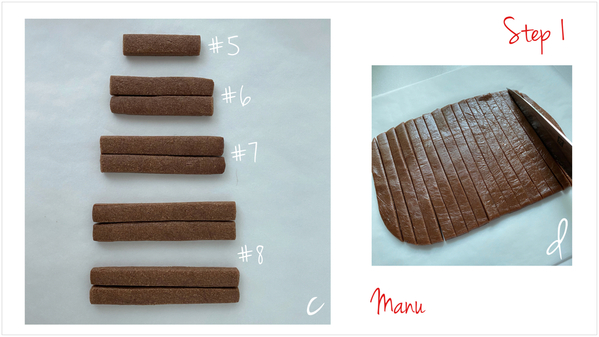
- 1 (1 x 6-cm/3/8 x 2 3/8-in) rectangle (#5)
- 2 (1 x 8-cm/3/8 x 3 1/8-in) rectangles (#6)
- 2 (1 x 10-cm/3/8 x 4-in) rectangles (#7)
- 4 (1 x 12-cm/3/8 x 4 3/4-in) rectangles (#8)
d. Tip: Use a sharp paring knife to cut the refrigerated dough into long, thin (1 x 12-cm/3/8 x 4 3/4-in) sticks. Put the dough in the fridge again. When the sticks are firm enough to handle without misshaping, transfer them onto a baking sheet, and bake according to your recipe. Once they are out of the oven and still warm, chop them to the lengths indicated in Step 1c. Let the sticks cool down completely, and file them with a Microplane tool or zester, if needed.
Step 2: Outline and flood cookies, and decorate cookie sticks
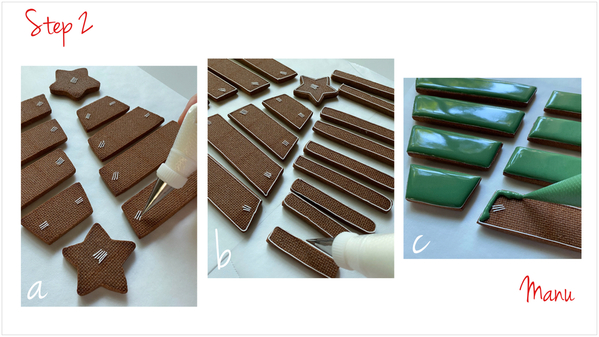
a. I prefer to decorate the flatter back side of these cookies. So flip over the two cookie stars and the eight trapezoidal tree parts. Cover all of the holes in the cookies by piping parallel lines of white piping-consistency royal icing with a PME #1 tip (or equivalent). These lines will block the holes and prevent them from filling with icing when flooded in Step 2c. They will also prevent the paper straws from sticking through the cookies and showing from the front in the final construction.
b. Now outline all 19 cookies, again using white piping-consistency royal icing and a PME #1 tip (or equivalent).
c. Using green flooding-consistency royal icing and a Wilton #3 tip (or equivalent), flood the eight trapezoidal tree parts, and let the icing dry completely.
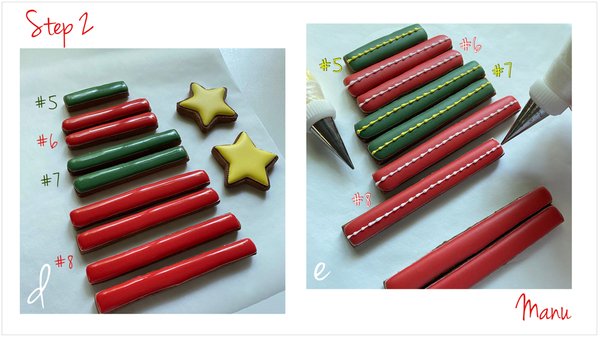
d. Keep using green flooding-consistency royal icing, and flood the #5 cookie stick and both #7 cookie sticks. Flood the remaining cookie sticks with red flooding-consistency royal icing and a Wilton #3 tip (or equivalent). Flood the two cookie stars using yellow flooding-consistency royal icing and, once again, a Wilton #3 tip (or equivalent). Let the icing dry completely.
e. Using yellow piping-consistency royal icing and a PME #1 tip (or equivalent), pipe trailing beaded borders* along the imaginary lines that run lengthwise through the middle of the green #5 cookie stick and the two green #7 cookie sticks. Now using white piping-consistency royal icing and a PME #1 tip (or equivalent), pipe a similar trailing beaded border on the two red #6 cookie sticks and on two of the four #8 cookie sticks. Keep the other two red cookie sticks plain.
*Note: For more information about piping a trailing beaded border, see Step 4a in my previous hand warmer tutorial.
Step 3: Decorate trapezoidal tree parts #1 and #3
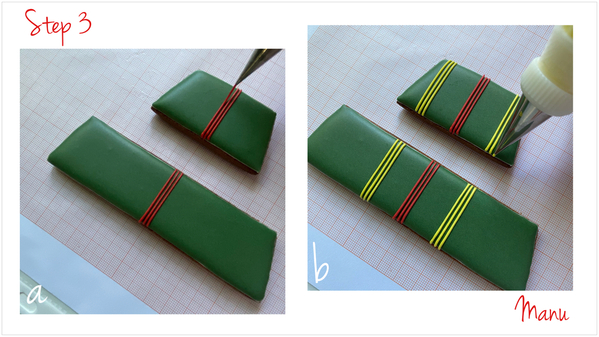
a. Place one set of trapezoidal tree parts #1 and #3 on top of graph paper. The lines on the paper are great guides for piping straight lines. Using red piping-consistency royal icing and a PME #1 tip (or equivalent), pipe a line crosswise through the middle of each cookie. Then pipe two parallel lines, one on each side of the center line on each cookie.
b. Now, using yellow piping-consistency royal icing and a PME #1 tip (or equivalent), pipe a trio of yellow lines on each side of the trios of red lines just piped in Step 3a. Pipe them about 1.5 centimeters (5/8 inch) away from the center red trio.
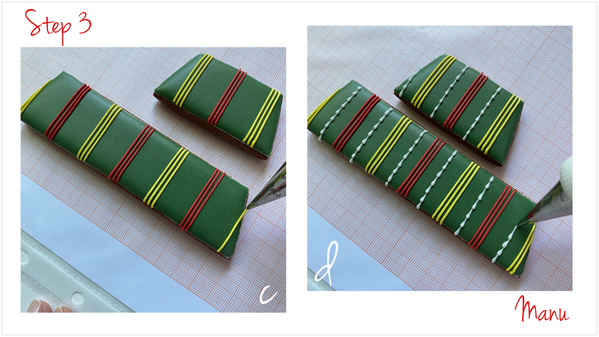
c. Keep piping trios of yellow lines on the larger #3 cookie, alternating red and yellow royal icing until you reach the edges of the cookie.
d. Using white piping-consistency royal icing and a PME #1 tip (or equivalent), pipe a trailing beaded border in the middle of each open section on both cookies.
Repeat Steps 3a to 3d for the other set of tree parts #1 and #3.
Step 4: Decorate trapezoidal tree parts #2 and #4
a. Using a ruler and a scribe tool, score a line lengthwise through the middle of both trapezoidal tree parts #2 and #4. These lines will serve as piping guides in the next step.
b. Use red thick piping-consistency royal icing and a PME #42 tip (or equivalent) to pipe a rope border* along the scored lines on each tree part.
* Note: For more information about piping rope borders, check out this @SweetAmbs' tutorial.
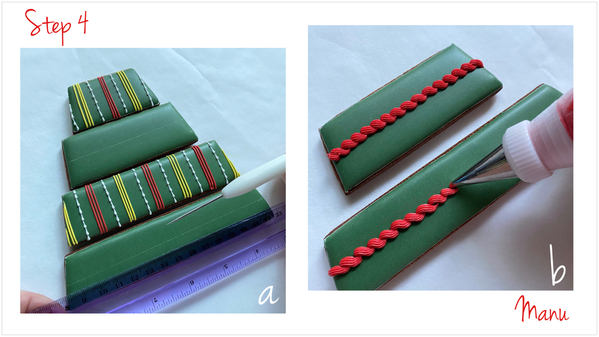
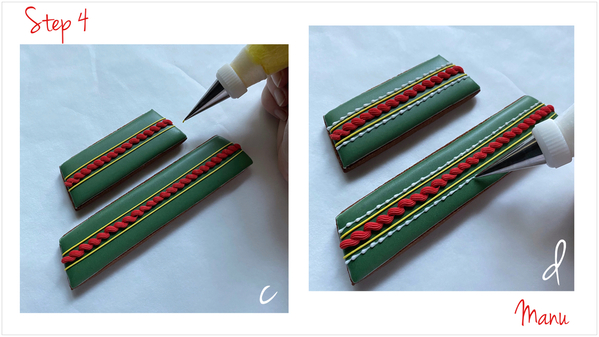
c. Pipe a line on each side of each rope border using yellow piping-consistency royal icing and a PME #1 tip (or equivalent).
d. Pipe a trailing beaded border next to each yellow line on both cookies using white piping-consistency royal icing and a PME #1 tip (or equivalent).
Repeat Steps 4a to 4d for the other set of tree parts #2 and #4.
Step 5: Assemble cookies into lantern
Group the stars and like-size trapezoidal tree parts in pairs, and connect each pair with straw segments as shown below. Use the two largest straw segments to connect the largest (#4) trapezoidal pair, and successively smaller segments to connect the three remaining smaller trapezoidal pairs. Use the solo (3.5-cm/1 5/16-in) segment to connect the stars.
Place the LED tealights in the center of a plate, and set two of the four red #8 cookie sticks (those without a beaded border) parallel to one another on opposing sides of the plate. Their flooded surfaces should be facing up. Next, create a second layer by setting the connected #4 tree parts on top of the ends of the #8 cookie sticks.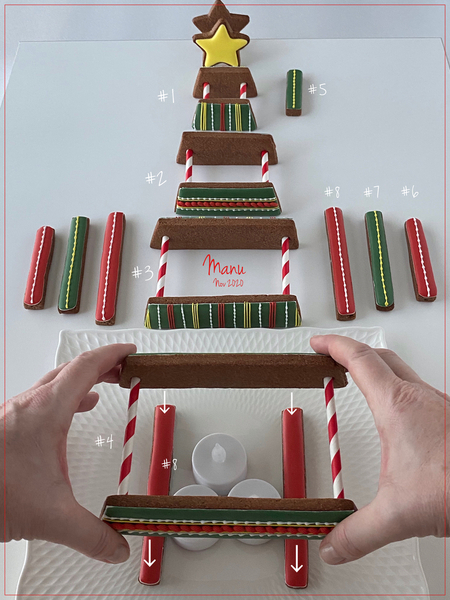
Continue building in this fashion, alternating pairs of cookie sticks (decorated sides now facing out) and connected trapezoidal tree parts, until you are left with the one #5 cookie stick and the two connected stars. Place the #5 cookie stick across the top middle of the structure (decorated side facing up).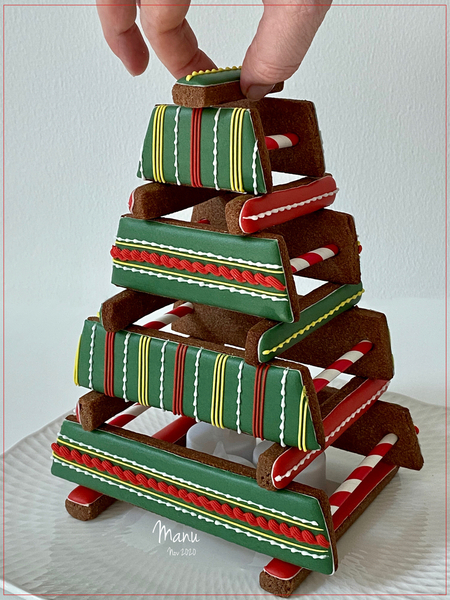
And last, place the connected stars on top of the #5 cookie stick! Ta da! 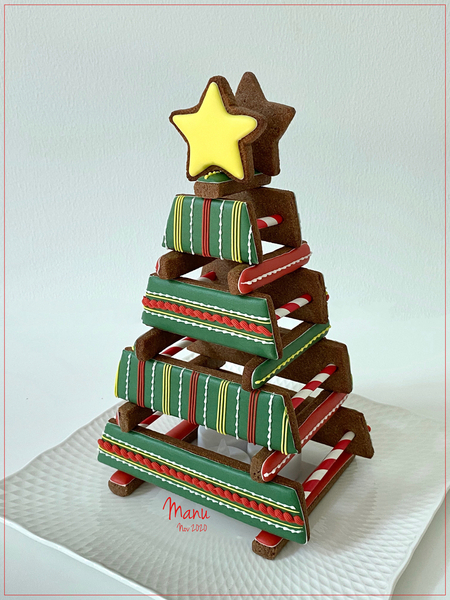
Note: Thanks to the straws, the structure is very stable, with the exception of the connected stars that are balanced on top. So, if you need to move the structure, just be sure to take off the stars first. Or "glue" them in place with royal icing, and let the icing fully set.
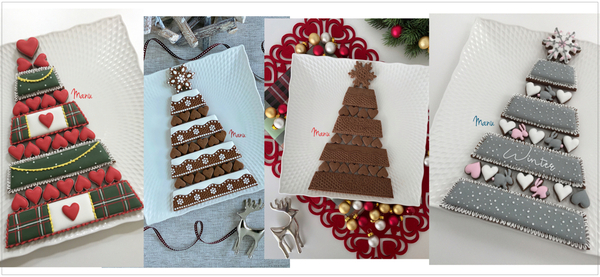
So, that is how two Christmas cookie platters like the one on the left below become a cookie lantern!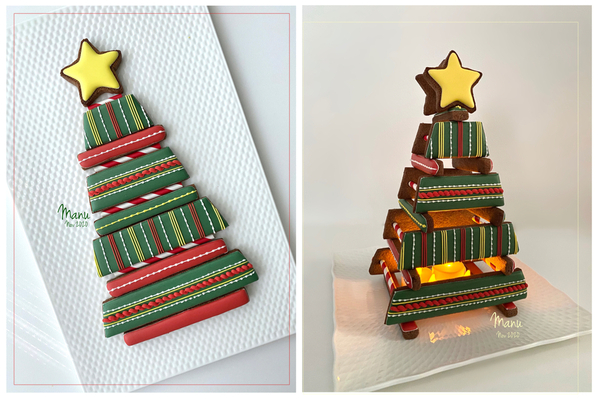
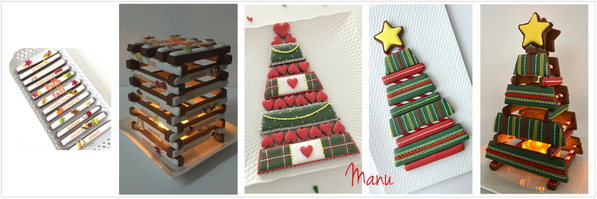
For more inspiration, here are examples of other Christmas tree platters from my past tutorials that use similar trapezoidal shapes. (Note: The embossed cookie technique used in the center two platters was inspired by @Julia M. Usher.)
- Made by Manu (November 2017): A Christmas Tree of Cookie Cards
- Made by Manu (November 2018): 3-D Christmas Tree Cookie 2018
- Made by Manu (November 2019): Christmas Cookie Platter 2019
Happy cookie-ing this holiday season!
Manu ❤️🎄

Manuela Pezzopane, affectionately called Manu by her friends and family, is a fan of everything handmade, and professes to have tried every possible hobby. However, it wasn’t until the end of 2014, when an American friend invited her to a Christmas cookie exchange, that she first discovered decorated cookies. In 2015, after watching Julia M. Usher's videos and signing up on Cookie Connection, Manu finally attempted her own. Since then, cookie decorating has become Manu’s passion. You can follow Manu on Facebook and Instagram, or email her at manubiscottidecorati@gmail.com.
Photo and cookie credits: Manuela Pezzopane
Note: Made by Manu is a Cookie Connection blog feature written by Manuela Pezzopane, where each month she shares the method behind a magical cookie of her own making. This article expresses the views of the author, and not necessarily those of this site, its owners, its administrators, or its employees. To read all of Manuela's past Made by Manu tutorials, click here. And to see all of Cookie Connection's tutorials, click here.



Comments (18)