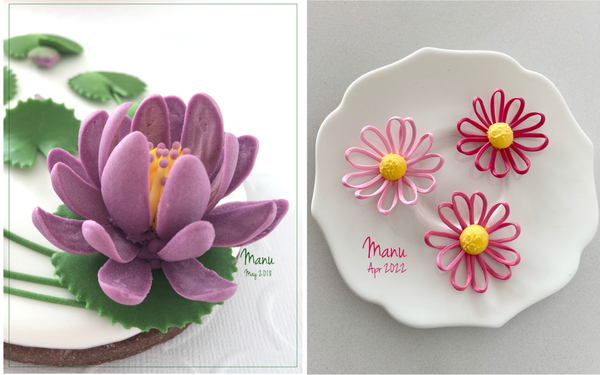
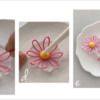
 My mother recently installed some lattices on her terrace and, with that image in mind, I immediately envisioned a Mother’s Day cookie project: a lattice cookie decorated with royal icing flower transfers. The transfers for this project are a variation of the lily transfers (pictured below left) that I made a few years back for this June 2018 Cookie Connection tutorial.
I rated this tutorial "intermediate" because of the flowers and their assembly, but don’t let this classification intimidate you! Give it a go anyway - there's nothing to lose! Or if you like the lattice concept and just want to try that, you can always stack simpler flower cookies or fondant flowers on the cookie instead.
As you may know if you've been following my tutorials for any time, I like to design using hand-cut cookies made with common household tools. This way, anyone anywhere can follow my cookie tutorials without investing in specialty items. But this time, I am actually using a tool: a huge round cookie cutter normally used to make lattice pie crust tops, which is perfect for the purposes of this tutorial. You can also cut lattice pieces from dough using a lattice roller cutter. I've linked to both tools in the list below, so that you have a couple of options. Alternatively, you can cut a lattice with a single diamond cookie cutter, used repeatedly in an array. Or you can weave strips of cookie dough, which is surely a labor of love.
** Disclosure: I have not been sponsored by any of the brands listed below or used in this tutorial .**
- Cookie dough of your choice
- Rolling pin
- Lattice dough cutter or lattice roller cutter
- Parchment paper
- Paring knife
- Royal icing for lattice cookie:
- White piping-consistency, in pastry bag with PME #1 tip (or equivalent)
- White flood-consistency, in tipless pastry bag
- Petal templates (See "Files" in "Attachments" at the end of this post.)
- Royal icing for flower transfers:
- Pink (or shades of pink) piping-consistency, in pastry bag with PME #25 tip (or equivalent)
- Green piping-consistency, in pastry bag with PME #25 tip (or equivalent)
- Yellow piping-consistency, in pastry bag with PME #1 tip (or equivalent)
- Yellow royal icing dots for flower centers (Please refer to Steps 1c and 1d of my past wreath tutorial.)
- Scribe tool
Step 1: Cut and bake cookie
I used the large round cutter in this tutorial. If you use the roller cutter instead, head directly to Step 1e after making the lattice.
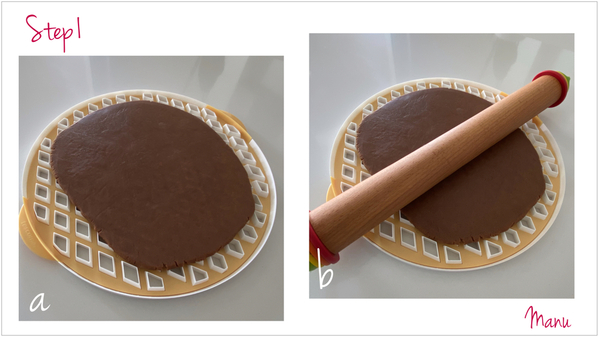
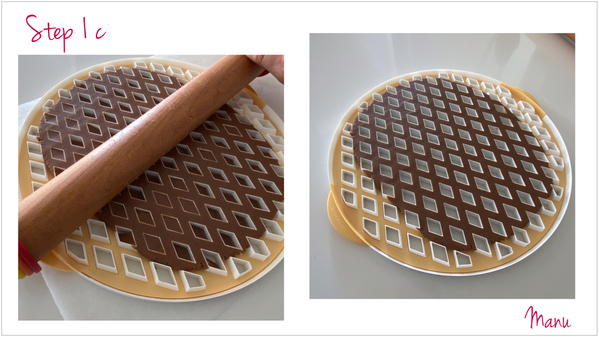
a. Roll your chilled cookie dough of choice to a thickness of about 0.6 centimeter (1/4 inch), and place it over the lattice cutter. (Position the cutter with its cutting edges facing up.)
b. Press the dough into the cutter using your rolling pin.
c. Keep rolling until the little diamond cutouts fall through the cutter, and you only have the the lattice remaining on top.
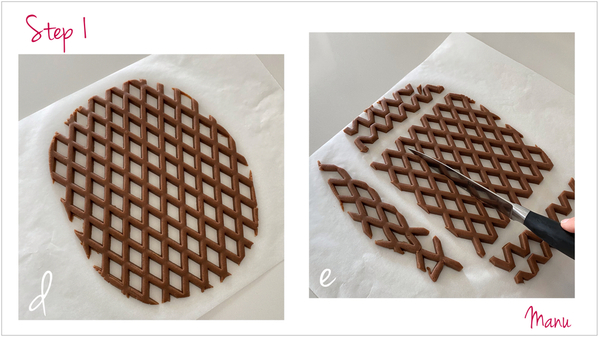
d. Place a piece of parchment paper over the dough, and invert the cutter and dough onto the paper. Remove the cutter from the dough. (The dough should easily drop from the cutter. If not, chill it longer, and try again.)
e. Use a paring knife to cut out a smaller lattice measuring about 18 x 5 centimeters (7 x 2 inches). This cookie is quite large, but it has holes so it counts as a regular cookie, doesn’t it? ![]() You can cut it into two smaller rectangles if you prefer. (Refer to the photo at the end of this post to see that outcome.)
You can cut it into two smaller rectangles if you prefer. (Refer to the photo at the end of this post to see that outcome.)
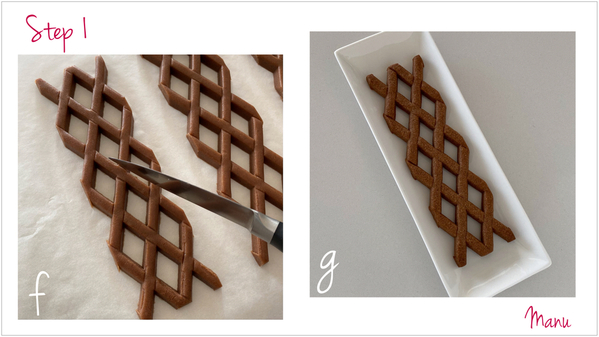
f. To highlight the intersections between lattice strips, use the spine (back) of the paring knife blade to imprint the dough, as shown below. The aim is to create a piping guide for Step 2, where the cookie will be outlined and flooded to give the impression that the strips cross over and under each other.
g. Bake the cookie as directed in your recipe, and let it cool completely.
Step 2: Decorate cookies
a. Using white piping-consistency royal icing and a PME tip #1 (or equivalent), outline all of the lattice strips that are leaning to the upper right, stopping and starting at the lines you imprinted in Step 1f.
b. Now, outline all of the remaining strips leaning to the upper left. Almost magically, a classic criss-cross pattern will appear quite clearly!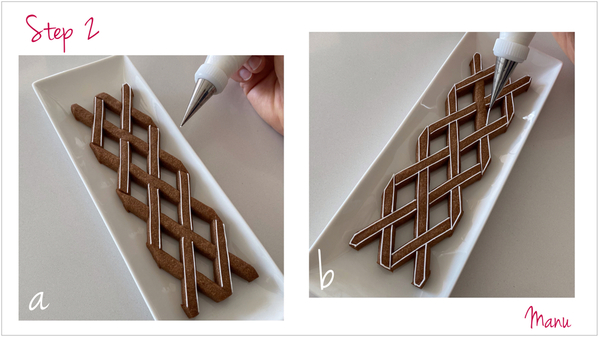
c. Use white flood-consistency royal icing and a PME #2 tip (or equivalent) to flood all of the right-leaning sections. Let the icing crust in front of a fan heater for a few minutes. Allowing some drying time will ensure that the strips remain distinct after flooding the remainder of them in the next step.
d. Now, flood the remaining strips, and let the icing dry completely.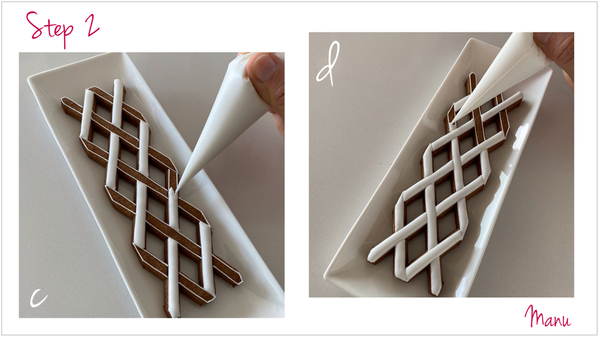
Step 3: Create flower transfers
As I mentioned at the start of this post, the concept behind the flower transfers is based on my past royal icing water lily tutorial. For this variation, the flower petals will simply be outlined and not flooded. The flowers will also be comprised of one layer of petals rather than the three layers in the water lily tutorial.
For the flower centers, please see Steps 1c and 1d of my past wreath tutorial, and prepare some yellow dots.
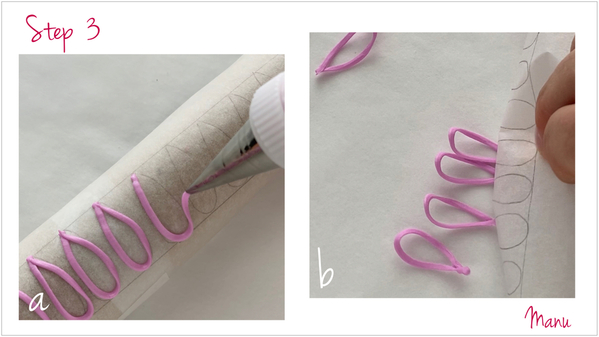
Download the petal templates (again, in "Files" under "Attachments" at the end of this post), and trace them on parchment paper. Cover a rolling pin with the traced parchment paper, but flip it over, so that the pencil markings face the rolling pin. (Otherwise, the pencil markings will transfer on to the royal icing petal outlines, and we don't want that!)
a. Using pink piping-consistency royal icing and a PME #25 tip (or equivalent), outline one petal at a time. Each petal measures about 2.0 x 0.6 centimeters (3/4 x 1/4 inch). Dry the petals by placing the rolling pin in front of a fan heater for 10 minutes. Or let them air-dry longer.
b. Carefully remove the parchment paper from the rolling pin, or nudge the transfers off the parchment paper while leaving the paper on the pin. The transfers should pop off the parchment paper quite easily once they are completely dry. That being said, be careful! It's best to remove the petals over a soft towel to avoid breakage.
c. Pipe a dot of piping-consistency royal icing over a piece of parchment paper. The color of this icing doesn't much matter, though I prefer to match it to the petal color so it is less likely to show in the final construction. Attach a series of petals (anywhere from 8 to 10 or more) to this icing by inserting the pointed end of each petal into the icing.
d. Once all of the petals have been attached, pipe one last dot of piping-consistency royal icing in the center of the flower, and set a dry yellow royal icing dot (prepared in advance) on top. When the royal icing is completely dry, the flower will pop easily from the parchment paper. These flowers are very fragile, so handle them with care!
e. Repeat Steps 2a to 2d to make as many flowers as you want. Be sure to make some spare pieces in cake of breakage. I used three shades of pink to create an ombré selection of flowers.
Here’s a compilation of videos that I made last summer (2021) when I developed this petal variation. In it, you'll find many different flower styles and colors for inspiration.
Step 4: Create bud and stem transfers
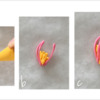
a. Using a PME #1 tip (or equivalent), pipe a squiggle of yellow piping-consistency royal icing onto parchment paper. The idea is to create a frilly flower center, using my image below as guidance.
b. While the yellow icing is still wet, place two petals on the sides, with the curve facing inward to enclose the yellow center. Make sure the narrow ends of the petals make good contact with the yellow icing. Gently push the ends into the icing (and closer together) with the tip of a scribe tool.
c . Add another petal at the middle top.
d. Add more petals to the bud, attaching them with the pink or yellow piping-consistency icing, until you are satisfied with the bud's size and shape.
e. Use green piping-consistency royal icing and a PME #25 tip (or equivalent) to pipe little segments of icing at the base of the bud (the sepals). Once the icing is dry, the bud will pop right off the parchment paper.
Repeat Steps 4a to 4e to make as many buds as you like.
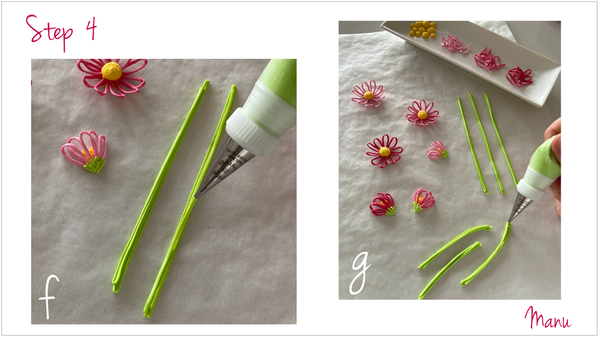
f. Keep using the same green icing to pipe three long stems measuring about 12.5 centimeters (5 inches) in length. Pipe more lines (about four or five) along each length. Reinforcing with more lines will create sturdy stem transfers that can be easily handled without breakage.
g. Pipe three more stems, just as you did in Step 4f, but this time shorter and curved. They should measure around 9 centimeters (3 1/2 inches) in length. Let the icing dry completely before starting the assembly process in the next step.
Step 4: Assemble cookies
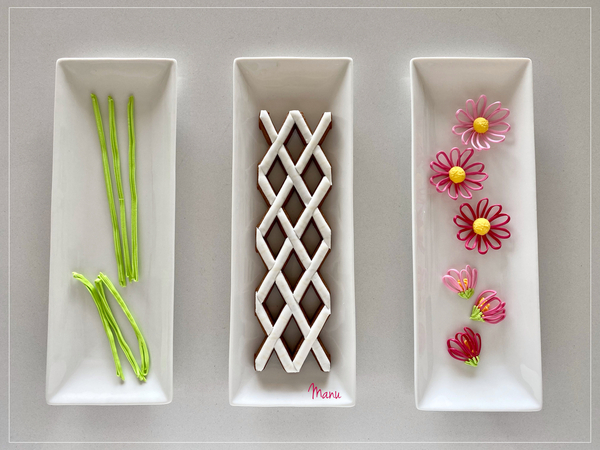
Now that the trellis and flower parts are made, it's time to "glue" the flowers, stems, and buds on the cookie with white piping-consistency royal icing.
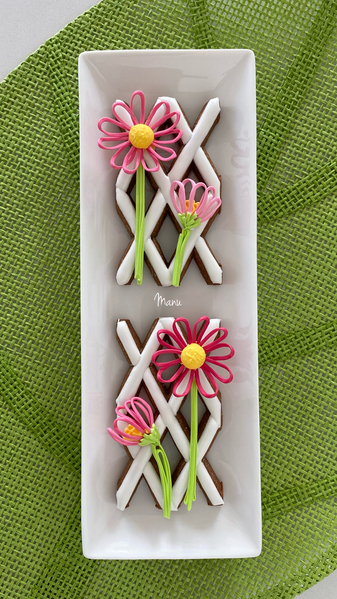
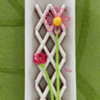
I kept this cookie very simple by using only one flower and one bud transfer . . .
Here’s a variation with two smaller cookies, about half the size of the one pictured above. I displayed the flower transfers in the same way, though I broke the stems to make them a bit shorter. This size is my favorite.
If you like lattice cookies and you need more inspiration for Mother’s Day, make sure to check out this video by @Julia M. Usher featuring a lattice with climbing clematis! [EDITOR'S NOTE: Thanks so much for the shout-out, Manu. My inspiration for the clematis flower came from your water lily tutorial! ~JMU]
And that’s all for this month 🌸
Ciao, Manu

Manuela Pezzopane, affectionately called Manu by her friends and family, is a fan of everything handmade, and professes to have tried every possible hobby. However, it wasn’t until the end of 2014, when an American friend invited her to a Christmas cookie exchange, that she first discovered decorated cookies. In 2015, after watching Julia M. Usher's videos and signing up on Cookie Connection, Manu finally attempted her own. Since then, cookie decorating has become Manu’s passion. You can follow Manu on Facebook and Instagram, or email her at manubiscottidecorati@gmail.com.
Photo and cookie credits: Manuela Pezzopane
Note: Made by Manu is a Cookie Connection blog feature written by Manuela Pezzopane, where each month she shares the method behind a magical cookie of her own making. This article expresses the views of the author, and not necessarily those of this site, its owners, its administrators, or its employees. To read all of Manuela's past Made by Manu tutorials, click here. And to see all of Cookie Connection's tutorials, click here.









Comments (17)