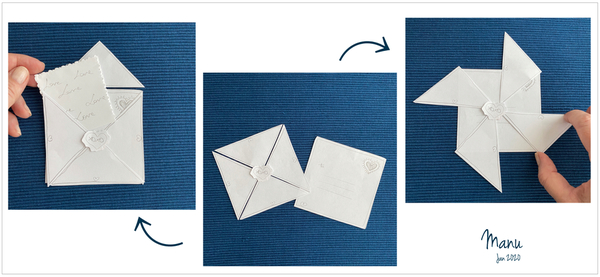
 The idea for this project was sparked by an ad on Instagram promoting stamps to make real wax seals. I initially wanted to make an entire wax seal cookie, but I instead ended up using royal icing to make seal transfers to go on larger envelope cookies. For the envelope design, I chose a square comprised of four small triangles (perfectly sized for teatime) for the envelope back, and a single large square for the front (to later receive a royal icing postage stamp). Since I like to experiment with cookie platters and styling variations, it didn't take me long to realize that I could also get a pinwheel just by rotating the triangles atop the large square. And . . . after playing around with my paper prototype some more, I ended up with yet another variation: an open envelope where a wafer paper note can be slipped into the top. So, you've got three styling options with the same five cookies! What's not to love about that?!
Let’s get started!
- Cookie dough of choice
- 1 (9.5-cm/3 3/4-in) square cookie cutter (I used one from this six-cutter PME set.)
- Sharp paring knife (for hand-cutting cookies)
- Royal icing:
- Piping-consistency white, in pastry bag with PME #1 tip or equivalent
- Flooding-consistency white, in tip-less pastry bag with opening equivalent to PME #3 tip
- Medium-consistency red, in pastry bag with PME #1 and #3 tips or equivalents
- Piping-consistency light grey, in pastry bag with PME #1 tip or equivalent (to pipe lines for address, optional)
- Scribe tool or equivalent
- Parchment paper (for heart stencil), or small (2 x 2-cm/3/4 x 3/4-in) heart stencil
- Small sugarcraft knife, craft paper punch, or scissors (for cutting stencil, as needed)
- Acetate (for royal icing transfers)
- Offset spatula
- Black food marker (to write lines for address instead of light grey icing, optional)
Step 1: Cut and bake cookies
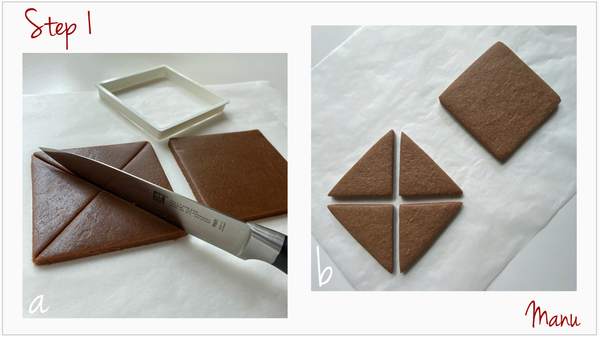
This project is composed of two square cookies, one of which is divided into four equal triangles. Once baked and decorated, the five cookies can be displayed in three different ways, as noted previously.
a. Roll your cookie dough to your preferred thickness. (I've rolled mine to about 0.5 centimeter, or 3/16 inch.) Use the (9.5-cm/3 3/4-in) square cookie cutter to cut out two square cookies. Using a paring knife, cut one of the two squares along both diagonals to get four identical isosceles triangles. Bake all five cookies according to your recipe's instructions.
b. Let the cookies cool completely before decorating them.
Step 2: Decorate cookies
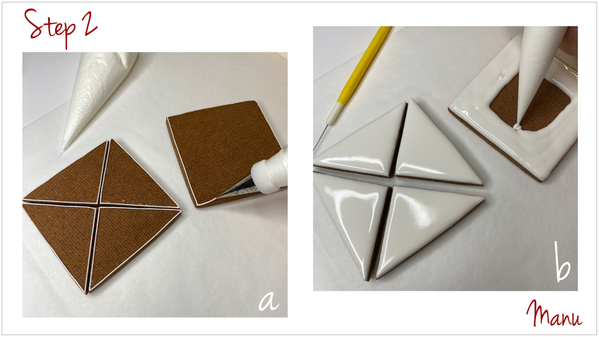
a. Use white piping-consistency royal icing and a PME #1 tip (or equivalent) to outline all five cookies. Try to outline the cookies as close to the edges as you can.
b. Flood all of the cookies using white flooding-consistency royal icing and a PME #3 tip (or equivalent). Use the scribe tool, as needed, to coax the icing into the sharp angles. Let the icing air-dry for about 8 hours, or use a fan or dehydrator to speed up the process.
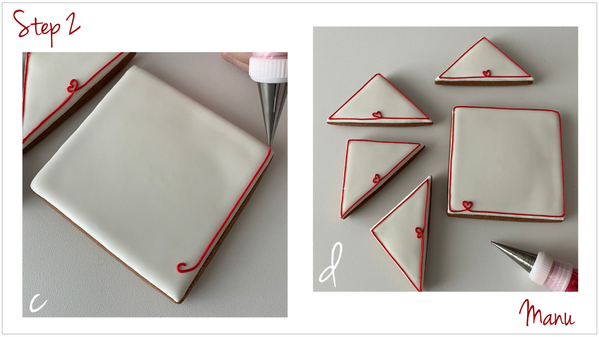
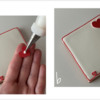
c. Once the icing is dry, use red medium-consistency royal icing and the equivalent of a PME #1 tip to outline the square cookie. Create a little heart, within the outline, close to the bottom left corner. Start by piping a half-heart in the lower left; then, without releasing pressure on the pastry bag, keep piping all around the edge until you get back to your starting point. Continue piping, again without releasing pressure, to close out the other half of the heart.
d. Now outline all four triangle cookies, creating a similar small heart in the middle of each long side.
Step 3: Create royal icing "wax seal" transfers
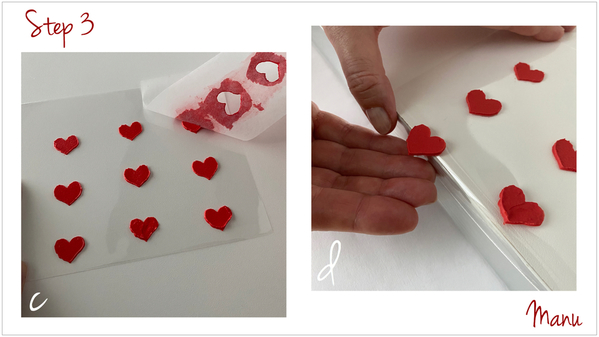
a. Prepare a parchment paper stencil by tracing and cutting out three (2 x 2-cm/3/4 x 3/4-in) hearts in the center of the paper. (To cut the hearts, I used a sharp sugarcraft knife, but you could also use a craft punch or scissors. If you plan to make many transfers, consider using thicker, reusable acetate rather than parchment paper. Alternatively, use an existing heart stencil.)
Lay a piece of acetate on your work surface, and place the parchment paper stencil over the acetate. Pipe some red medium-consistency royal icing on the back of an offset spatula.
b. Spread a thick (at least 2-mm/1/16-in) layer of icing over the stencil. Never mind if the top layer is uneven, because the flat underside of the heart will be upright in the final design. The aim, first and foremost, is to get a thick transfer, not a smooth, thin one. (Note: I used the same stencil three times to make nine hearts. While you only need two hearts for this project, it's always a good idea to make some extras in the event of breakage, as transfers can be quite delicate! Again, if you're going to make many transfers, or this project again and again, consider making a more durable stencil using acetate and a craft punch.)
c. Now remove the stencil, and let the royal icing heart transfers dry completely.
d. Once the transfers are completely dry, it is time to remove them from the acetate. To avoid breakage, place a transfer near the edge of your work surface, and gently peel away the acetate from underneath. The transfer will drop into your hand. If the acetate does not easily peel away from the icing, then the icing is not completely dry. In that case, allow a little more drying time. Repeat this step to remove all of the transfers from the acetate.
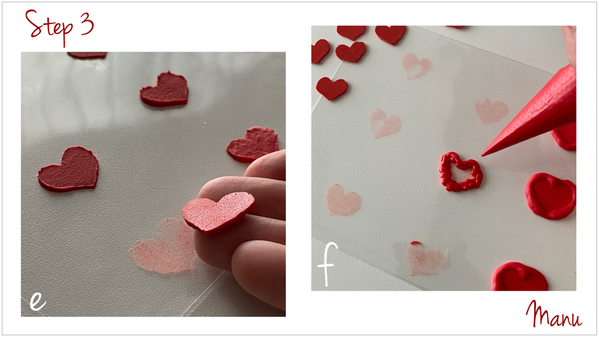
e. When you flip over the transfers, you will notice that the sides that were attached to the acetate are flat and glossy (although the latter doesn’t show well in the picture.) As noted earlier, it is this flat, glossy side that will face up in Step 3g. Have your transfers close by, glossy side up, and ready to call into action before you start piping in the next step.
f. You will also notice that the transfers have left heart-shaped "footprints" or "shadows" on the acetate. Using red medium-consistency royal icing and a PME #3 tip (or equivalent), pipe roughly and generously around the edge of one of the heart-shaped shadows. There’s no need to fill in the center. (Note: This icing "ring" will be the royal icing-equivalent of a puddle of wax, ready for the stamp.)
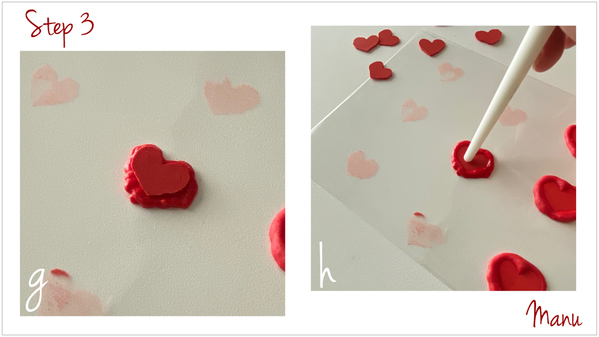
g. Now gently place a heart transfer, flat side up, on top of the icing you just piped in Step 3f.
h. Carefully push the transfer into the icing. Use your finger or the soft gummy end of a scribe tool (or both)! You need to be patient, and make sure to apply even, but gentle pressure across the entire surface of the transfer. Remember that, although relatively thick for a transfer, the heart is still quite fragile and could easily crack. In the end, you'll have a beautiful flat heart surface embossed in the icing, just as if it had been left by a real stamp!
Repeat Steps 3f through 3h to make as many heart-shaped seals as your heart desires! (Just be sure to reserve one flat heart transfer for use in Step 4a.)
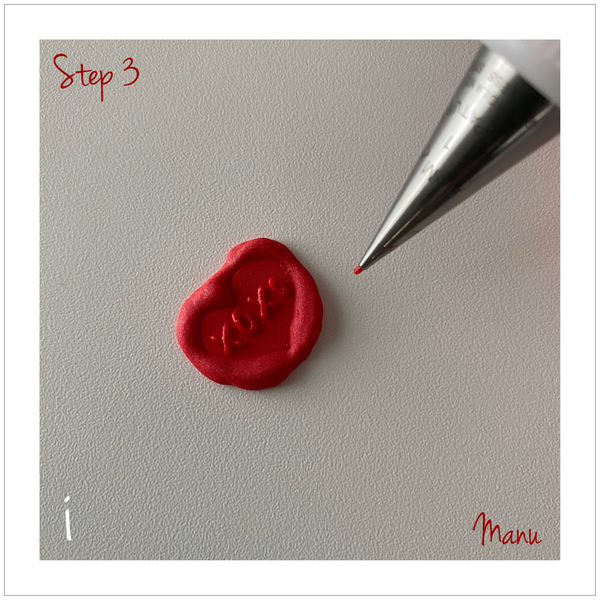
i. Now, using red medium-consistency royal icing and a PME #1 tip (or equivalent), pipe some lettering on the flat heart-shaped part(s) of your seal(s). I piped “XOXO” below, and many more messages after that!
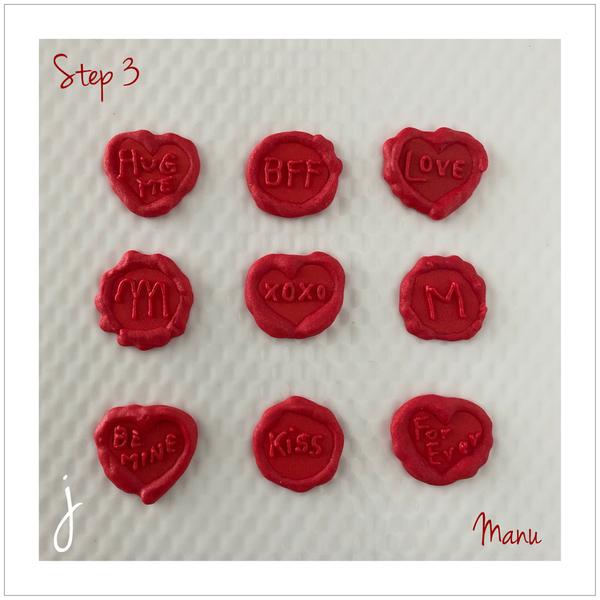
j. I also experimented by making some circular seals. (Aside: By this point, the transfers will be two layers thick and quite sturdy. You could even use them to seal real envelopes, or a box of cookies, by attaching them with double-sided sticky tape!)
Step 4: Create postage stamp, and add final details to envelopes
a. Use white piping-consistency royal icing and a PME #1 tip (or equivalent) to glue one of the heart transfers to the upper right corner of the square cookie.
b. With the same icing and tip, pipe a dotted border around the heart to resemble the jagged edge of a stamp.
c. Use light grey piping-consistency royal icing and a PME #1 tip (or equivalent) to pipe a few lines in the center of the square for the recipient's address. If you don't want to pipe the lines, you can instead draw them with a black food marker.
c. Arrange the four triangular cookies from Step 2D into a square (to resemble the back of a love letter) as depicted below. Choose a royal icing seal, and place it in the center of the four cookies. (I typically don't glue down the seal, to ensure that the cookies can be easily separated for eating. However, whether you glue or don't glue is completely up to you.)
All "sealed" now, and ready to go!
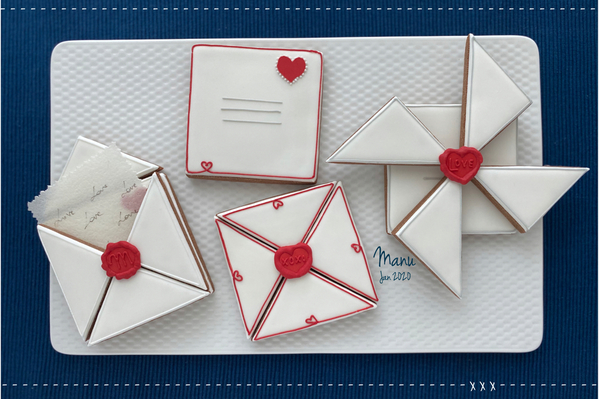
Although I initially liked the idea of the red outline with the little heart for the back of the envelope, I found it a bit redundant with the front of the envelope once I assembled the four cookies. So I did another variation of the project with a more simple grey outline on the back, as well as an open envelope with a wafer paper message and round seal.
I think the red outlining works especially well when the cookie composition takes the shape of a pinwheel - sort of a Valentine's Day-meets-nautical vibe!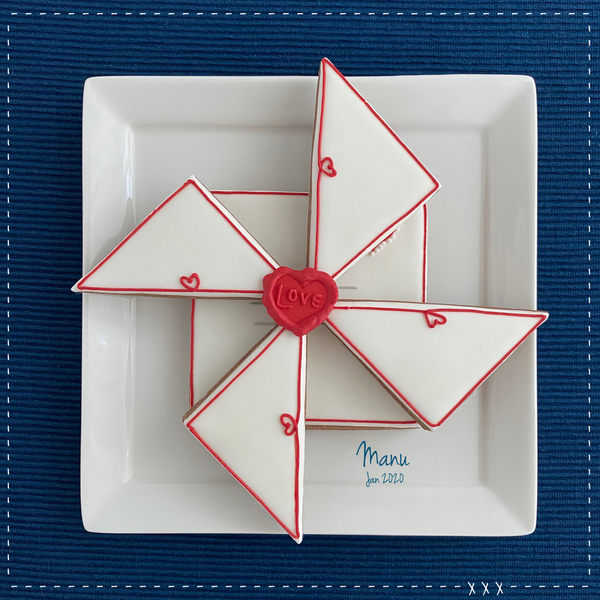
And, last but not least, a recap of all three compositions, all in one place!
Love, Manu 💌


Photo and cookie credits: Manuela Pezzopane
Note: Made by Manu is a Cookie Connection blog feature written by Manuela Pezzopane, where each month she shares the method behind a magical cookie of her own making. This article expresses the views of the author, and not necessarily those of this site, its owners, its administrators, or its employees. To read all of Manuela's past Made by Manu tutorials, click here. And to see all of Cookie Connection's tutorials, click here.










Comments (25)