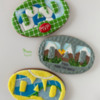
 While digging in my memories for inspiration, hiking came up as the theme for this Father's Day cookie tutorial. I envisioned a landscape in the morning at the beginning of a hike, surrounded by a rock . . . something like a frame or a window in the shape of the word "DAD". Eventually, I added the message “You are my rock” to arrive at the final design we'll create together below. But the themes and possibilities for personalizing this cookie are really endless.
- Landscape and Dad Templates (See "Files" in "Attachments" at the end of this post.)
- Parchment paper
- Paper towels
- Scribe tool (or equivalent)
- 1 (16.5 x 11-cm/6 1/2 x 4 1/4-in) oval cookie, preferably made of dark dough (I used the third largest cutter in this nesting set of six cutters.)
- Tea strainer or fine-mesh sieve
- Icing sugar, aka confectioner's or powdered sugar (one spoonful)
- Royal icing:
- White and grey piping-consistencies, in pastry bags with PME #1 tips (or equivalents)
- Light blue, brown, light green, yellow, and white thick flooding-consistencies, in pastry bags with PME #2 tips (or equivalents; I used tip-less bags)
- Green flooding-consistency (to paint details on trees)
- Grey flooding-consistency, in pastry bag with PME #2 tip (or equivalent; I used a tip-less bag)
- Paint brushes: liner, flat, and round
- Brown, forest green, white, and yellow gel food coloring
- Alcohol, i.e., vodka or grain alcohol (to dilute above colorings)
- Black food marker
- Scissors or small cutting knife (i.e., X-Acto knife)
- Acetate (to practice piping letters)
Step 1: Transfer landscape template onto cookie
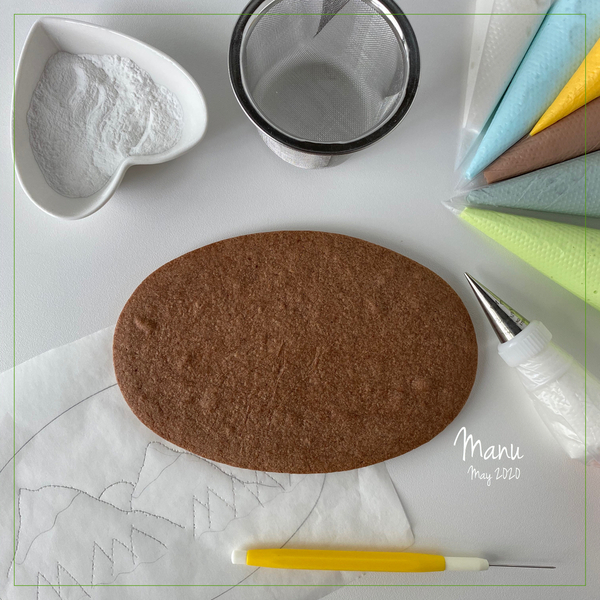
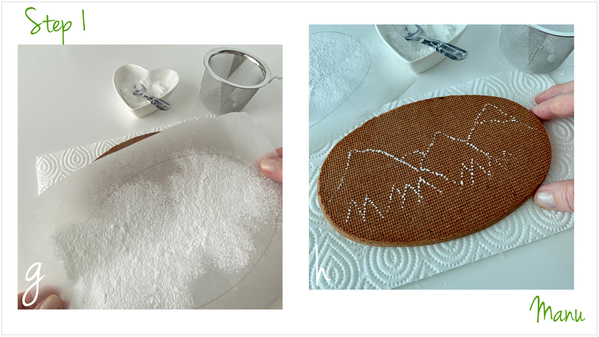
Here’s a photo recap of what you’ll need for Step 1 (with the exception of the icings, which come into play in later steps). The landscape template will be transferred onto a dark cookie using the pouncing technique and icing sugar. (For additional pouncing technique details, see my “Wet-on-Wet Frangipani” tutorial, July 2019.)
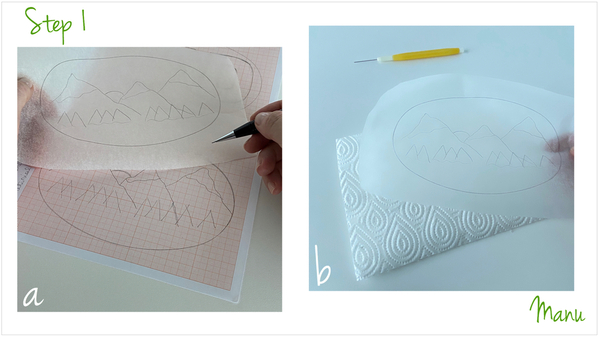
a. Trace the landscape template onto parchment paper. (Again, the template is in "Attachments" at the very end of this post.)
b. Place the parchment paper over some paper towels, and have your scribe tool ready. The soft layer of paper towels between the parchment and your work surface will “ease” the point of the scribe through the parchment paper as you prick the design in Steps 1c and 1d.
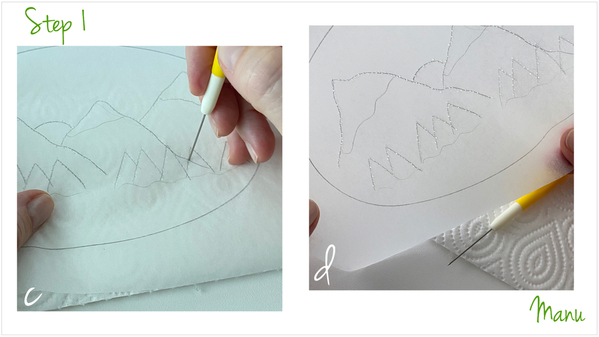
c/d. Now, take the scribe tool, and prick (or pounce) holes through the design. The pricking will be very quick, but make sure to prick all of the lines in the design. I forgot the snow on two of the mountains, but only realized that in the next step!
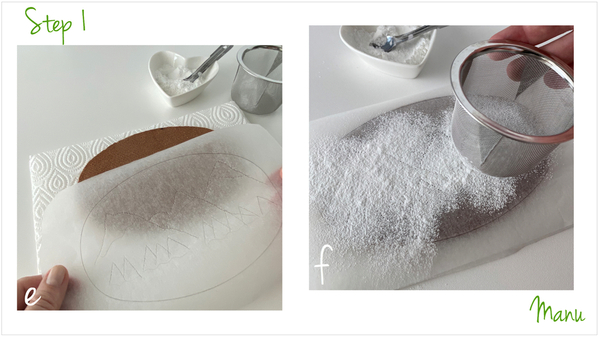
e. Lay the pricked template on your cookie, taking care to center the pricked design.
f. Use a tea strainer or fine-mesh sieve to sift the icing sugar over the parchment paper. Cover the entire pricked design.
g. Lift the parchment paper directly up and off the cookie, taking care not to drop any icing sugar remaining on the top of the paper onto the cookie.
h. The icing sugar will have passed through the holes in the pricked template, leaving a "transferred" outline of the design on the cookie.
Step 2: Trace design, and flood cookie
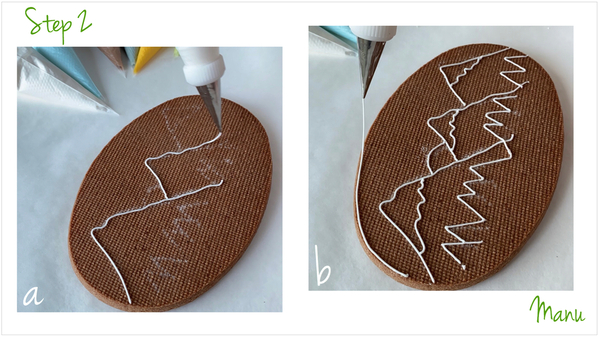
a. Tap the cookie to remove any excess sugar, and you will be left with a faint, but clear outline. Use white piping-consistency royal icing and a PME #1 tip (or equivalent ) to outline (or trace) the sugar guide on the cookie.
b. Outline the perimeter of the cookie using the same icing and tip.
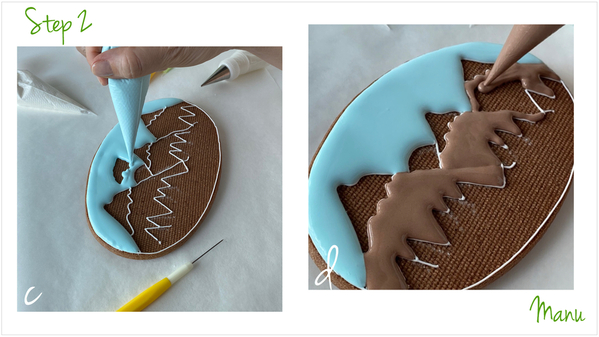
c. Now, using all of the different colors of thick flooding-consistency royal icing and a PME #2 tip (or equivalent), fill in each section of the piped design, starting first with light blue for the sky.
d. Next, move on to the brown for the mountains. Note: You could wait for the icing in each section to set before piping the next section, so that each section stays distinct. Or you could apply each icing immediately after the prior one using the wet-by-wet approach. This way, the icing in each section will merge with that in the adjacent area. Or you can use both effects.
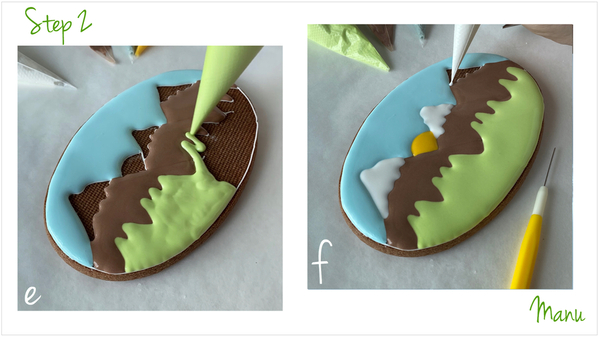
e. Flood the bottom part with the light green royal icing.
f. And last, use yellow royal icing for the sun, and white for the snow. Now that all of the sections have been filled, let the icing dry completely (at least 8 hours) before moving to the next step. (Alternatively, use a food dehydrator or fan to accelerate the drying process.)
Step 3: Paint and pipe details
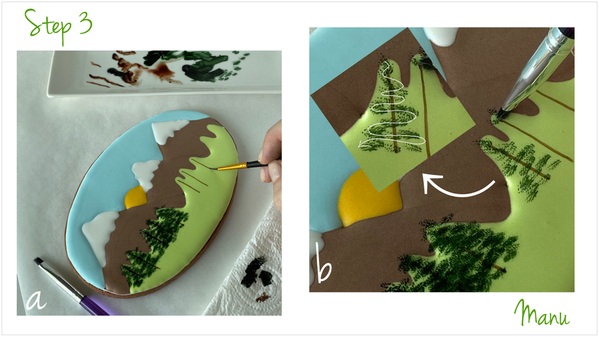
a. Use a liner paint brush and brown gel food coloring diluted with alcohol to paint 10 tree trunks. Start at the top of each of the 10 green “peaks” on the design, and move down toward the bottom of the cookie about 3 centimeters (1 1/4 inches).
b. Return to the first tree trunk, and use a flat paint brush and diluted forest green gel food coloring to paint a sort of spiral that gets larger as you move down the trunk. Repeat until you've covered most of the light green royal icing under the tree. Then, repeat this step to paint nine more trees, one on each of the remaining trunks.
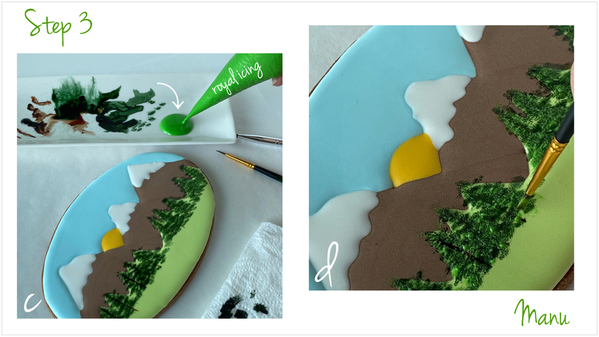
c/d. Pipe some green flooding-consistency royal icing on a tray, and use it, along with the liner brush, to paint dot-like highlights all over the trees. These little dots of color add texture and also create the sense of new, light green growth emerging on the otherwise dark trees.
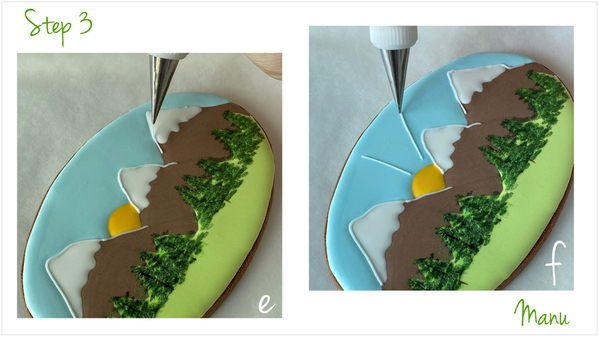
e. Use white piping-consistency royal icing and a PME #1 tip (or equivalent) to outline the snowy peaks.
f. Using the same icing and tip, pipe some rays for the sun. Note: Pipe four rays rather than three as I did, so the middle one doesn't get covered under the rocky frame in Steps 4 and 5.
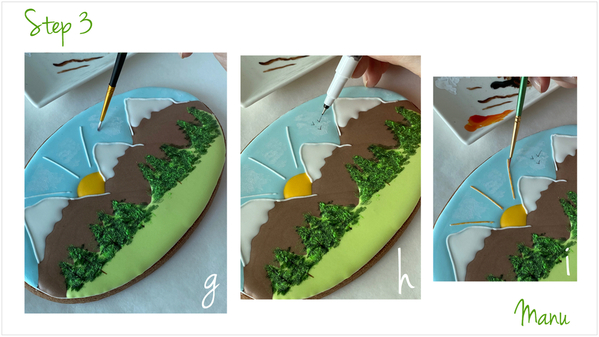
g. Use diluted white gel food coloring to paint some clouds for added interest in the sky.
h. Use a black food marker to draw some birds, which will give even more depth to the sky. I drew three simple “V”s to the left of the rightmost peak (where they'll be exposed after the rocky frame is added in Steps 4 and 5).
i. And, last, use diluted yellow gel food coloring to paint the sun rays.
Step 4: Score and pipe "DAD"
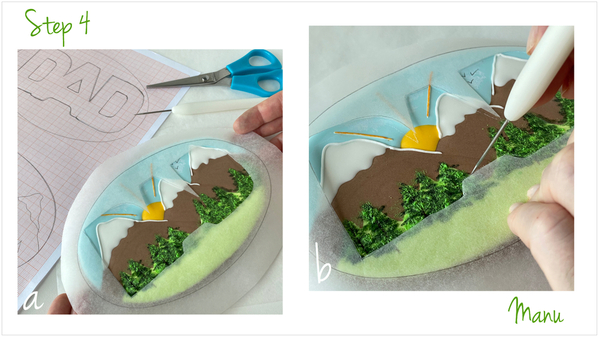
a. Using the "DAD" template (again, in "Attachments" at the end of this post), trace the word “DAD” and the cookie outline on parchment paper. Cut out "DAD", and place the remaining stencil (what's left after "DAD" is removed) on top of the cookie. Take care to align the traced cookie outline on the paper with the actual cookie edge. (Also cut out the openings in the "D"s and "A", and set aside these pieces for use in Step 4d.)
b. Use the scribe tool to score the outline of "DAD" into the cookie. That scored marking will be your piping guide in the next step.
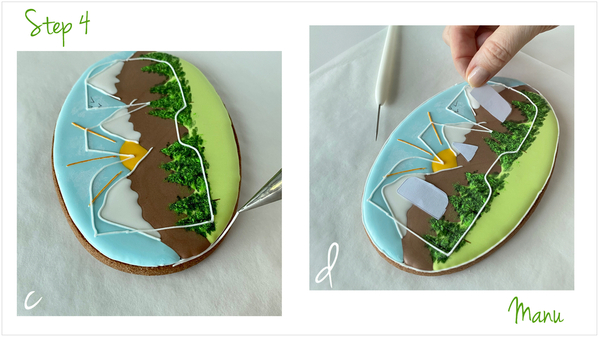
c. Use white piping-consistency royal icing and a PME tip #1 (or equivalent) to trace over the scored mark around "DAD". Also outline the perimeter of the cookie.
d. Place the letter cutouts set aside in Step 4a in their appropriate spots on the cookie, within the outlined "DAD".
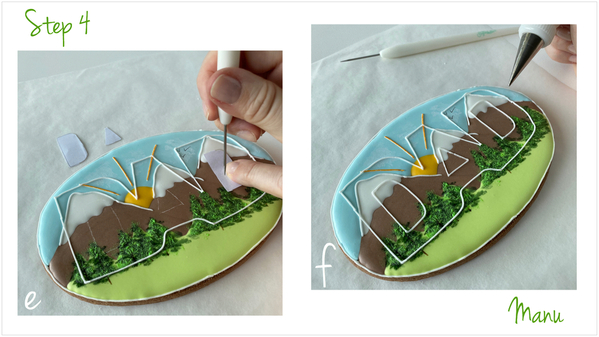
e. Again, use the scribe tool to score around the cutouts to create piping guides.
f. Pipe over the scored guides with the same white piping-consistency royal icing and tip used in Step 4c.
Step 5: Flood frame and add rock effect
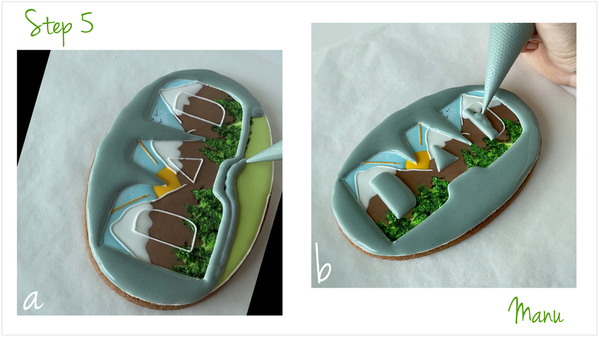
a. Use grey flooding-consistency royal icing and a PME #2 tip (or equivalent) to flood the "frame" (outlined area) you just created in Step 4.
b. Flood the “holes” in each letter too. Let the icing set a few minutes, until it gets a thin crust that can be easily cracked. Tip: Pipe a small outline on parchment paper, and then flood it. You can use this icing as a test to see how long it takes to get crusty, yet still easily cracked. Drying time will depend on ambient humidity and the exact icing consistency to start.
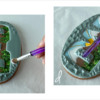
c. Now, on to the rock effect! Use a round paint brush to crack the crusty surface. You don’t need to apply too much pressure; the icing should easily crack. Keep cracking the entire gray flooded area EXCEPT for the central bottom part, as we are going to pipe a message over it.
d. Use the handle-end of the paint brush to crack each letter “hole”. (I flip the brush to crack these areas, as the smaller handle-end is easier to fit into these tight spaces.) Let the icing dry completely. Note: I first learned about this technique from Aixa Zunino, aka @Dolce Sentire - Aixa Zunino. Check out her tutorial here on Cookie Connection.
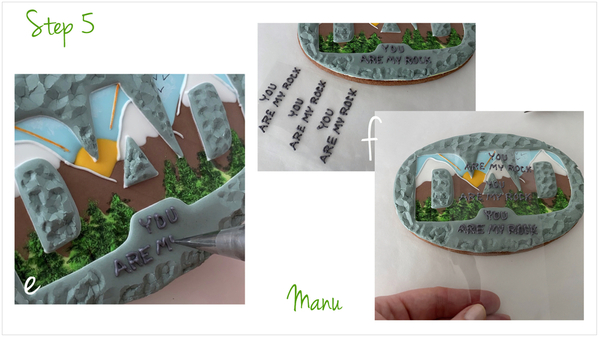
e. Use grey piping-consistency royal icing and a PME #1 tip (or equivalent) to pipe the message “You are my rock” on the bottom, flat gray area.
f. Tip: I am not good at letter piping, but practice makes perfect! I used a piece of acetate and placed it over the cookie to practice piping, and I piped that sentence several times. By doing so, I learned exactly how to space the letters and fill the space. So when it came time to pipe on the actual surface of the cookie, I could do it even blind!
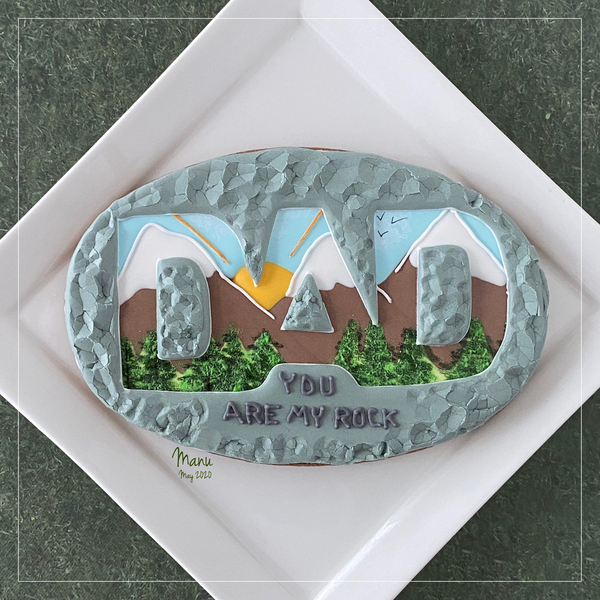
And here’s the finished cookie!
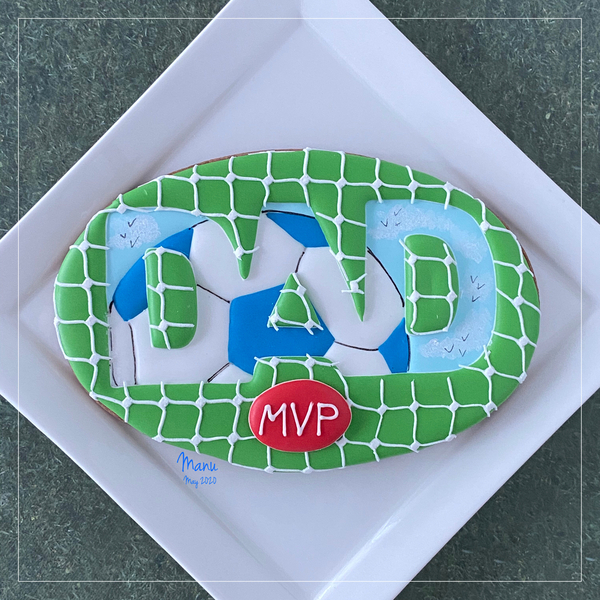
Of course, you can apply this concept to many other themes. Here’s a soccer-themed variation, because dad is always the most valuable player:
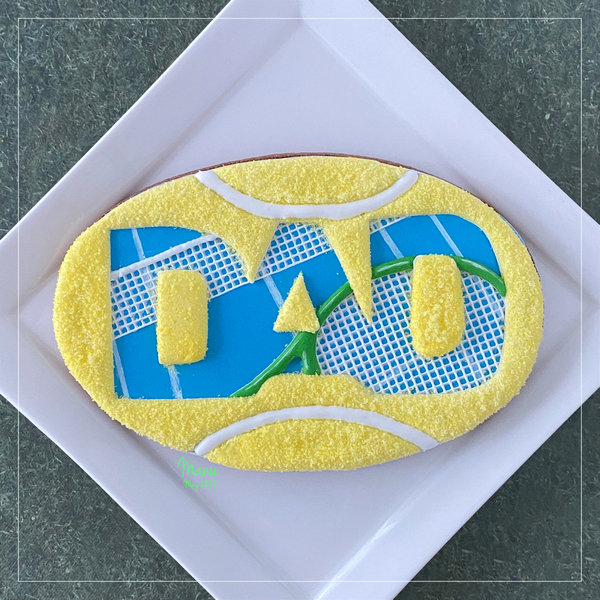
And here’s another one, this time tennis-themed. I know, I should have cut out a round shape for the ball, but if the recipient is a dad who loves tennis, I am sure he will appreciate it anyway.
And if you made it to this point . . . here’s a video recap. Enjoy!
Ciao,
Manu🏔⚽️🎾


Photo and cookie credits: Manuela Pezzopane
Note: Made by Manu is a Cookie Connection blog feature written by Manuela Pezzopane, where each month she shares the method behind a magical cookie of her own making. This article expresses the views of the author, and not necessarily those of this site, its owners, its administrators, or its employees. To read all of Manuela's past Made by Manu tutorials, click here. And to see all of Cookie Connection's tutorials, click here.






Comments (26)