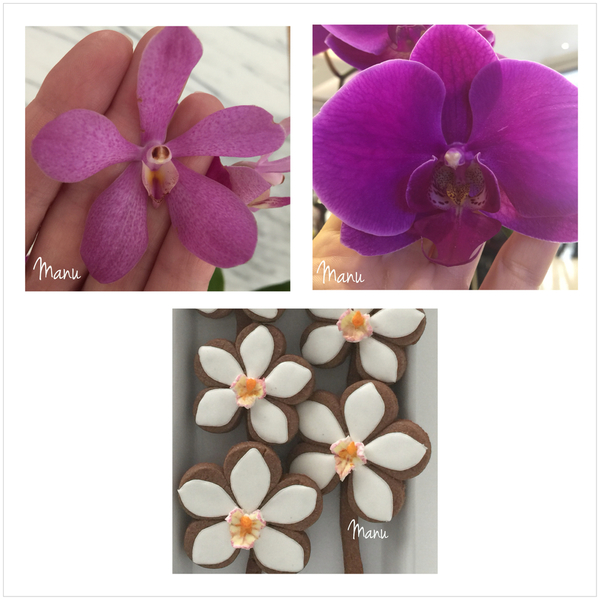
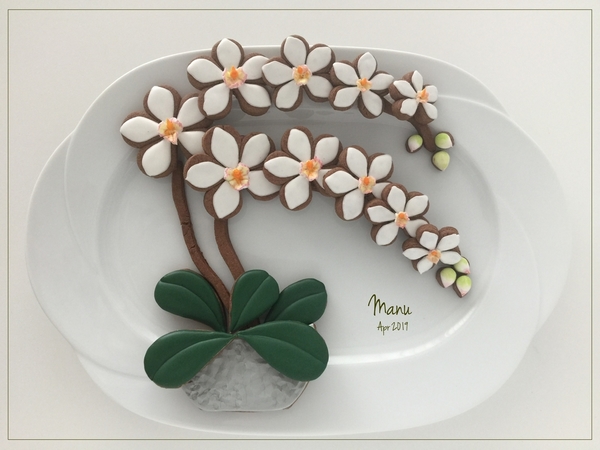
 Upcoming Mother’s Day and orchids are the inspiration for this month's tutorial design. It couldn’t be any other flower, as I am currently living in Thailand where orchids are everywhere, in every color and in every shape. In fact, I used them as a backdrop for my last Easter bunny tutorial, because there isn’t the same rich choice of Easter eggs here!
The regularly shaped petals of the orchid to the left (below) gave me the idea to use my set of five-petal daisy cookie cutters, which happens to be very popular and easy to find worldwide. The cutters in this set come in graduated sizes of the exact same shape, just as orchids do on a branch. I was also drawn to the vibrant color of the orchid to the right (below), and thought it would stand out nicely on a white plate. However, when I tried to recreate the color, it looked pretty dull (maybe because of lack of contrast to my dark cookie dough), so I opted for plain white instead. I also tried to recreate the two large petals on the right orchid, but I didn’t like the look. I ultimately decided to go with a simpler design that's a hybrid of the two orchids. My orchids have regular petals (almost) like the ones to the left, but their centers were inspired by the one to the right.
- Cookie dough of your choice
- 5 (3.5 to 6.5-cm/1 3/8 to 2 1/2-in) five-petal daisy cookie cutters, 2 from this three-piece PME set and 3 from this four-piece PME set (see exact dimensions in Step 1)
- Templates for vase and leaves (see “Attachments” at end of this post)
- Large (8.5 x 9.5-cm/3 3/8 x 3 3/4-in) heart cutter from this six-piece Wilton set (optional for vase as shown in Step 1; you can also hand-cut using my template)
- Assorted (2.5 x 4-cm to 3 x 5.5-cm/1 x 1 5/8-in to 1 1/8 x 2 1/8-in) teardrop cookie cutters (optional for leaves; again, you can also hand-cut using my templates)
- Sugarcraft knife or equivalent
- Royal icing and pastry tips:
- White piping-consistency with PME #1 and #2 tips or equivalents
- Grey flooding-consistency with PME #2 tip or equivalent
- Green flooding-consistency with PME #2 tip or equivalent
- White thin flooding-consistency with PME #2 tip or equivalent
- White thick piping-consistency with Wilton #67 and #65 leaf tips or equivalents
- Paint brushes (round, fine, liner)
- Scribe tool
- Pale yellow, hot pink, egg yellow, and green food coloring
- Alcohol (i.e., vodka or Everclear) to dilute food coloring
Step 1: Roll, cut, and bake cookies
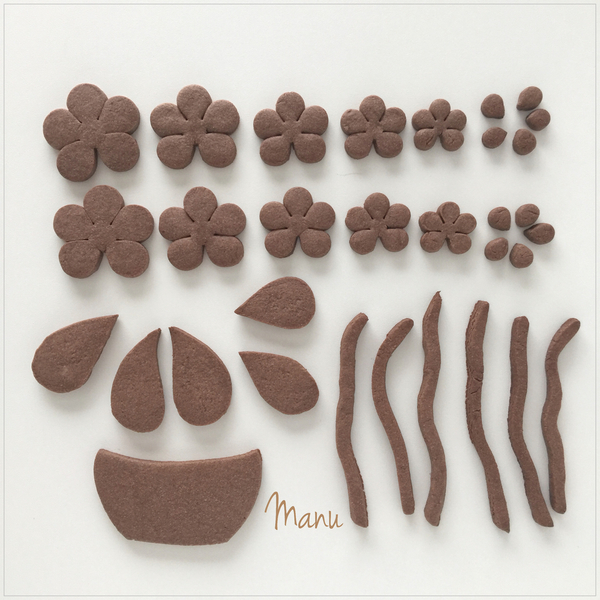
Roll out your favorite cookie dough, and cut out all of the cookies indicated below. I've separated the pieces into two categories: (1) ones I cut with standard cutters and (2) others I hand-cut with my templates. Though, again, some of the hand-cut pieces (namely the vase and leaves) could be cut with cutters, as suggested in the supplies list and below.
- 12 orchid flowers:
- 2 extra large (6.5-cm/2 1/2-in) daisies, from this 3-piece set
- 2 large (5.7-cm/2 1/4-in), from this 3-piece set
- 2 medium (5-cm/2-in) daisies, from this 4-piece set
- 2 medium-small (4.5-cm/1 3/4-in) daises, from this 4-piece set
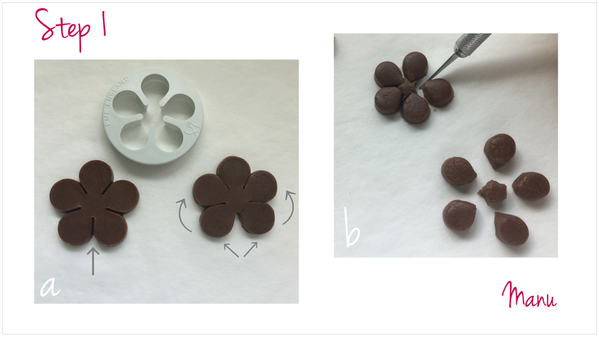
- 4 small (3.5-cm/1 3/8-in) daisies, 2 cut into separate petals (see Step 1b, below), from this 4-piece set
- 5 leaves (Again, use my templates in “Attachments”, or cut using standard teardrop cutters ranging between 2.5 x 4 centimeters to 3 x 5.5 centimeters, or 1 x 1 5/8 inches to 1 1/8 x 2 1/8 inches.)
- 6 or so (12-cm/4 3/4-in) stems (Just cut slender sticks and then misshape them to give them slight bends and curves.)
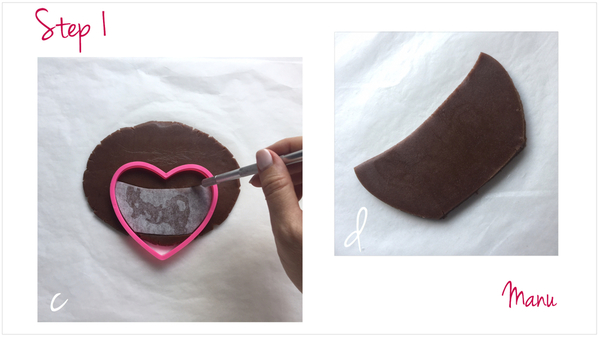
- 1 vase (Again, use either my template or a heart cookie cutter, as shown in Steps 1c and 1d below.)
Additional notes:
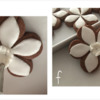
a. I used a standard five-petal daisy cutter, but to make the flowers look more like orchids, push the two bottom petals toward the others to make more room between them.
b. To make orchid buds, cut out the petals of the two smallest daisies (before baking). Either discard or reuse the small pieces of dough left behind in the centers.
c. To "franken-cookie" the vase (aka, shape it from other cutters), use the large (8.5 x 9.5-cm/3 3/8 x 3 3/4-in) heart cookie cutter to cut the top of a heart; then make two parallel curved cuts with a sharp craft knife to form the top and bottom edges of the vase.
d. Alternatively, you can print out my template in "Attachments", place it on top of the rolled dough, and cut around it with the same sharp craft knife. (There are so many ways to do the same thing! I always like to share a couple of options!)
And here's a visual summary of the shapes and sizes you should have, after all the cookies are baked:
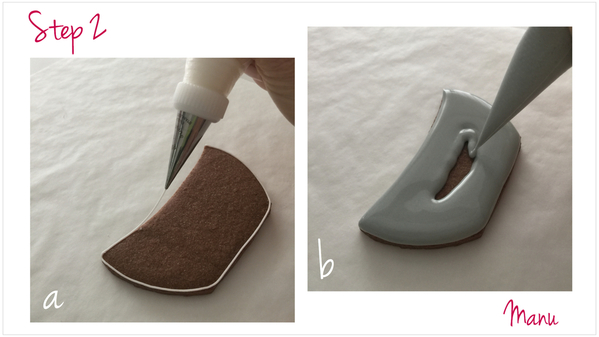
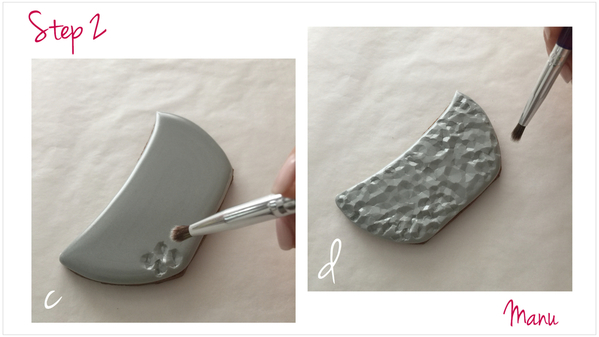
Step 2:Ice and texture vase
a. Outline the vase cookie using white piping-consistency royal icing and a PME #1 tip (or equivalent).
b. Flood the cookie using grey flooding-consistency royal icing and a PME #2 tip (or equivalent). Let the icing set for a few minutes, just until a thin crust has formed that can easily be cracked.
c. Now, crack the icing by repeatedly pushing the soft round brush-end of a paint brush into the surface.
d. Keep cracking the surface in this manner until you have textured the entire cookie. (I first learned about this technique from Aixa Zunino, aka @Dolce Sentire - Aixa Zunino, in her tutorial here on Cookie Connection.)
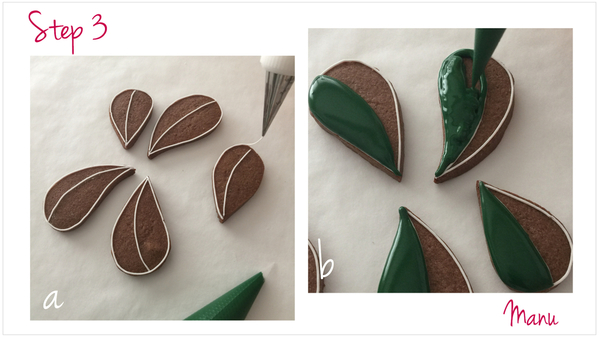
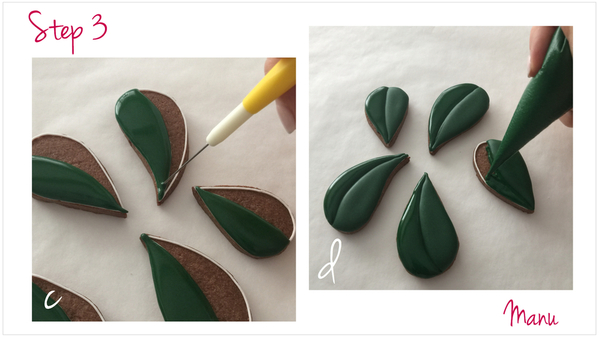
Step 3: Decorate leaves
a. Pipe a line through the middle of each leaf cookie, and then outline all of the leaves. Use white piping-consistency royal icing and a PME #1 tip (or equivalent).
b. Flood one half of each leaf cookie with green flooding-consistency royal icing and a PME #2 tip (or equivalent).
c. While the icing is still wet, use a scribe tool to "tease" the icing into the tiny corners. Let the icing set. (By allowing a little waiting time between piping each half, you will ensure that the leaf sections remain distinct from one another.)
d. Once the icing is set, flood the remaining half of each leaf, and let the icing dry.
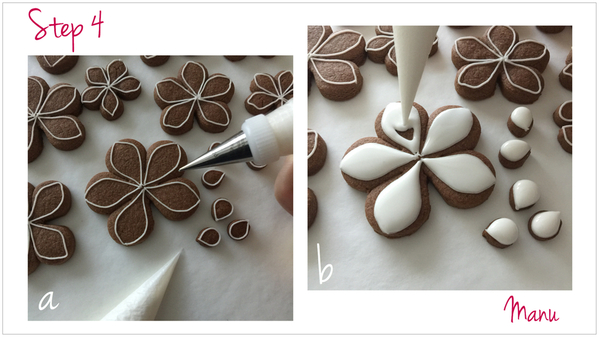
Step 4: Decorate orchids and buds
a. Using white piping-consistency royal icing and a PME #1 tip (or equivalent), pipe the outlines of five long petals on each cookie orchid. You shouldn’t outline the entire daisy shape. Instead, pipe a narrow and pointed petal within each large cookie petal, leaving some bare cookie dough at the sides. Outline the orchid buds as well, but outline them in their entirety.
b. Use white thin flooding-consistency royal icing to flood the petals. Just apply a very thin coat of icing on each petal, as we don’t want the petals to look puffy. Flood the buds with the same icing, but be generous with the icing in this case, as we do want the buds to look puffy!
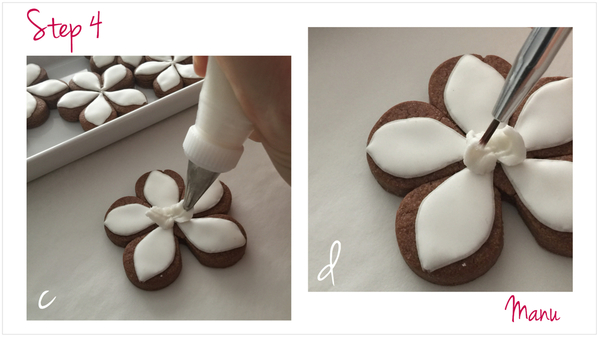
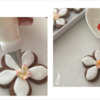
c. Now use white thick piping-consistency royal icing and a Wilton #67 leaf tip (or equivalent) to pipe two leaves in the center of each orchid. Thinking of the orchid as a clock, pipe one leaf pointing outwards at the 10 o’clock-position, and the other one at 2 o’clock.
d. Use a fine paint brush to gently curl the points of each leaf toward the center of the orchid.
e. Now, pipe a bigger leaf* pointing out at the 6 o’clock position.
f. Again, use a fine paint brush to shape the leaf toward the center of the flower, just as you did with the other two leaves.
* Note: I started with a Wilton #67 leaf tip to pipe all three leaves on the three biggest orchids. I then switched to a smaller #65 leaf tip for the two smallest orchids.
g. Once the icing is dry, paint the center of the orchid with pale yellow food coloring diluted with alcohol.
h. Next, paint the edges of the leaves with hot pink food coloring diluted with alcohol. Use a liner paint brush to also highlight the leaf veins with pink coloring.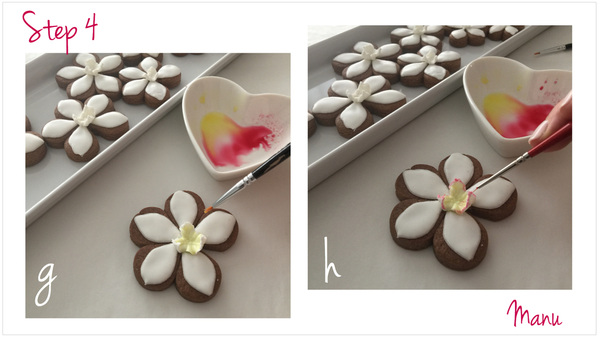
i. Using white piping-consistency royal icing and a PME tip #2 (or equivalent), pipe a teardrop in the center of each orchid. The point of the teardrop should face up.
j. Once the icing is dry, paint each teardrop with egg yellow food coloring diluted with alcohol.
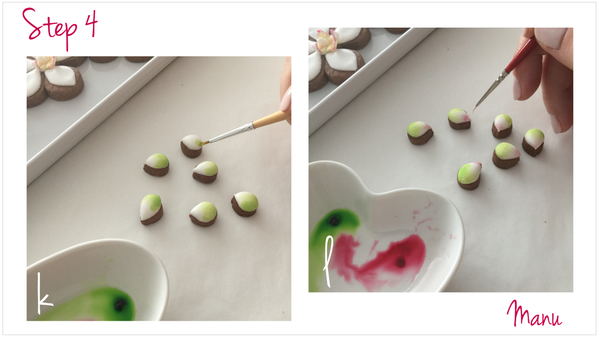
k. And last, the buds! Paint their wide ends with green food coloring diluted with alcohol.
l. Then paint the pointed ends with hot pink food coloring diluted with alcohol.
Now that our cookies are all decorated (except for the branches that I decided to leave naked), we can arrange the cookie platter!
Step 5: Assemble cookie platter
Since I needed a landscape orientation for the title image of this tutorial, I gave the orchid branches a curve. I used only four of the six branches that I cut (two are hidden under the flowers) and only six of the ten buds . . . I used the other four for a “cookie quality test” (I ate them). They passed it, BTW!
But this set is very versatile. You can arrange the cookies in a completely different composition depending on the plate/tray you plan to use. For instance, I arranged the cookies below in a vertical portrait format. I used all of the six branches that I cut, plus six buds.
Since my first composition was meant for Mother’s Day, I offer this one (virtually) to all of my fellow cookiers who are reading. I hope you enjoy it!
And that’s all for this month.
Ciao,
Manu

Manuela Pezzopane, affectionately called Manu by her friends and family, is a fan of everything handmade, and professes to have tried every possible hobby. However, it wasn’t until the end of 2014, when an American friend invited her to a Christmas cookie exchange, that she first discovered decorated cookies. In 2015, after watching Julia M. Usher's videos and signing up on Cookie Connection, Manu finally attempted her own. Since then, cookie decorating has become Manu’s passion. You can follow Manu on Facebook and Instagram, or email her at manubiscottidecorati@gmail.com.
Photo and cookie credits: Manuela Pezzopane
Note: Made by Manu is a Cookie Connection blog feature written by Manuela Pezzopane, where each month she shares the method behind a magical cookie of her own making. This article expresses the views of the author, and not necessarily those of this site, its owners, its administrators, or its employees. To read all of Manuela's past Made by Manu tutorials, click here. And to see all of Cookie Connection's tutorials, click here.









Comments (32)