 When I used to sell my cookies, practicality was my worst enemy. It was an infuriating little voice in my head whispering sad truths: “too fragile”, “ too big”, “too sticky”. Every design had to live in a little bag without risk of breaking, smudging, or becoming stale on its path to the customer’s event. Now that I’m no longer selling my cookies, all I want to make are designs that refuse to be bagged: dimensional cookies, mounted cookies, enormous cookies, etc. Valentine’s Day seems like the perfect occasion to keep this trend going with a design that is lacy and delicate, floral and fragile, beautiful and delightfully impractical.
Supplies:
- Two large, nesting heart-shaped cookie cutters plus one small heart-shaped cutter from the same set (I used the two largest cutters from this set to cut the dough and the second smallest cutter as a guide for the heart transfer.)
- Silicone baking mat and/or parchment paper
- Food-safe marker
- Royal icing:
- Flooding-consistency cream (AmeriColor Ivory)
- Stiff-consistency cream
- Tips:
- Turntable (optional, but recommended)
- Flat paint brush
- Large offset spatula
Step 1: Create cookie heart frame and template for royal icing transfer
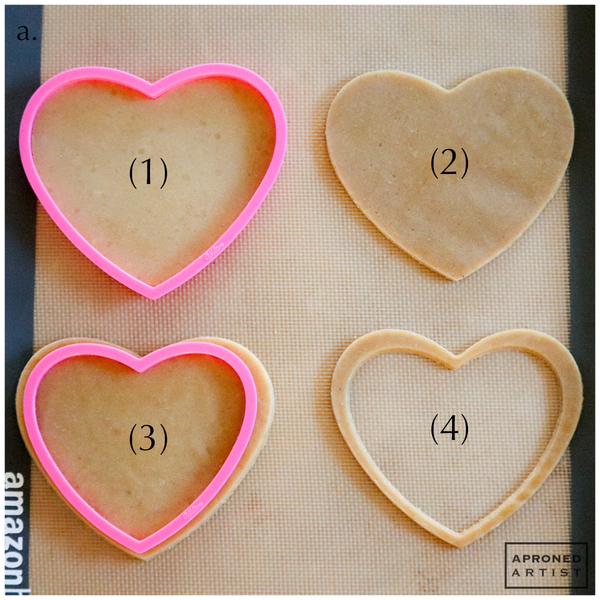
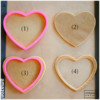
a. Using the larger of the two nesting heart-shaped cutters, cut out your cookie dough directly on a silicone baking mat or piece of parchment paper (1). Remove the cookie cutter, but do not move the cut heart (2). Then, use the smaller heart-shaped cookie cutter to remove the center of the large heart (3). You should be left with a thin heart-shaped frame (4).
b. Bake the cookie frame, reducing the baking time by a few minutes if necessary. Allow the cookie to cool completely.
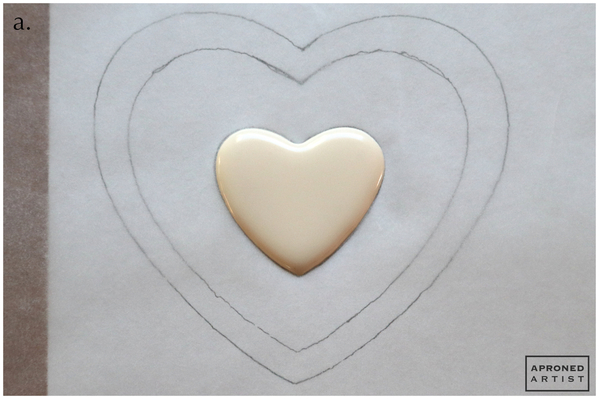
c. We'll be suspending a royal icing transfer in the center of the cookie frame made in Steps 1a and 1b. But, first, we need to create a template for the transfer. Using a food-safe marker, trace along the edges of the baked cookie frame onto a piece of paper. Then, trace the small heart-shaped cutter in the center of the heart frame.
Step 2: Pipe heart transfer and flood cookie frame
a. Cover the template created in Step 1c with a piece of parchment paper. Using flooding-consistency cream royal icing and a PME #1.5 tip (or equivalent), pipe the center heart transfer. Set the transfer aside to dry completely.
b. Flood the baked heart cookie frame with the same cream royal icing, and let that icing dry completely too.
Step 3: Add flowers and leaves to heart transfer
a. Now, we'll be adding royal icing flowers and leaves to the heart transfer to ultimately bridge the gap between it and the surrounding cookie frame. You may want to draw the flowers and leaves on your template, as I have, so that you have a rough guide for piping. The goal is to connect the heart transfer to the cookie frame with enough leaves and flowers that it has the structural integrity to stay intact, while still leaving a significant amount of empty space.
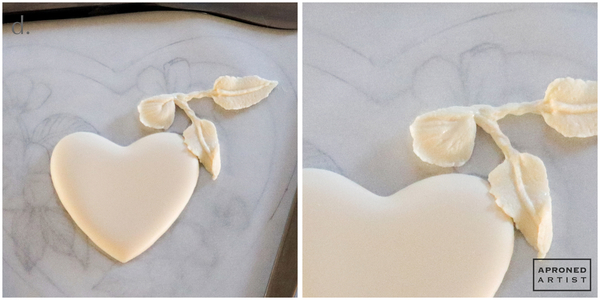
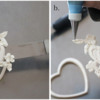
The flowers are much easier to pipe if you can rotate your work surface, so I highly recommend using a turntable. If you don’t have a turntable, try working on top of a large paper towel or something that you can easily slide around. Carefully move your heart transfer, still attached to the parchment paper with the template underneath, to your turntable. (If your transfer has popped off of the parchment, reattach it with a small bead of royal icing.) Using stiff-consistency cream royal icing and a PME #1 tip (or equivalent), pipe the underlying branches that will connect your leaves and flowers. These branches can be messy; their purpose is to provide structure, and they will eventually be covered almost entirely by the flowers and leaves.
b. Using stiff-consistency cream royal icing and a Wilton #67 tip (or equivalent), pipe leaves at the ends of your branches. Try to position the leaves so that they connect to the heart transfer and extend into the cookie frame outline on your template.
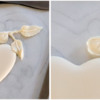
c. If you want to curl your leaves, wait until the icing is just starting to firm up but has not yet set (this took about 30 seconds for me). Then, using a damp, flat paint brush, gently pull the edge of the icing over itself.
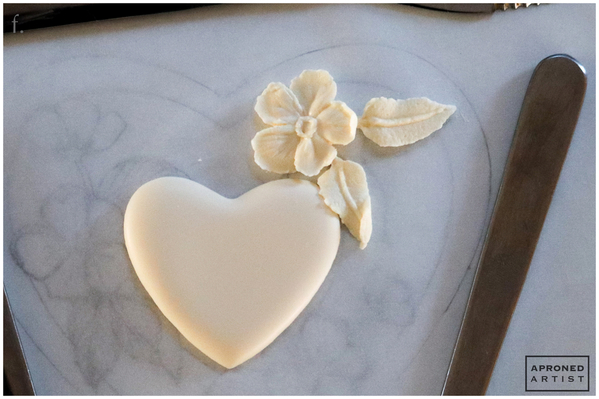
d. With the same icing and a Wilton #102 tip (or equivalent), pipe a flower petal. (For a detailed description of how to pipe a flower petal, see Wilton’s apple blossom tutorial.) If desired, use the pointed tip of the paint brush to remove the seam in the center of the petal (depicted in the right photo below).
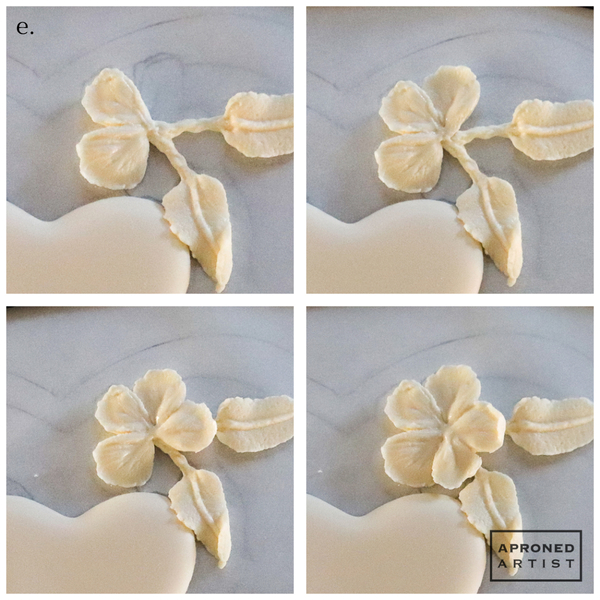
e. Continue piping petals in the same fashion, rotating the turntable with each petal to give you better access. Use the paint brush as necessary to gently shape the petals or to curl the edges (as we did with the leaf in Step 3c).
f. Using the same icing and a PME #1 tip (or equivalent), pipe a wavy circle in the center of the flower.
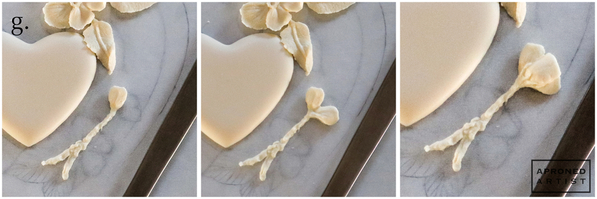
g. If you want to add a flower in profile, pipe a narrow petal angling to the left of the tip of a branch. Add a similar narrow petal angling to the right, and a larger petal in the center of the two angled petals. Finally, add a few sepals (the tiny, narrow leaves at the base of a flower) with a PME #1 tip (or equivalent).
h. Continue adding flowers and leaves, connecting the heart transfer to the frame outline until you feel there is enough structure to keep the transfer intact. Let the flowers and leaves dry completely.
Step 4: Attach transfer to cookie frame
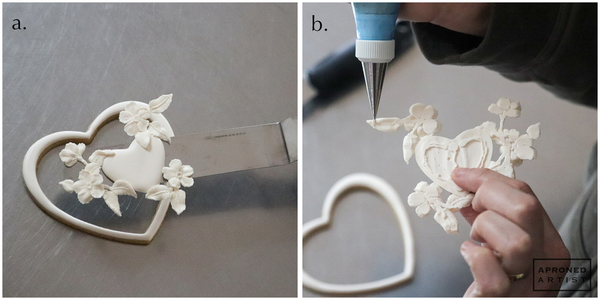
a. Carefully peel the parchment paper away from the transfer. Slide a large offset spatula beneath the transfer, and balance it on the spatula a few inches from your iced cookie to see how it fits within the cookie frame. If it looks like it's not going to make contact with the frame in any area, gently slide it back onto your template, and add some more flowers and leaves to close the gap(s). Let the icing dry before lifting the transfer and checking the fit again.
b. Using stiff-consistency cream royal icing and a PME #1 tip (or equivalent), pipe small dots of icing onto the transfer where it will make contact with the cookie frame. Place the transfer on the spatula again, and gently position the transfer on the cookie frame. When it's where you want it, carefully slide out the spatula. Alternatively, you may find it easier to hold the edges of the heart (where there are no leaves or flowers) between your thumb and forefinger, and carefully lower the transfer onto the cookie frame. (But, any which way you attach the transfer, it is delicate business. Ultimately, some of my flowers broke off. I also added some additional leaves after the transfer was attached just for peace of mind.)
Wipe away any excess icing that squeezes out with a damp paint brush, and let the icing dry completely.
Despite the challenges of this cookie, its fragility is what makes it so beautiful!
This concept would work equally well for a wedding, anniversary, or even a birthday. Change the inner transfer to a letter to spell out initials or words.
Wishing you all much love and a very happy Valentine’s Day!
Source: Wilton Brands, LLC, How to Pipe Apple Blossoms


Samantha Yacovetta began cookie decorating in 2013. While working at a local bakery, Samantha became captivated by cookie art when a customer requested princess-themed cookies. Attracted initially to the precision of cookie decorating, Samantha soon found that the limitless design opportunities turned it into her artistic passion. Samantha began regularly stocking the bakery case with decorated cookies and for several years sold cookies through her own company, Aproned Artist, a cottage food operation. Having retired from the business life, Samantha now enjoys making cookies just for fun from her home in San Jose, California, USA. To learn more about Samantha, please check out her Cookie Connection portfolio, her Facebook page, and her past Every Little Detail tutorials here.
Photo and cookie credits: Samantha Yacovetta
Note: Every Little Detail with Aproned Artist is a monthly Cookie Connection blog feature written by Samantha Yacovetta focused on the special little details that make big statements in cookie design. This article expresses the views of the author, and not necessarily those of this site, its owners, its administrators, or its employees. To read all of Samantha's past Every Little Detail tutorials, click here. And to see all of Cookie Connection's tutorials, click here.
















Comments (56)