
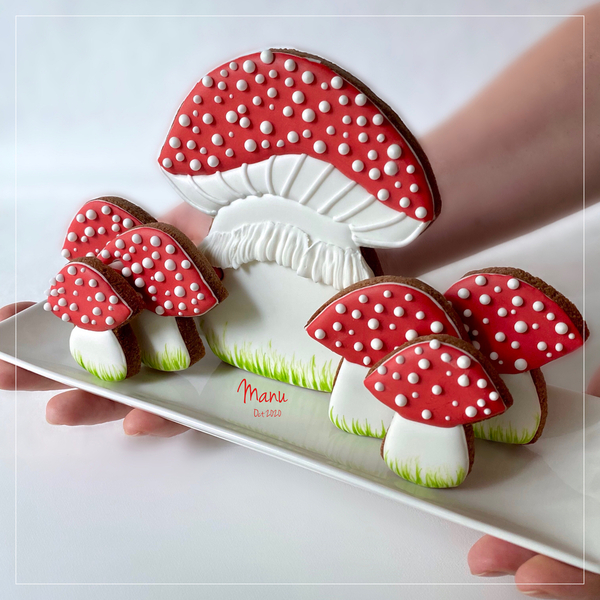
This month, I'm sharing a different idea for a cookie platter where the cookies are propped vertically. I've displayed the mushroom cookies close together and used segments of a paper straw to connect them through holes cut into each cookie. This way, the cookies remain stable when served standing on a plate. Lollipop sticks could also be used, but I prefer paper straws for several reasons: they are light yet sturdy; they don’t bend easily; they are easy to cut; they cut nicely through raw cookie dough without misshaping it (as the excess dough gets pushed into the straw); and, last but not least, they can be securely fit into cookies without using icing “glue”. Let’s see how I made this cookie composition.
- Cookie dough of your choice
- Templates or cookie cutters of your choice (You’ll find my cookie templates and all measurements in "Attachments" under "Files" at the end of this post.)
- Parchment paper (for templates)
- Hole punch (for punching holes in templates)
- Sharp knife
- 1 paper straw
- Royal icing:
- White piping-consistency, in pastry bag with PME #1 tip (or equivalent; for outlining)
- White flooding-consistency, in pastry bag with PME #2 tip (or equivalent; I used a tip-less bag)
- Red flooding-consistency, in pastry bag with PME #2 tip (or equivalent; I used a tip-less bag)
- White piping-consistency, in pastry bag with PME #25 or #2 tip (or equivalent; for piping gills)
- White thick piping-consistency (like what you'd use for piping roses), in pastry bag with Wilton #104 tip (or equivalent; for piping ruffle)
- White thin piping-consistency, in pastry bag with PME #2 tip (or equivalent; for piping round dots)
- Fine liner paint brush
- Green gel food coloring diluted with vodka
Step 1: Roll, cut, and bake cookies
I started this cookie composition with paper templates, arranged as they might be on a plate. Where the cookies overlapped, I cut holes where I planned to later insert straw segments to hold the cookies upright. Next, I translated those paper templates into cardboard ones, which I actually stood up and connected with straws to test my idea. If it worked with thin cardboard (as it did!), I knew it would work with cookies!
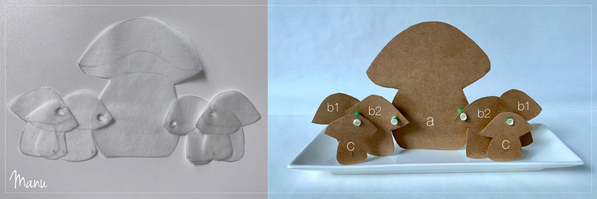
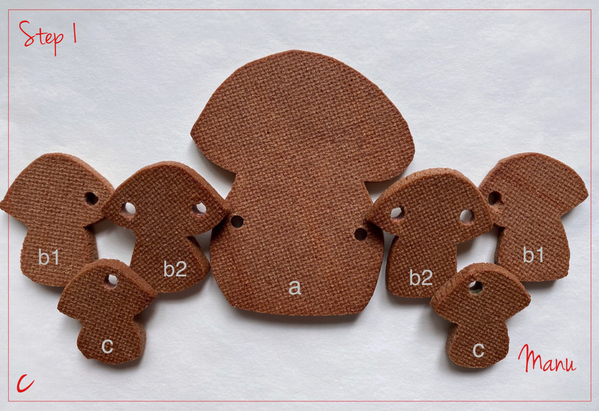
A total of seven cookies and four paper straw segments are needed for this cookie platter. I used three sizes of mushrooms cut with templates, but any mushroom cookie cutters can be used.
- 1 large (10 x 12-cm/4 x 4 3/4-in) mushroom cookie with 2 holes cut in the stalk (a)
- 4 medium (5.5 x 6-cm/2 3/16 x 2 3/8-in) mushroom cookies; 2 with 1 hole cut into the top (b1) and 2 with 2 holes cut into the top (b2)
- 2 small (4.5 x 5-cm/1 3/4 x 2-in) mushroom cookies with 1 hole cut into the top (c)
- 2 short (2-cm/3/4-in) segments
- 2 long (3.5-cm/1 3/8-in) segments
(Note: These measurements are just for reference. It's best to cut the straw right before assembling your cookies to best fit the segments to the thickness of your iced and decorated cookies.)
If you are not going to use your own cutters, download my templates, trace them onto parchment paper, cut them out, and then cut out the holes using a hole punch.
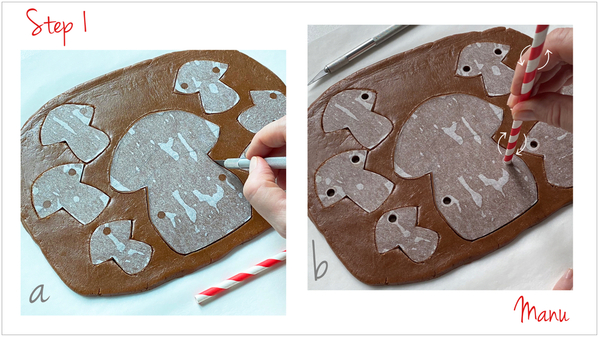
a. Roll your dough to your favorite thickness. I rolled mine to a thickness of 0.6 centimeter (1/4 inch), but rolling it thicker will add even more stability to the standing cookie composition. Place the parchment paper templates on the cookie dough, and use a sharp knife to cut out all of the shapes.
b. Use a paper straw to cut out the holes by plunging it perpendicularly into the dough and rotating it. Apparently, a standard paper straw can pass through the hole cut by a standard hole punch! Tip: To avoid misshaping the cookies, don't remove the excess dough from around the mushrooms until the holes have been cut.
c. Bake the cookies according to your recipe. Once the cookies are out of the oven and still warm, insert the straw into all of the holes to make sure it can still pass through them. However, take care not to enlarge the holes, as the straw segments need to make good contact with the cookies to keep the composition in an upright position. Let the cookies cool completely.
Since the back side of the standing composition will be bare, I decided to ice the cookie backs with royal icing, so that the fronts become the backs. This way, when the cookies are upright, they will look finished from both sides even though the backs (once the fronts!) are not iced. (In the picture below, the back sides, textured by my baking mat, are facing up, ready to be iced!)
Step 2: Decorate cookies
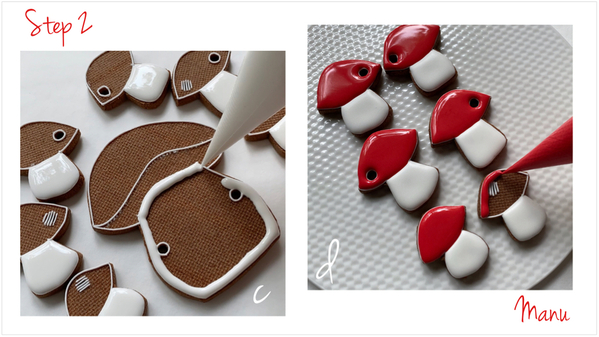
a. Using white piping-consistency royal icing and a PME #1 tip (or equivalent), outline all of the cookies. Before outlining the large mushroom (a), transfer the design onto the cookie, as desired, with the pouncing technique. (For more info about that transfer technique, see Step 1 of my previous tutorial here.)
b. Now, to cover some of the holes so that the paper straws won't stick through the cookies and show from the front! (I'll be referring to such holes as "covered holes" in later steps.) To do this, first pipe parallel lines over the holes in the two small mushrooms (c) on their front-facing sides; then pipe lines over the innermost hole in each of the two medium mushrooms (b2). The innermost hole is the one that overlaps the large mushroom. Again, always pipe these lines on the front-facing sides. These lines will block the holes and prevent them from filling with icing when flooded in upcoming steps.
Simply outline around all the remaining holes in the medium mushrooms (b1 and b2) and the large mushroom (a).
c. Using white flooding-consistency royal icing and a PME #2 tip (or equivalent), flood the stalks of every mushroom. Let the icing dry.
d. Using red flooding-consistency royal icing and a PME #2 tip (or equivalent), flood the top parts (or caps) of the medium and the small mushrooms. Flood directly over the "covered holes" made in Step 2b.
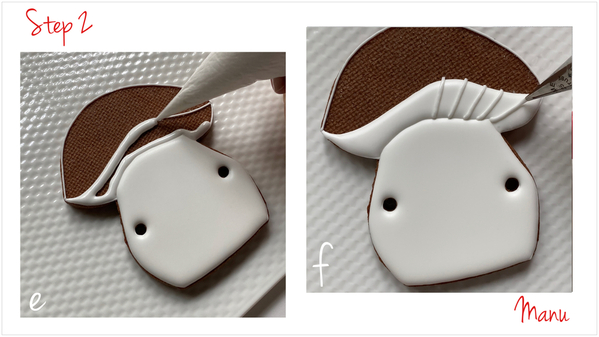
e. Once again using white flooding-consistency royal icing and a PME #2 tip (or equivalent), flood the middle section of the large mushroom. Let the icing set.
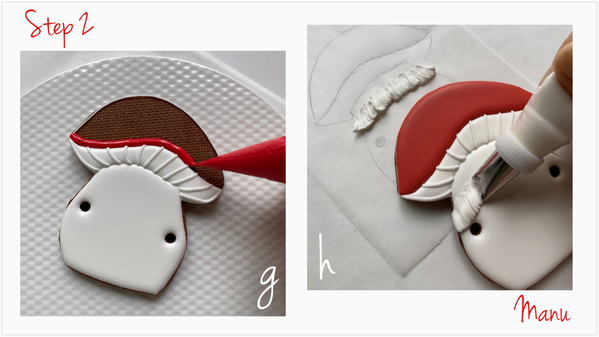
f. Still working on the large mushroom, pipe some some lines to resemble gills under the cap. The best way to give realistic perspective to the gills is to imagine piping eyelashes emanating from the seam between the stalk and middle section. For this task, I used white piping-consistency royal icing and a PME #25 tip (which has a small bend in it), but a round #2 tip will also work fine.
g. Using red flooding-consistency royal icing and a PME #2 tip (or equivalent), flood the large mushroom cap top in red, and let the icing dry completely.
h. Use a Wilton #104 tip and white thick-consistency royal icing to pipe a ruffle on the large mushroom stalk so it resembles the ring (or veil) on some real mushrooms. This piping tip has a slender teardrop shape and is typically used for piping roses and other flower petals. Keep the narrow end of the tip about 1 centimeter (3/8 inch) from the upper edge of the stalk. Tip: If you don’t feel confident piping directly on the cookie, practice the ruffle on parchment paper with the template underneath as a piping guide. Once you've got the piping down pat, pipe the final ruffle as a royal icing transfer (i.e., let it dry on the parchment paper and then later attach it to the cookie).
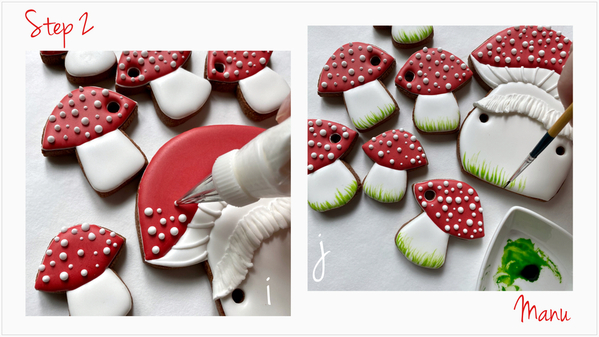
i. Pipe different size dots randomly over all of the mushroom tops using white thin piping-consistency royal icing and a PME #2 tip (or equivalent).
j. Using a fine liner paint brush and green gel food coloring diluted with vodka, paint blades of grass along the base of each mushroom. Paint vertical strokes starting from the bottom of the stalk and extending about 1 centimeter (3/8 inch) up its side.
Step 3: Assemble cookies
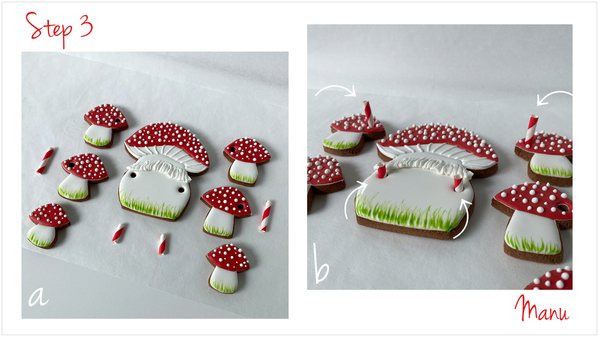
a. Once the paint and icing are dry, it's time to assemble the cookies by connecting them with the paper straw segments.
b. Insert the short segments into the large mushroom (a), and the long segments into the medium mushrooms (b1), so that their ends are sticking up on the front-facing sides of each cookie.
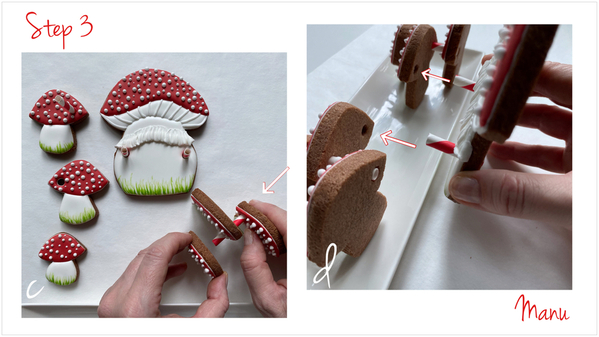
c. Lift a medium cookie (b1), and thread the long straw segment all the way through a medium cookie (b2) and into the "covered hole" on the back of a small cookie (c) so that the small cookie is on top. With this group of three cookies now connected, place it upright on a plate. Repeat this step with the remaining two medium cookies (b1, b2) and one small cookie (c). Place this second group on the plate so that the large mushroom cookie will fit in between it and the first group.
d. Connect the large mushroom cookie to the two groups of cookies by inserting the short paper straw segments into the "covered holes" on the back of the medium (b2) cookies in each group.
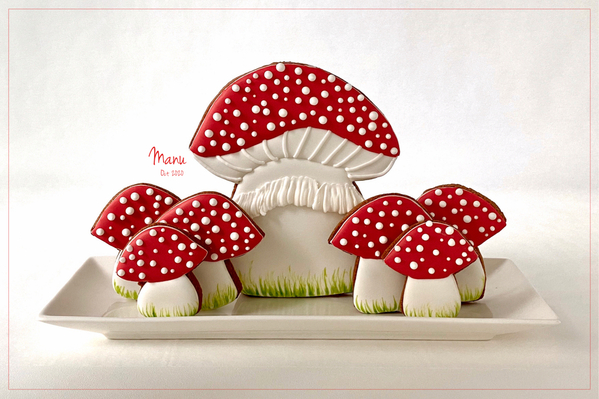
And here’s our standing cookie platter - all done!
- Made by Manu (April 2020): Tropical Arrangement Cookie Platter
- Made by Manu (January 2020): Royal Icing Wax Seals, Love Letter Cookies . . . and a Pinwheel!
- Made by Manu (December 2019): One Cookie Shape for Many Snowflakes
- Made by Manu (November 2019): Christmas Cookie Platter 2019
- Made by Manu (April 2019): Orchid Cookies for Mum
- Made by Manu (October 2018): November Cookie Platter
- Made by Manu (September 2018): Fall Cookie Platter Surprise
- Made by Manu (February 2018): Walking Toward Spring
- Made by Manu (January 2018): Valentine’s Cookie Mug
- Made by Manu (December 2017): Winter Cookie Platter
- Made by Manu (September 2017): Fall Cookie Platter
- Made by Manu (July 2017): Nautical Cookie Platter
Happy fall! 🍄 🍂🍃🍁
Manu

Manuela Pezzopane, affectionately called Manu by her friends and family, is a fan of everything handmade, and professes to have tried every possible hobby. However, it wasn’t until the end of 2014, when an American friend invited her to a Christmas cookie exchange, that she first discovered decorated cookies. In 2015, after watching Julia M. Usher's videos and signing up on Cookie Connection, Manu finally attempted her own. Since then, cookie decorating has become Manu’s passion. You can follow Manu on Facebook and Instagram, or email her at manubiscottidecorati@gmail.com.
Photo and cookie credits: Manuela Pezzopane
Note: Made by Manu is a Cookie Connection blog feature written by Manuela Pezzopane, where each month she shares the method behind a magical cookie of her own making. This article expresses the views of the author, and not necessarily those of this site, its owners, its administrators, or its employees. To read all of Manuela's past Made by Manu tutorials, click here. And to see all of Cookie Connection's tutorials, click here.




Comments (18)